Application APIs
Create an API that allows your applications to process incoming HTTP requests
Introduction
Sometimes you need to interact with your Application or its data outside of Airkit. With Airkit's Application APIs, you can build custom API endpoints for an application that allow you to create journeys, modify existing journeys, or get information back from journeys.
Add Web Resource to org
Before starting, a URL resource is required to be set up in order to be utilized by the API. Go to console.airkit.com, go to Resources (left-hand side nav), and create a new resource by clicking the “New” button. The URL resource will have to be configured depending on the scenario - for this example, the configuration looks like this:

This will generate a url that will serve as the API endpoint. For this example, that endpoint will be https://app.airkit.com/c/AppApi.
Tokens
If the app API requires Authentication and should not be publicly available, a token must be created. For this you will need an API key that can be generated from the studio console (API > Tokens):
.gif)
Make sure to safely store the generated token at that moment since it will not be retrievable afterwards.
Securing API Endpoints with Tokens and Permissions
An App API can be configured to require authentication or to be publicly available.
Creating a Token
If the App API requires authentication, a token must be created. To create a token, go to console.airkit.com and click on API in the left hand navigation. Then click on Tokens > '+New' > enter in a name for the token. You can also configure user variables and IP addresses for additional layers of permissions.
.gif)
Then click Create, which will generate a token.
Configuring the API to require Authentication
To configure the API to require Authentication, go to Connection Builder and select the API created under 'Web Links'.

Then Click on the checkbox under Requires Authentication. This will enforce the API to have a Bearer token with the API Request.

To add an API Key Group, which is used to give API access to particular users within an organization, go to Configuration Builder, scroll down to API Key Filtering, add an API Key Group. Then select the Token name created previously.

Once the API Key group is configured, then it can be configured to the API.

Testing the App API
To test an API that requires authentication, the following header must be set:
" Authorization: Bearer<token>" where <token> is replaced with the token generated in the "Creating a Token" section. Below is a screenshot of testing the API from Postman.

Configure HTTP resource in Configuration Builder
Once the URL resource is created you will need to configure it in your app. Open the app in the studio, and navigate to Configuration Builder, and scroll down to the Integrations section.
Create a new “HTTP resource” connector: set any name that is meaningful , and under the Credential dropdown, select the URL resource created in the previous step.

Create App API
Creating an API request handler / Endpoint
This section will provide an overview on how to create and configure an endpoint, this is, a specific route within an app that can be invoked externally and that can handle certain types of operations.
To create an endpoint within an app, go to Connection Builder > Web Links, and click on the Plus (+) button. Then select HTTP Request.

The http method can be GET or POST. Typically, GET is to obtain data from the App API, and POST is to send data to the App API (for example, to perform insert or update operations).

'URL' will be the resource you created under the Configuration Builder section of the App in the previous step. Please note that the resource must not be in use (this means, each endpoint will have a unique url, and be either GET or POST). There cannot be endpoints that share the same url, even if they implement different http methods.
To enforce authentication, check the “Requires Authentication” checkbox - otherwise, if you want your API to be publicly accessible, leave it unchecked. If checked, you’ll need to include an “Authorization” header. For more information, refer to Securing API Endpoints with Airkit API Tokens & Permissions.
Under Url Format you can specify the URL path parameters (not to be confused with query parameters) to be sent with the request. This is optional. The parameters need to be set between curly braces and separated by a slash. Example:

Configuring the Journey Mapping
Journey Mapping is where to configure the mapping of an API Request to an existing session or conversely, starts a new session. This is also where you can define what validation is needed as a part of the API request by using a Data Flow and can also set a response body and response status.
In this section, you’ll be able to configure the behavior and the events to occur once a request is received in an endpoint. To achieve this, there are a few different sub-sections at disposal.

Sample Payload
This is a sample so you can know how to build the request. After expanding the Sample Payload, hit the Play button to see what that payload would look like.

Validation
Validation offers the ability to validate the HTTP request before continuing on to the Journey Mapping step. This is useful to ensure that the HTTP Request received is valid and has all the proper elements that the API is expecting. For example, if the API Request is expecting an integer, the validation step is where you can pass the payload to a Data Flow and use Airscript to check to see if the request is valid. The output of the Data Flow is then passed to the connection namespace, which can be used in the validation step.
In the example below, we have two path parameters (the same that were specified in the example in in the “Creating an API request handler” section). Since it’s a GET endpoint, there’s no body. If this was a POST endpoint, there could be a body in this payload. You will need to build a Data Flow separately, and set it as the validator step under the Data Flow title. This example has a Data Flow set up called "Validation Data Flow", which outputs a concatenated string.

To pass data to the input fields from the API endpoint, use the namespace payload to parse the object coming from the Sample Payload.

After running the Data Flow by hitting the 'play' icon, the validation action can be used to validate the outputs of the Data Flow using Airscript. The namespace 'connection' is the result of the Data Flow configured in the validation step. Also, if the validation returns 'FALSE', then the journey mapping will actually be skipped and will return the response.
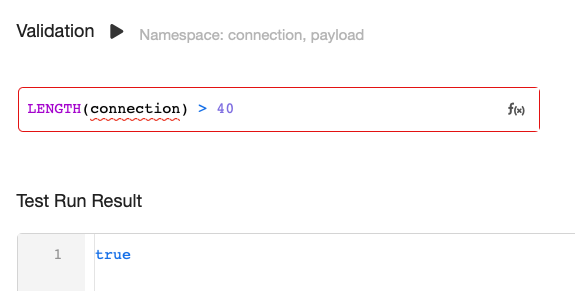
Quick Note: pay attention to the relevant namespaces here (payload, connection).
Mapping
This section is where to define what happens after the request has been received and validated, in regards to the journey in particular. You can start a new journey, replace the existing one, abort it or resume it if a match is found (an identifier must be provided).
Start Parameters
Start parameters is where you can pass any type of data that is available from the API request to the journey to session.start. Start parameters are only applicable when the Journey Behavior is 'Start or Create a new Journey'.
Journey Identifier Expression
The journey identifier expression is where to map an identifier on a session from a piece of data out of the payload or connection namespace. For example, if there was a specific ID that came out of the request payload, that ID can then be used as the journey identifier. The identifiers can be of type Text, Journey ID, or Phone.
Journey Event Payload  Journey event payload is where to pass data from the API endpoint into the API Request event namespace.
eventResponse
This is what the App API will return after the specified chain of operations are executed. The status and the body are both customizable.
isValid will return the outputs from the validation step.


NOTE: pay attention to the relevant namespaces here (payload, connection, metadata, isValid)
Response Headers
This provides the ability to add an HTTP header in an HTTP response. One example that this can be useful is for redirecting to a URL. To do this, set the Response Status to 302 if the response is valid.
.png)
Then, add an HTTP parameter with the Field Name "Location" and the value metadata.canvas_link.
-api.png")
Publishing and Testing
Once finished configuring the App API, the application needs to be published to make the HTTP resource live. To publish, click on the 'Publish' button in the top right hand corner.
.png)
For further information on publishing, refer to Publishing Your Application. Once the application is published, the API endpoint is now live and can be receive requests.
To test out the API, there is a feature to simulate HTTP events in the App Preview. This is how to make a request within the App Preview and where to debug and see the different states as well as test out the mapping of the request as well.
When in the studio, go to App Preview > API. Select HTTP Request and enter in the URL of the endpoint and click on Simulate HTTP Event. It also provides the capability to pass a request payload as well.
.png)
Updated 3 months ago