Conversations with Actors
Define and Initialize the Actor
The previous section discussed what Actors are and their significance in enabling omni-channel Journeys. Here, we take a deeper dive into how to apply the concept of Actors by examining their relevance in establishing various communication channels, an important component of creating omni-channel Journeys.
Channels that require Actor Initialization
Chat Bots and Voice Bots
Two-way text and phone conversations are managed through Chat Bots and Voice Bots respectively. Dialogue Bots (the collective term for Chat Bots and Voice Bots) define how incoming messages are parsed and responded to. Each one is typically designed around a conversation flow. A Dialogue Bot might, for instance, share order tracking information upon request or walk Actors through the process of completing a survey. Chat Bots are defined and edited in the Chat Bots Builder, Voice Bots in the Voice Bots Builder.
Dialogue Bots are triggered as Actions. Specifically, Chat Bots are triggered by the Start Chat Bot Action and Voice Bots by the Start Voice Bot Action. These Actions can be taken at any point after the Actor has been initialized with an appropriate value stored asactor.phone. For a more detailed walkthrough of how to set up Dialogue Bots, see Building a Simple Chat Bot and Building a Simple Voice Bot.
SMS and Email Notifications
Notifications are outgoing email or SMS messages that do not require a response through the same channel. While Notifications cannot parse replies or incoming messages, they can still be used to prompt responses from the recipient. For example, Notifications might contain web links or cues to prepare for a previously-scheduled meeting. Most commonly, Notifications are used to send reminders or follow-up messages spurring users to continue a half-finished Journey.
Both SMS and Email Notifications are defined and edited in the Notifications Builder.
Notifications can be sent as Actions. SMS Notifications are sent by the Send SMS Notification Action and can be taken at any point after the Actor has been initialized with an appropriate value stored asactor.phone. Email Notifications are sent by the Send Email Notification Action and can be taken at any point after the Actor has been initialized with an appropriate value stored asactor.email.
Notifications can also be sent as a direct part of the Journey. This is done in the Journey Builder, where both Send an Email and Send and SMS can be dragged and dropped directly into the Journey flow. Again, the Actor must be initialized with an appropriate value stored asactor.phone in order to send SMS Notifications; likewise, the Actor must be initialized with an appropriate value stored asactor.email in order to send email Notifications.
Initializing the Actor
The Actor can be initialized multiple times throughout a Journey. This is particularly relevant in cases when one Actor identifier is collected without the other. For instance, it's possible to begin a Journey with an incoming call or text, at which case the phone number associated with the incoming call is automatically saved and used to initialize the Actor while the email of the Actor is still unknown. Should the email of the Actor later become relevant, the Actor will need to be initialized again.
Starting a Journey with an incoming call or text
When a Journey begins with an incoming call or text message, relevant starting parameters – such as the phone number and location of the caller – are saved automatically. (For more information on what information is automatically collected, see Information Captured from Incoming Calls and SMS.) The phone number of the incoming message is saved under the Session Namespace, which allows the value of session.start to set the actor variable. From there, the Actor can be initialized.
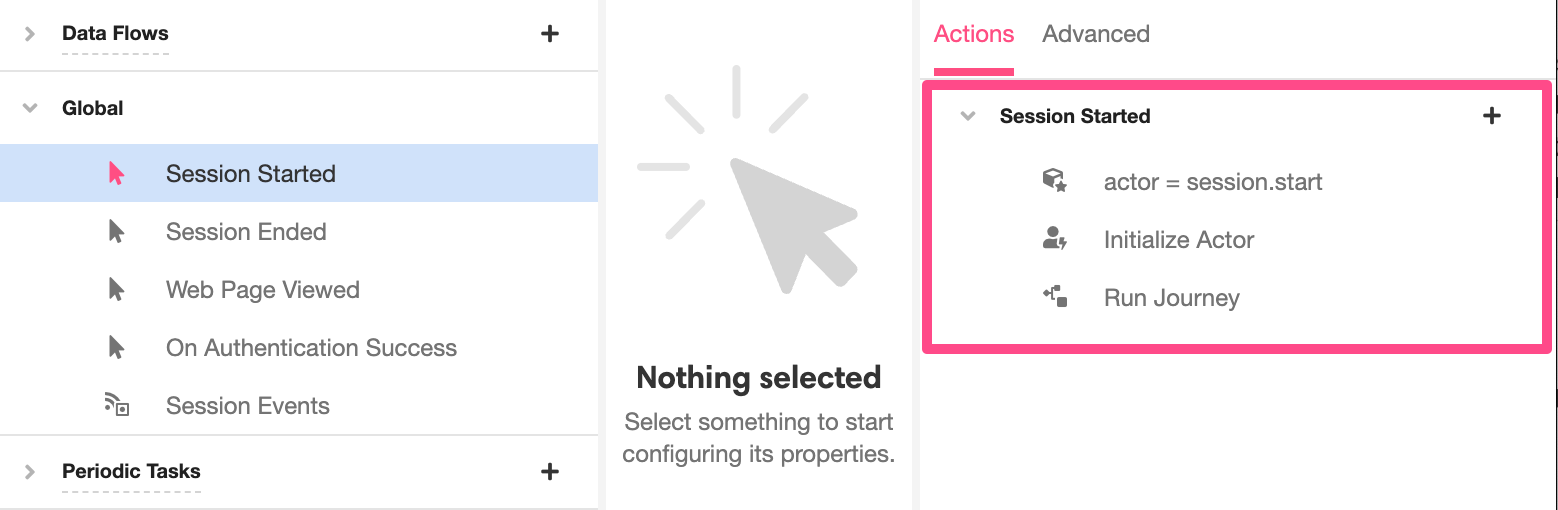
All of this is set up automatically as part of starting a Journey. You can see this in the Connections Builder, under Global -> Session Started. This Starting Event can be Inspected, at which point the Actions Tab will that the start of the Journey triggers an Action Chain that comes out of the box with three Actions already set up: one that sets the value of the Actor, one that initializes the Actor, and one that begins the Journey:
What number are these incoming texts and phone calls being sent to?
Whatever number you want to associate with the application!
The Console provides the means to connect your phone numbers to your Org. Once connected to an Org, phone numbers will become available in the Settings when accessing your application in the Studio. Under the Chat Bot section, you can select an available number to receive, send, and manage texts associated with your application. Likewise, under the Voice Bot section, you can select an available number to receive, send, and manage associated calls.
Once a phone number is configured, incoming messages to that phone number through the designated channel will automatically be parsed as part of a Journey. For instance, suppose a phone number has been configured in the Voice Bot section of Settings. If a Journey begins with the Calls a number Starting Event, any phone call made to the configured phone number will automatically trigger the start of a new Journey. Any outgoing calls will also be sent from the configured number.
For more on how to associate your phone numbers with Airkit apps, see Connecting Your Twilio Numbers To Airkit.
Initializing an Actor mid-Journey
When a Journey begins with an incoming call or text, Airkit can define actor.phone and use it to initialize the Actor by default, because the relevant data to do so is automatically collected, stored in the appropriate format, and bound to a pertinent variable. In cases where relevant Actor properties cannot be defined until a Journey is well underway, the Actions required to define and initialize the Actor must be explicitly set manually and explicitly.
There are many ways to learn an Actor's phone number or email address. For instance, you could ask a user to give them directly via a form in a Web Flow, or you could pull their contact information from an external API. The varying means of collecting contact information necessitate that you explicitly define which piece of incoming data be used to define the Actor.
The process of doing so is largely a matter of replicating what is done by default when a phone number is collected through incoming calls and texts. When the phone number is collected, it can be used to set actor.phone. When the email address is collected, it can be used to set actor.email. Once both or either of these Actor properties has been set, the Actor can be initialized.
Initialize the Actor in 3 Steps
Step 1: Bind the relevant contact information to a variable.
Phone numbers and email addresses can be collected and bound to a variable just like any other value. For instance, if the relevant contact information was collected via an input box in a form, data binding will occur as part of the functionality of the input box. Note that in order to be used to properly initialize an Actor, actor.phone requires a properly-formatted phone number and actor.email requires a properly-formatted email address.
What does it mean for a phone number to be properly formatted?
Airkit expects phone numbers in the E.164 general format. Under the hood, Airkit uses the ISPHONE function to test if a string contains a valid phone number. See reference documentation on ISPHONE for more details on how phone number must be formatted in order to be parseable.
The function PARSE_PHONE can be used to convert an improperly-formatted phone number into a format that Airkit can parse, and thus use to establish a phone or SMS channel.
What does it mean for an email to be properly formatted?
Airkit expects email addresses to contain a local part, followed by the @ symbol, followed by a domain. Under the hood, Airkit uses the ISEMAIL function to test if a string contains a valid email address. See reference documentation on ISEMAIL for more details on how phone number must be formatted in order to be parseable.
Step 2: Use theSet Variable Action to set the values of actor.phone and/or actor.email, as relevant.
Step 3: Use theInitialize Actor Action to initialize the Actor.
Once an Actor is initialized, communication channels associated with the relevant Actor property will be established automatically.
For instance, once an Actor is initialized with a value for actor.phone, voice and SMS channels will be established automatically. All incoming texts and calls from this phone number will be considered part of the ongoing Journey. All outgoing texts and calls will likewise be sent to the established phone number.
Likewise, once an Actor is initialized with a value for actor.email, all email Notifications will be automatically sent to the Actor's email address.
Updated 4 months ago