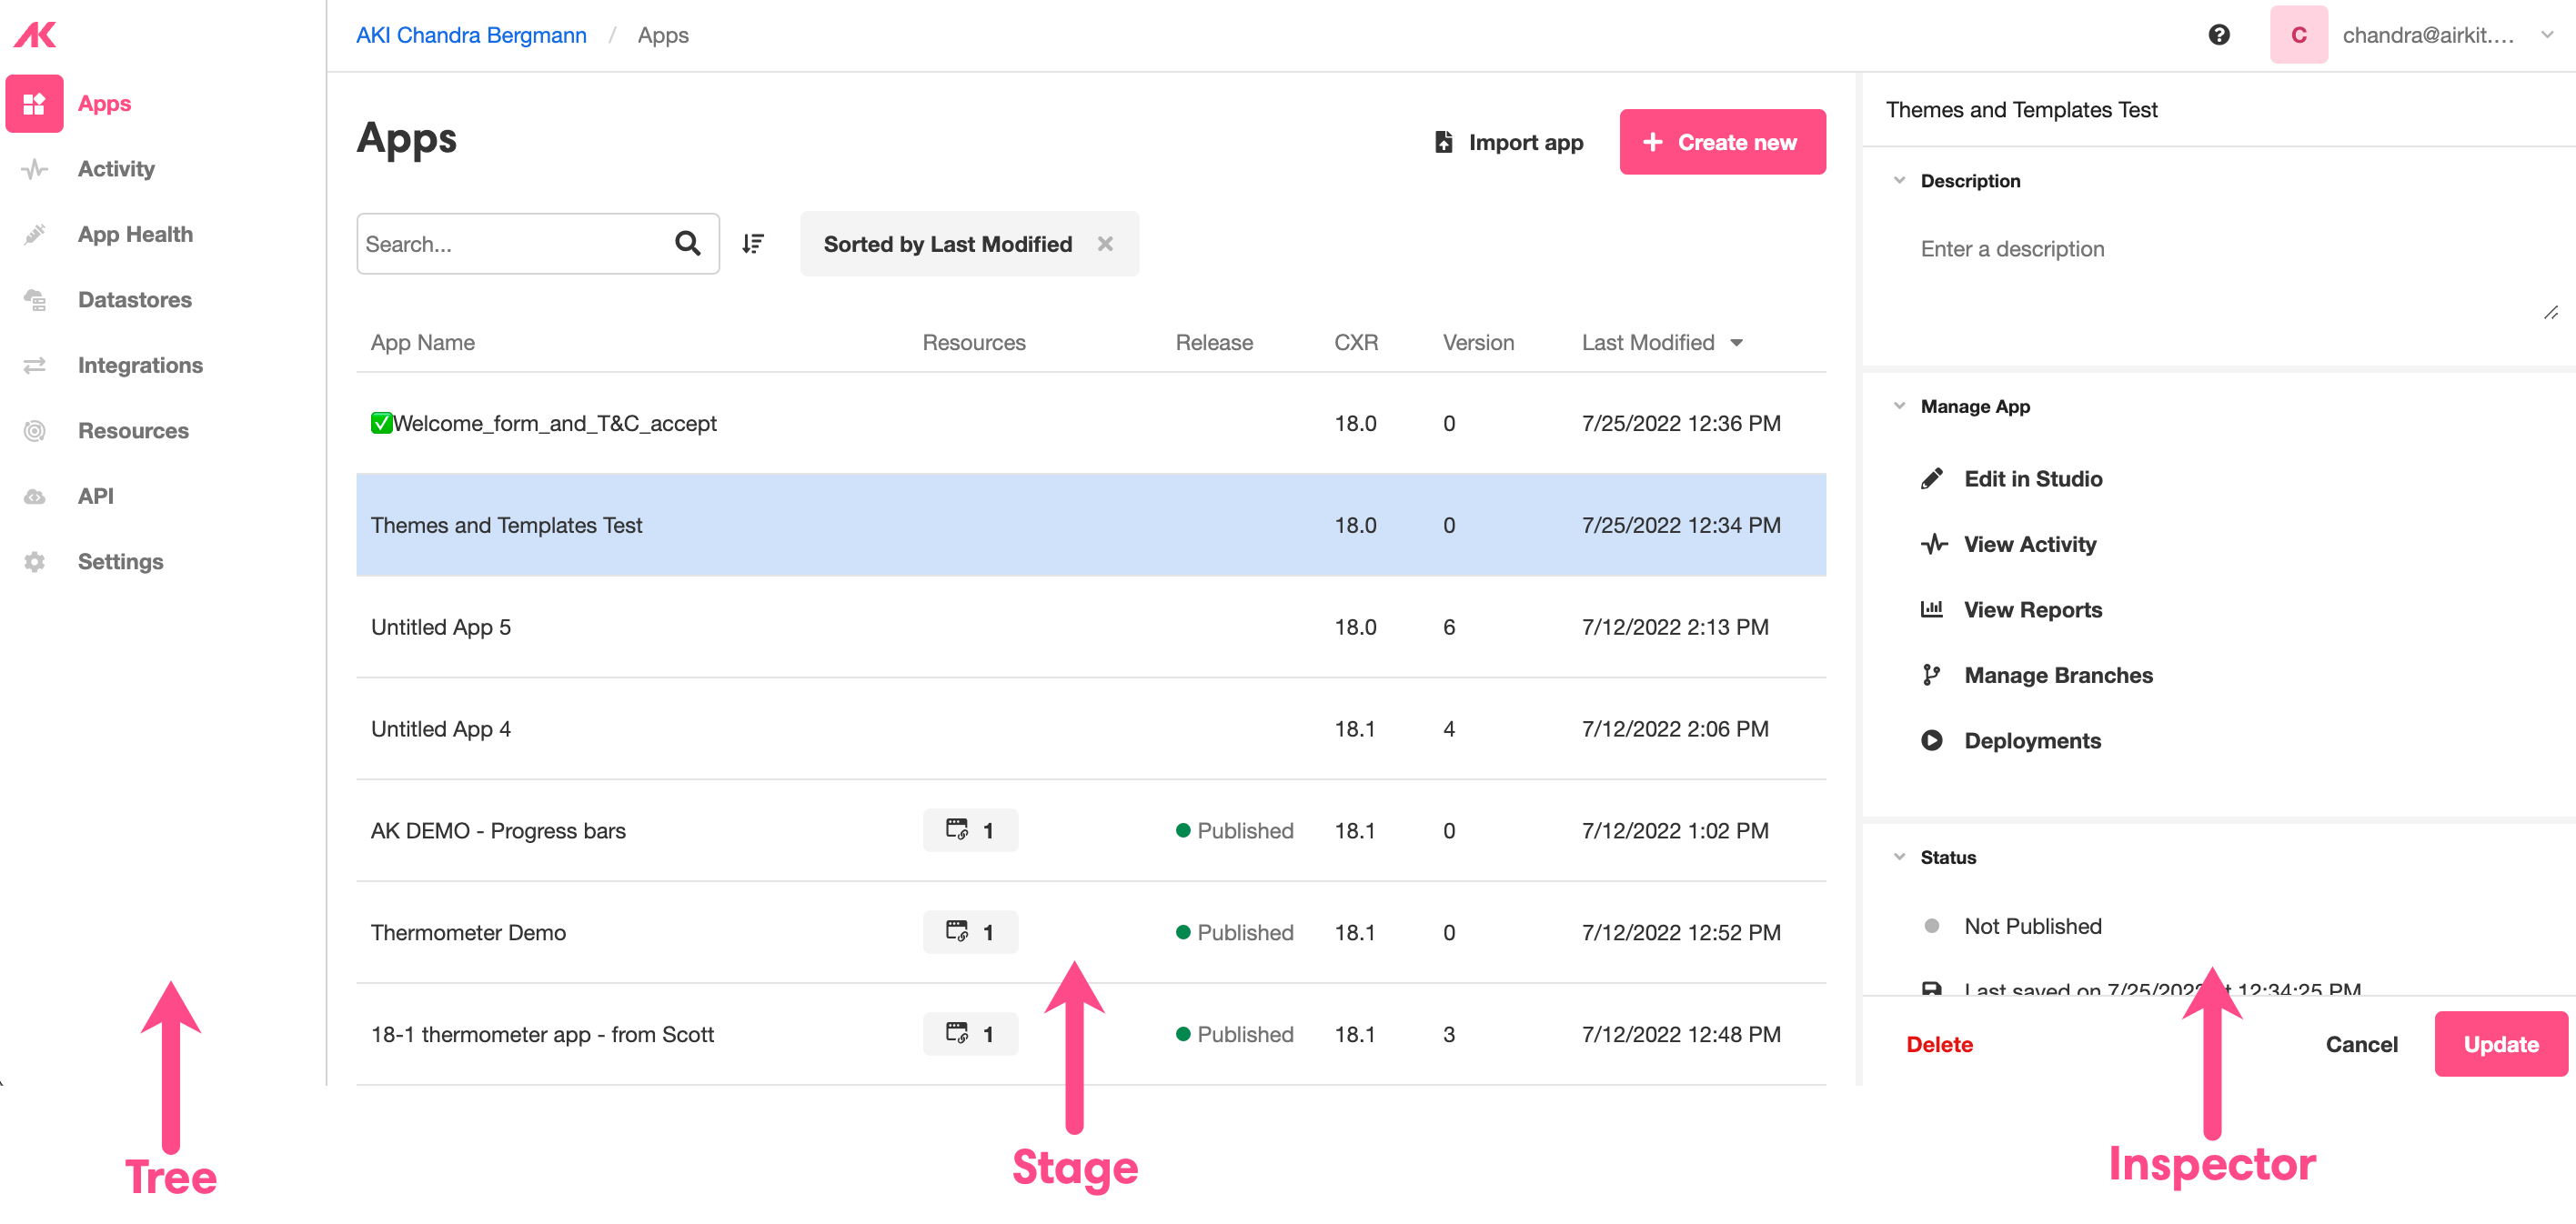
Console
The Airkit console is the part of the platform provides access to Org-level material, making it possible to configure application resources, connect external integrations, and access all applications that have been created within the relevant Organization.
You can access the Console at console.airkit.com, which will automatically direct you to the latest version of the Console.
If you're maintaining apps in earlier versions of Airkit, keep in mind that some Org-level resources need to be configured in a version-matching Console. To access an earlier version, place the desired version in the URL. For instance, if you're building an app on CXR 17.15, make sure to create your Web URL Route Resources on v17-15.console.airkit.com.
On the leftmost side of the console is the Tree, which allows you toggle between different tabs within the Console. The contents of the selected section is displayed in the Stage to the immediate right of the Tree. Clicking on individual elements within the Stage opens the Inspector, which displays more details about the element being Inspected:
Structure of the Stage
While the layout of the Stage varies depending on which section has been selected, there are some features that remain whenever applicable. This section discusses what they are and how to use them.
'Create New' Button
Many tabs have a 'Create New' Button in the upper right:

Clicking this button opens the Inspector, which provides the interface to create a new instance of the the tab-relevant item. For instance, if the Apps tab is open, this button creates a new app, whereas if the Resources tab is open, this button creates a new resource.
Organizing Information
To the upper left of the Stage is the search bar and the 'Sort' button. If present, the 'Filter' button will rest between them:

These make it possible to explore and organize the items stored under a particular tab.
- Search - Search for an item by name
- Sort - Sort items according to the value held in a particular column.
The effects of the 'Sort' button can be replicated by clicking directly on the column name:
.gif)
Switching Orgs
It's possible for a single Airkit account to have access to multiple Organizations. For instance, one Org might contain a company's enterprise apps, and another might be intended for personal experimentation. However, only one Org can be accessed at a time. To switch what Org is being accessed, select the desired Org from the dropdown menu on the upper right of the Console.
Tabs
Apps
Creates and accesses all the apps associated with the relevant Organization.
Clicking anywhere on the row designating an app opens up the Inspector, where you can view the app's status, edit the app's name or description, open the app in the Studio, or even delete it.
.gif)
This is the section that will be opened automatically upon logging into an Organization.
Activity
Views the logged Events and metrics associated with all of the Organization's apps.
To view metrics associated with a particular app, select it from the dropdown menu on the upper right:
.gif)
There is no 'Create New' button under Activity. This section of the console is not meant to be part of building directly; it is meant to display data regarding what has already been built.
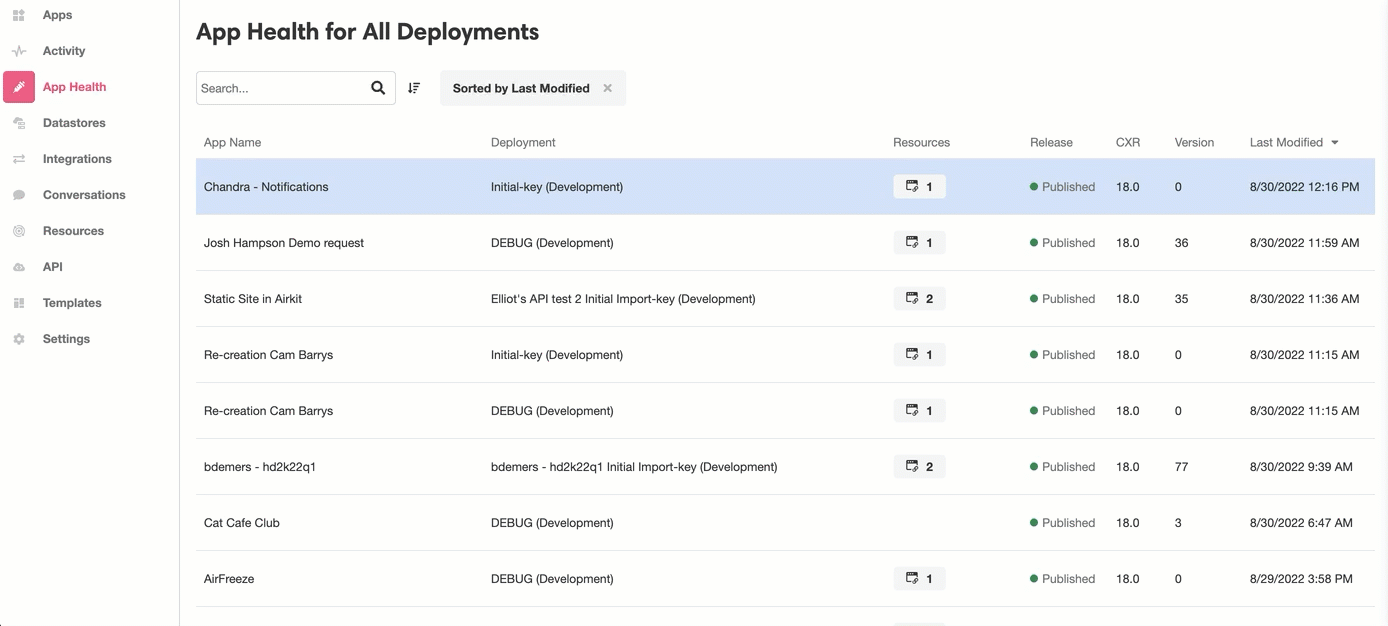
App Health
Lists applications and deployments, which can be Inspected for further information regarding the application's health.
Email
The Email Tab tracks the outgoing emails sent from an application. This includes both emails sent as Notifications and emails sent as part of a Data Flow.
In addition to seeing the total number of emails sent from the application, you can also check on the status of each email:
- Send – The send request was successful but it has not yet been delivered. If account-level or global suppression is being used, this status will remain as the email continues to go undelivered.
- Rendering Failure – The email wasn't sent because of an issue rendering the template.
- Reject – The email was determined to contain a virus, and thus was not delivered.
- Delivery – The email was successfully delivered.
- Hard bounce – The email was permanently rejected by the recipient's mail server.
- Complaint – The email was successfully delivered, but it was marked as spam.
- Delivery Delay – The email couldn't be delivered because a temporary issue occurred, such as the recipient's inbox being full.
- Subscription – The email was delivered successfully, but the recipient updated the subscription preferences by clicking List-Unsubscribe in the email header or the Unsubscribe link in the footer.
SMS
The SMS Tab tracks the outgoing text messages sent from an application. This includes both texts sent as Notifications and texts sent as part of a Chat Bot.
In addition to seeing the total number of texts sent from the application, you can also check on the status of each text. The status categories are, broadly:
- Pending - The text is in the process of being dispatched.
- Delivered - The text was successfully delivered to the recipients device.
- Sent - The text was successfully sent to the nearest upstream carrier, but no confirmation was (yet) received that it was delivered to the recipient's device.
- Failed - The text failed to be delivered.
Examining an individual text can provide more detail on its status. Under the hood, Twilio handles SMS messages in Airkit; see Twilio's documentation on possible status values for more details.
Datastores
Views a list of theDatastores connected to your Organization.
Clicking on one opens the Inspector, which displays information regarding which apps reference the Datastore, as well as the schema of the App Objects stored within.
.gif)
Using this information, it is possible to share custom data objects between different applications in your organization.
There is no 'Create New' button under Datastores. Creating a new Datastore must be done in the Studio, in the AirData Builder.
Integrations
Defines connections with the outside world.
This is the section you'll use to configure how external data sources will be authenticated. Once authenticated, you can use it across your applications, whether as part of an HTTP request, a control, or a Data Operation.
There are two subcategories under Integrations: Connected Accounts and Custom Integrations.
Connected Accounts
Provides credentials that allow you to integrate with a configured external source.
Connected accounts can be used to create connections in Connections Builder that retrieve or send data to these connected accounts.
Out-of-the-box, Airkit with common external sources, such as Stripe and Twilio, preconfigured. Custom external sources can also be added in the Custom Integrations section, see below.
Custom Integrations
Configures external sources.
These external sources can be accessed under Connected Accounts(see above) to provide credentials for a particular account. The process of using a custom integration is first defining what the integration should look like in the custom integrations section and then adding a credential for the integration in the Connected Accounts section.
Currently supported custom integrations are:
- OAuth 2.0 - Use OAuth and configure all the needed properties.
- API Token - Standard API token implementation.
- HTTP - Basic Auth Basic Username and password HTTP Auth.
- Custom Token - Specify custom parameters to retrieve a token.
- SFTP - Specify a username and password or private key for authentication.
For more on custom integrations, see Custom Integrations.
Resources
Connects to specific external resources like phone numbers and web domains.
This is where you'll define the external resources used to interface directly we app users, such as:
- Phone Numbers - used to send and receive calls and text messages.
- Domains - define the web domain of links to Airkit web apps.
- Embeds - defines the means to embed published Airkit apps into existing web pages.
Note that this is not where you will designate what app you want to associate these resources with; that must be done by accessing the app itself in the Studio, within Settings.
For more on adding and modifying resources, check out this article.
API
Tells external sources how to recognize and authenticate your apps.
The Integrations and Resources sections tell your apps how to recognize and authenticate external sources. The API section tells external sources how to recognize and authenticate your Airkit apps. This is primarily done in two ways: tokens and web hooks.
Tokens
Creates and views web tokens as needed.
Tokens will be displayed only at the time of creation. You will be able to use this token when connecting between external resources and Airkit with an Airkit App API. It is also possible to connect multiple Airkit Apps together in this fashion.
For a more detailed walkthrough of how create and use tokens, check out Securing API Endpoints with Airkit API Tokens Permissions.
Webhooks
Configures Webhooks
Webhooks are used to create datasources and resources in your Organization.
Settings
Modify settings pertaining directly to your account, Organization, and security. Note that not every role has the needed permissions to access every one of the following subsection; for more on the permissions given to each type of user, check out Managing User Roles.
Users
This section provides a list of active users in the Organization and describes their login information and role.
Invites
Add a new user to an Organization, if applicable (as only users with the appropriate permissions will be able to invite new users).
When inviting a new user, selecting the SSO Only checkbox will use the user’s Google OAuth credentials (if applicable) to log in. The user can log in using an assigned username and get to set a password themselves. If a username is not assigned, the invited user will be allowed to set their own.
For more on this section, check out Adding Users to Airkit.
Organization
View and modify information related directly to your Organization, including how your Org appears on the platform and the authorization credentials required to access it.
Organization Account Info
Configure how your Organization name is displayed.
Authentication
Configure SAML to authenticate builders that will be working within your Org.
Enterprise FeatureThis feature requires an ENTERPRISE license. If you would like to enable this feature for your Airkit Organization, please contact your Airkit representative or contact [email protected].
White Labeling
White-label outgoing communication.
Logs & Notifiers
Specify Organization-level notifications and logs. Logs can be stored in an S3 bucket. Notifiers can send alerts via Slack, email, or a custom Webhook when an app produces an error. For more information on Logs see App Event and Audit Logs. For more information on notifiers, see Integrating Error Notifications to Slack.
Encryption Keys
Create and manage encryption keys. For more on how to create and use encryption keys, check out Encrypting Data.
My Account
View your account and security information.
Updated 3 months ago