Your First App (A Simple Form)
We recommend building a simple Contact Form as your first application. Building a simple Contact Form provides a digestible introduction to the component parts can make up Airkit Journeys. We've provided a tutorial for doing so in two mediums: videos and written tutorials, both of which cover the same material. Feel free to go through both, use either exclusively, or supplement one with the other – whatever is most conducive to your learning style.
Video
Tutorial
We're going design a Journey that captures users' contact info and then stores that information back to AirData.
What is a Journey?
Journeys
Journeys are a means of conceptualizing how Airkit keeps track of where users are within the flow of the application, as well as what they've done, entered, or requested in the process of going through it.
An Airkit Journey starts when a user first begins to go through the flow of an app. This can happen in a multitude of ways, but regardless of how a Journey starts, it spans all of the user's interactions with that app, across all relevant channels, as long as the app has some way of recognizing the Journey.
For more on how to conceptualize Journeys in Airkit, see Journeys.
What is AirData?
AirData
AirData is a datastore tied to an Airkit app's profile, allowing records to be stored for collection or retrieval, even after a user has closed the app or ended their Journey. Information within AirData is structured according to AirData App Objects, such as the Contact Object described later in this tutorial. For more information on how data is structured in AirData, see documentation on AirData App Objects.
Once stored in AirData, information can be used or analyzed in a variety of ways, both outside and within Airkit apps. AirData Querying Capabilities dives deeper into how to access information stored in AirData.
These are the Studio parts you will be working with:
- Journey Builder: Start the Journey
- Web Flows Builder: Creating the Contact Form UI
- AirData Builder: Creating the App Object in AirData
- Connections Builder:
- Creating the Data Flow to Insert Data
- Connecting the Data Flow to the UI
- App Preview: Previewing the App
Defining how the Journey begins
When creating an app, you will first land on Journey Builder in the Studio. This is where you'll outline the intended flow of the application and define how Journeys begin. Specifically, is where you'll define the first Web Flow of a Journey, which will be displayed with the user first uses the web channel to access the application.
- Since the Contact Form app will be triggered by a link, drag the Visit a Link icon from Triggers > User Interactions on the left-hand side of the screen to Triggers in the Stage.
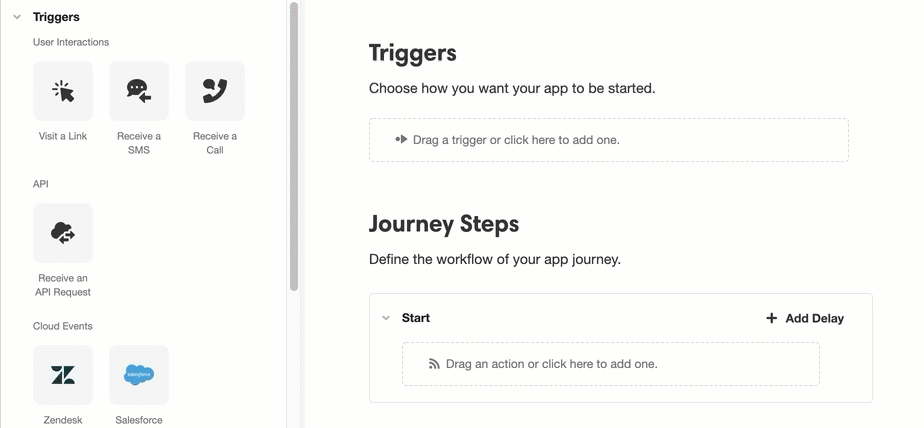
- Then, under Journey Steps, turn your attention to the Step 1 box. Under Web Flow Starts, select the '+' icon to create a new Web Flow to tie to Step 1.

What is a Web Flow?
Web Flows
Web Flows are containers for Web Pages. A user's Journey will frequently consist of multiple Web Pages, which will be sorted into Web Flows. Each Web Flow is typically built around a particular purpose, such as collecting a user's contact information.
Because the application being made in this tutorial is, by design, very simple, it consists of only a single Web Flow. However, Airkit applications can consist of any number of Web Flows, and when building out long, complicated Journeys, properly designated Web Flows are an important component of keeping app components organized.
The article Web Flows goes into more depth on what Web Flows are and how they are used.
What are Journey Steps and why do they need to be associated with Web Flows?
Journey Steps are subsections of an application flow.
While each Step must begin with a new Web Flow, Web Flows and Journey Steps are distinctly different things: Journey Steps can contain any number of Web Flows. Web Flows are typically built around a specific purpose, such as filling out an individual form or making a single appointment. Meanwhile, Journey Steps conceptualize a broader perspective focused on funnel milestones. Filling out a form and making an appointment are done in different Web Flows, but they could very well be part of the same Journey Step depending on the nature of the application.
The first non-Start Step in every Journey, Step 1, designates the Web Flow users will first see when first navigating to the web portion of the application. In some cases, this might be the only non-Start Step in the Journey. In every case, the Web Flow associated with a Step will be the first Web Flow displayed upon navigating to that Step.
You've now set up an entry point for your application and defined a Web Flow for it to lead to.
Save your work frequently, so you don't have to worry about losing progress by accident! Click the Save button on the upper left of the Studio, or use the usual keyboard shortcuts: CMD + S or CTRL + S.

Updated 3 months ago