AirData Builder
The AirData Builder is where you'll create custom App Objects and view data that has been saved to AirData.
Like most Builders, the layout of the AirData Builder maps comfortably onto the general structure of the Studio: to the immediate right of the Builder Bar is the Tree, to the right of which is the Stage, to the right of which is the Inspector.
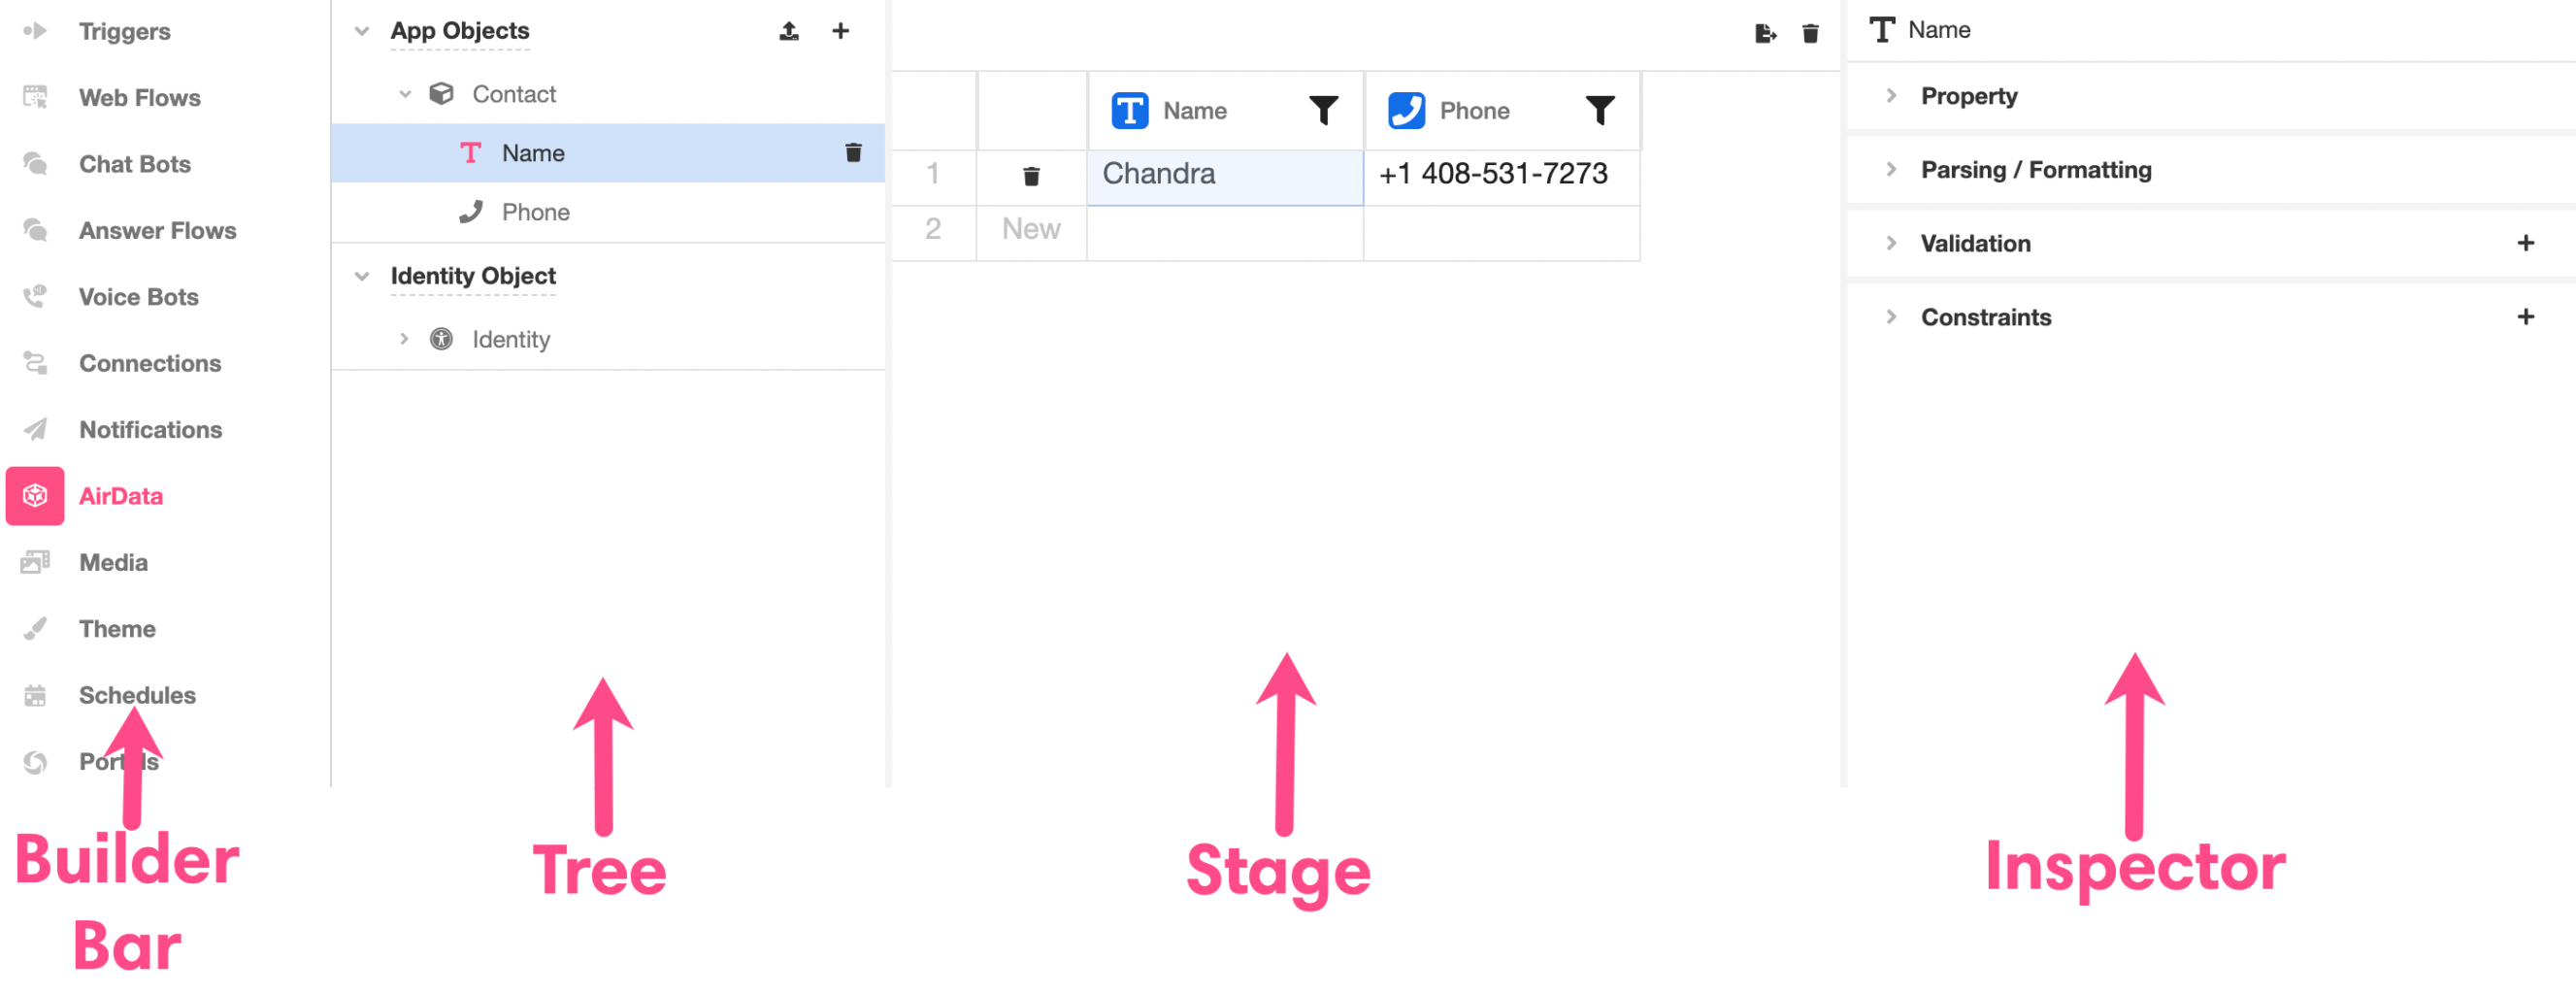
Tree
The Tree is where you'll find an expandable and collapsible breakdown of App Objects. The object or property you select in the Tree determines exactly what is displayed in the Stage and the Inspector.
The structure of the Tree is structured into three levels, which nest as follows:
- Object Type (App Objects or Identity Objects)
- Object
- Properties of the object
- Object
App Objects
App Objects define how data is structured and stored within AirData. They are entirely customizable and can contain any number of properties of any Data Type.
The Identity Object
The Identity Object is a special type of App Object that comes pre-defined in every app. It is important because it defines the structure of data pertaining to the Actor, the customer going through a Session. The actor variable is a type of Identity, and it is crucial that the actor variable have access to structure of the Identity Object.
In the vast majority of use cases, no data will actually be stored under the Identity Object. The presence of the Identity Object is important because it structures data pertaining to the Actor, which is saved and accessed during the relatively short-term length of a Session. It is not often used for long-term data storage the way most App Objects are – although, depending on use-case, it can be.
For more on the Identity Object, see Identity Object.
Adding App Objects
New App Objects can be added by clicking the '+' button on the upper right corner of the Tree, next to the App Objects section.

There are three different types of objects you can add:
Places and Schedules are objects specifically designed to work with Airkit's mapping and scheduling components respectively. They are automatically generated with the relevant properties. Custom App Objects are user-defined objects; they can have any number of properties, which themselves might be any primitive type or even other App Objects.
To create a custom App Object from scratch:
- Click the '+' icon to the right of the App Objects section in the Tree.
- Select Add App Object from the menu that appears.
- Rename the App Object by double-clicking the auto-generated App Object name ("Untitled Object") that appears in the Tree and replacing it with a more informative name.
- To add new properties to the App Object, click on the '+' icon that appears to the right of the App Object in the Tree and select the data type of the desired property. Property names can be edited in the same way App Object names can.
Object properties and even whole App Objects can be deleted by clicking on the trash icon that appears to the right of relevant element in the Tree.
Importing Objects and Creating Datastores
Information saved to AirData is stored in Org-level collections called Datastores, which cluster Objects by Profile rather than application, allowing the sharing of information between applications and the separation of information collected by different deployments of the same app.
In addition to allowing the creation of new App Objects, clicking the '+' button on the upper right corner of the Tree provides the option to import Objects and create new Datastores.
Importing Objects allows single App Object Databases to be queried by multiple apps. Creating new Datastores allows additional separation of information collected by different deployments of the same app. For more on either application, see Datastores.
Copying and Pasting data into AirData
Data can be copied and pasted into the AirData grid, assuming the fields match up with the columns and types. When copying and pasting rows, there is a 100 row limitation.
Stage
App Objects
When viewing an App Object or an App Object property, the Stage displays the data that has been saved to the App Object.
Gathered data is displayed in a table. The interface is reminiscent of a spreadsheet, with each row representing an individual instance of an App Object and each column corresponding with a particular property. Every App Object has its own table.
The following example shows how the Stage appears when examining an Object with three properties: Name (a string), Age (a Number) and Favorite Food (another string). There are three instances of this object stored. Note that, on the left of each instance, there's a trash symbol; clicking on it will delete the instance and all associated data:
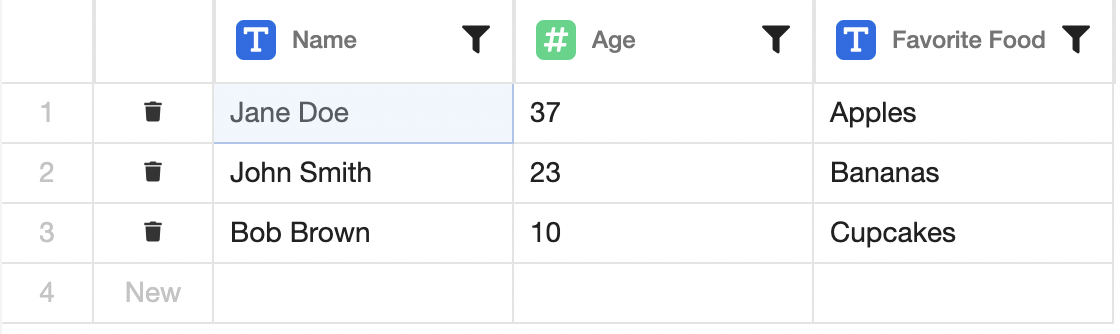
Visualizing your saved data in this way allows you to quickly skim through it and notice obvious trends. It also makes it easy to confirm data is being saved as intended.
Filters
To further simplify the process of examining data, Airkit makes it possible to filter data based on specified criteria directly in the Stage. To the right of each object property is a filter icon; clicking it brings up filtering options.

These filter options can ensure that a specific filed has a particular value, meets a certain threshold, or is equal to a specific value. Filtering out data unrelated to your current search cuts down on noise and makes it even easier to notice trends within the clusters of data you care about.
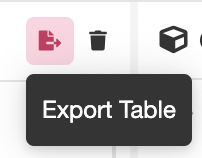
Export Table
App Object Tables can be exported as CSV files by clicking on the 'Export Table' icon to the upper right of the Stage.
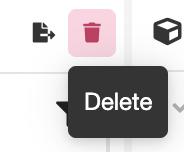
Delete App Objects
In addition to being able to delete App Objects in Tree by clicking on the trash icon to the right of the App Object as it appears in the Tree, you can also delete App Objects while viewing them in the Stage, by clicking on the 'Delete' icon to the upper right of the Stage.
Inspector
The Inspector is where you can examine and modify individual elements within the AirData Builder. The exact functionality available within the Inspector varies depending on what is being Inspected.
Unlike the Inspectors associated with most Builders, the AirData Builder Inspector does not make changes that will be reflected in the Stage; most changes made in the AirData Builder Inspector only define changes to how data will be displayed elsewhere.
Display Expression (Object Level)
Displays is a dropdown menu that allows you to choose which property of the Object will be displayed in a cell should this object be used as a property in a separate object.
Property (Property Level)
Provides means to examine and edit fundamental characteristics of a property, including:
- Display Name - defines how the name of the property will be displayed in external Portals. If Display Name is left blank, the displayed name will match the name of the property.
- Description - a description of the property; intended for internal documentation only.
- Field Aliases - used to track previous property names. Should you need to change the name of a property after data has already been saved to it, create a new Field Alias and associate it with the old name before saving the property with its new name. This will allow data saved to the old property name to roll over into the new property name.
- Encrypt - designates if the property will be encrypted or not. In order to encrypt the values saved in a property, you will need to set up an Encryption Key in the Console.
- Data Tag - classifies property data by assigning it a tag. Tagging information as sensitive prevents it from being seen by developers with insufficient permissions and prevents it from being downloaded insecurely. For more on why you would want to tag data, see Data Masking and Auditing.
- Datatype - displays the data type of the property.
- Restrict Values - limits the values that can be entered by users viewing the data in an external Portal, assuming the Portal is editable. The values listed under Restrict Values will appear for selection in a dropdown menu should a Portal user edit or add a value for the relevant property.
Formatter/Parser (Property Level)
Modify the way that data is viewed and stored in external Portals.
- Formatter - Changes how the data will be viewed in Portals.
- Parser - Changes how the data will be stored in Portals.
You can utilize Airscript to alter the format of the displayed data. To reference the data, use the namespace @. The @ symbol corresponds to the field data.
The following example shows how Airscript functions can be entered as input for either Formatter or Parser. The function FORMAT_PHONE takes the data in every cell in the relevant column (which represents, ostensibly, phone numbers) and converts it into the international phone number format. If this function is entered into the Formatter, it will only change the way these phone numbers will be displayed in Portals; If this function is entered into the Parser, it will change the way the phone numbers are stored:
FORMAT_PHONE(@, "INTERNATIONAL")Validation (Property Level)
Places rules on how data will be displayed in external Portals. No changes made here will impact the way data is displayed in the AirData Builder Stage; they will only be noticeable when viewing Portals.
There are three validation rules that you can add to an app object field. (One other, Is Unique, appears when you click the '+' icon to the right of the Validation section in the Inspector, but this is deprecated; its functionality has been moved under Constraints.)
.gif)
-
Is Required - ensures that this field must have data if its being entered by a user. The field could still have empty data inside Object-Service. This coupled with the constraint Not Null ensures that data always is present.
-
Length is Within Range - allows you to set an upper and lower bound on the length of the data. This will perform the Airscript function LENGTH on your input.
-
Custom Rule - utilizes Airscript to allow you to create more complex validation rules. The custom expression is expected to result in a Boolean. Instances where your custom Airscript output TRUE will be marked as valid; instances where your custom Airscript output FALSE will be marked as invalid. The @ symbol should be used as a placeholder for the value the relevant object property. For instance, the following example shows how to use the function ISPHONE to validate that each instance of data is a valid phone number:
ISPHONE(@)Constraints (Property Level)
Constraints place limits on what data can be added when attempts are made to add data; App Objects that do not meet the constraints will not be saved.
There are four unique Constraints that you can add to an app object field.
.gif)
Unique - ensures that no two instances have the same value for this field. This signifies that this column can be used as a primary key: a way to identify a single row of data.
Not Null - ensures that this field must have a value and that value cannot be NULL. This constraint is helpful in requiring input if you decide to create a Data Grid Portal page.
Default Value - provides a default value to this field. If no data is entered by the user, this default value will be recorded into AirData.
User Variable - acts as a row-level permissioning for the data.
Be careful: constraints will be applied to retroactively all data saved in the relevant App Object, and all instances where the constraints are not met will be permanently deleted as soon as the constraints are applied.
Storing and accessing information in AirData
Most commonly, data is gathered as users go through their Sessions; connecting information entered by users is done by creating Data Flows – specifically, ones that include AirData Queries – in the Connections Builder. Data can also be added manually or as part of AirData Queries in the Connections Builder directly.
Once you’ve saved information to AirData, you can click on the App Object in the Tree to see all the data associated with it. You can select on any given cell to modify data, and you can scroll to the last row to add a new App Object instance.
Updated 3 months ago