App Preview
The Preview button allows you to explore how your in-progress Airkit Apps would behave if deployed as-is. Previewing your application fully emulates everything you've built out so far, allowing you to test every channel, interaction, and pathway your users can take.
In addition to simulating how a user might interact with your app, previewing your app also provides the option to peak under the hood and ensure that your app is meeting all of your quality and testing standards.
Accessing and using App Preview
You can preview your application at any point throughout the process of building it out in Airkit Studio. Clicking on the Preview button to the upper right of the Studio will open up your App Preview in a separate tab.
.gif)
To ensure your App Preview will emulate all components of your app build, you'll need to save your app before previewing. If you don't, you will receive a reminder to do so upon clicking the Preview button.
There are two fundamental components to the App Preview:
- Previews - Emulate how users will experience your app.
- Viewers - Examine how your application behaves under the hood when you emulate various interactions your app might have with the outside world.
The Viewers window can be opened or closed by clicking on the double arrow icon ('<<' or '>>' respectively) on the upper right of the Previews window.

Previews
The Previews window is where you can simulate all the external feedback your application might respond to and see exactly how your app responds. The most fundamental tab is Device Preview, which allows you to experience how your app's interactive UI appears and responds to users. Additionally, other tabs within the Previews window allow you to simulate what happens when Events are triggered (even if said Events are only triggered by external sources via, ie, Subscription Events).
Toggling through the different Preview tabs is as simple as clicking on the name of the desired tab, all of which appear on the top of the Previews window.

Device Preview
The Device Preview tab is what will be opened automatically when you first access your App Preview. It simulates an interactive Session through your application from the perspective of a hypothetical user. This provides a reasonable approximation of how users will perceive your app.
A dropdown menu at the top of the Previews window allows you to change the simulated device on which your application Session is emulated. You can choose to see your Session framed by a variety of smartphones and tablets as well as in Full Screen mode, which approximates the experience a user would have if accessing your application from their desktop or laptop computer.
.gif)
The 'rotate' icon to the immediate right of this dropdown menu simulates rotating the device between landscape and portrait views.
Within the Device Preview, there are icons at the bottom that indicate different channels. Currently Airkit Supports Voice, Text, and Web Channels. Because Sessions have consistent state across channels, you can switch which channel you are viewing and the state will be preserved across the other channels. To switch channels, simply click on the the relevant icon channel.
The following example shows how these icons will appear when accessing the Web Channel. Note that the Web icon is highlighted in pink:

The Device Preview is entirely interactive. Enter text responses, click buttons, or reply to texts as they appear inside of your simulated device. Associated Actions will fire just as they would within a deployed app.
The following example shows how the Device Preview can be used to view different channels. The example Session begins on the Web. Pressing a button on the first web page activates a Chat Bot, and the text it sends can be accessed via the Text channel:
.gif)
Note the warning in the Text Channel that the Actor is not set up. When an app is deployed, initializing the Actor is a crucial component of activating a Voice or Chat Bot from a web app, because it tells your application which phone number to send the voice or chat message to. The App Preview warns you when this is the case, but it nevertheless allows you to simulate sending voice or chat messages without requiring the Actor to be initialized, because all calls and texts can only be sent to the emulated device, which does not, itself, have an associated phone number.
Bear in mind that even if Airkit won't allow for the sending of the same text message to the same phone multiple times within a 30-minute period when the app is published, Chat Bots can be tested in App Preview as many times as needed. That is to say, when the app is unpublished, Airkit will send the same text message to the same number as many times as needed for testing purposes; whereas the behavior will differ when the app is published to protect users from feeling spammed.
API
The API tab is used to simulate relevant HTTP Events. After an HTTP Event has been simulated, you can toggle back to Device Preview to see how the HTTP Event would impact the user's Session through your app.
To learn more about HTTP Events, check out Creating an API for your Airkit App.
Webhooks
The Webhooks tab is used to simulate data updates from external sources. After an an update from an external source has been simulated, you can toggle back to Device Preview to see how it would impact the user's Session through your app.
A webhook is a Subscription service that automatically informs your application if a change is made to an external resource. For more on webhooks and Subscriptions, check out Passing Data from External Systems.
Links
The Links tab provides a list of all web links relevant to your application. Clicking on a web link allows you to simulate what a user will experience if they click on a link to that URL.
Outside of App Preview, these web links are managed in Connections Builder and woven into your application using Triggers Builder. It is not at all uncommon for a web app to only have a single relevant web link: the one that begins a user's Session.
Timers
Timers are used to trigger Action Chains at designated times. (For instance, a common use case of timers is to send a text reminder a short time before a scheduled appointment.) The Timers tab allows you to keeps track of any timers that are set throughout the course of your emulated Session.
Many timers are associated with Action Chains that will not occur for hours or even days after the timer is set. For testing purposes, this is far too long to reasonably wait, and so the Timers tab also provides the means to trigger timers early, allowing you to see their effects in the Device Preview without needing to wait the full length of the timer.
Viewers
The Viewers window provides a means to examine how your application behaves under the hood when you use the functionality in the Previews window to emulate various interactions your app might have with the outside world. Updates to the Viewers window occur simultaneously to changes made in the Previews window.
Whenever the Viewers window is open, it will display two Viewers: Event Log Viewer on top and the State Viewer on bottom.
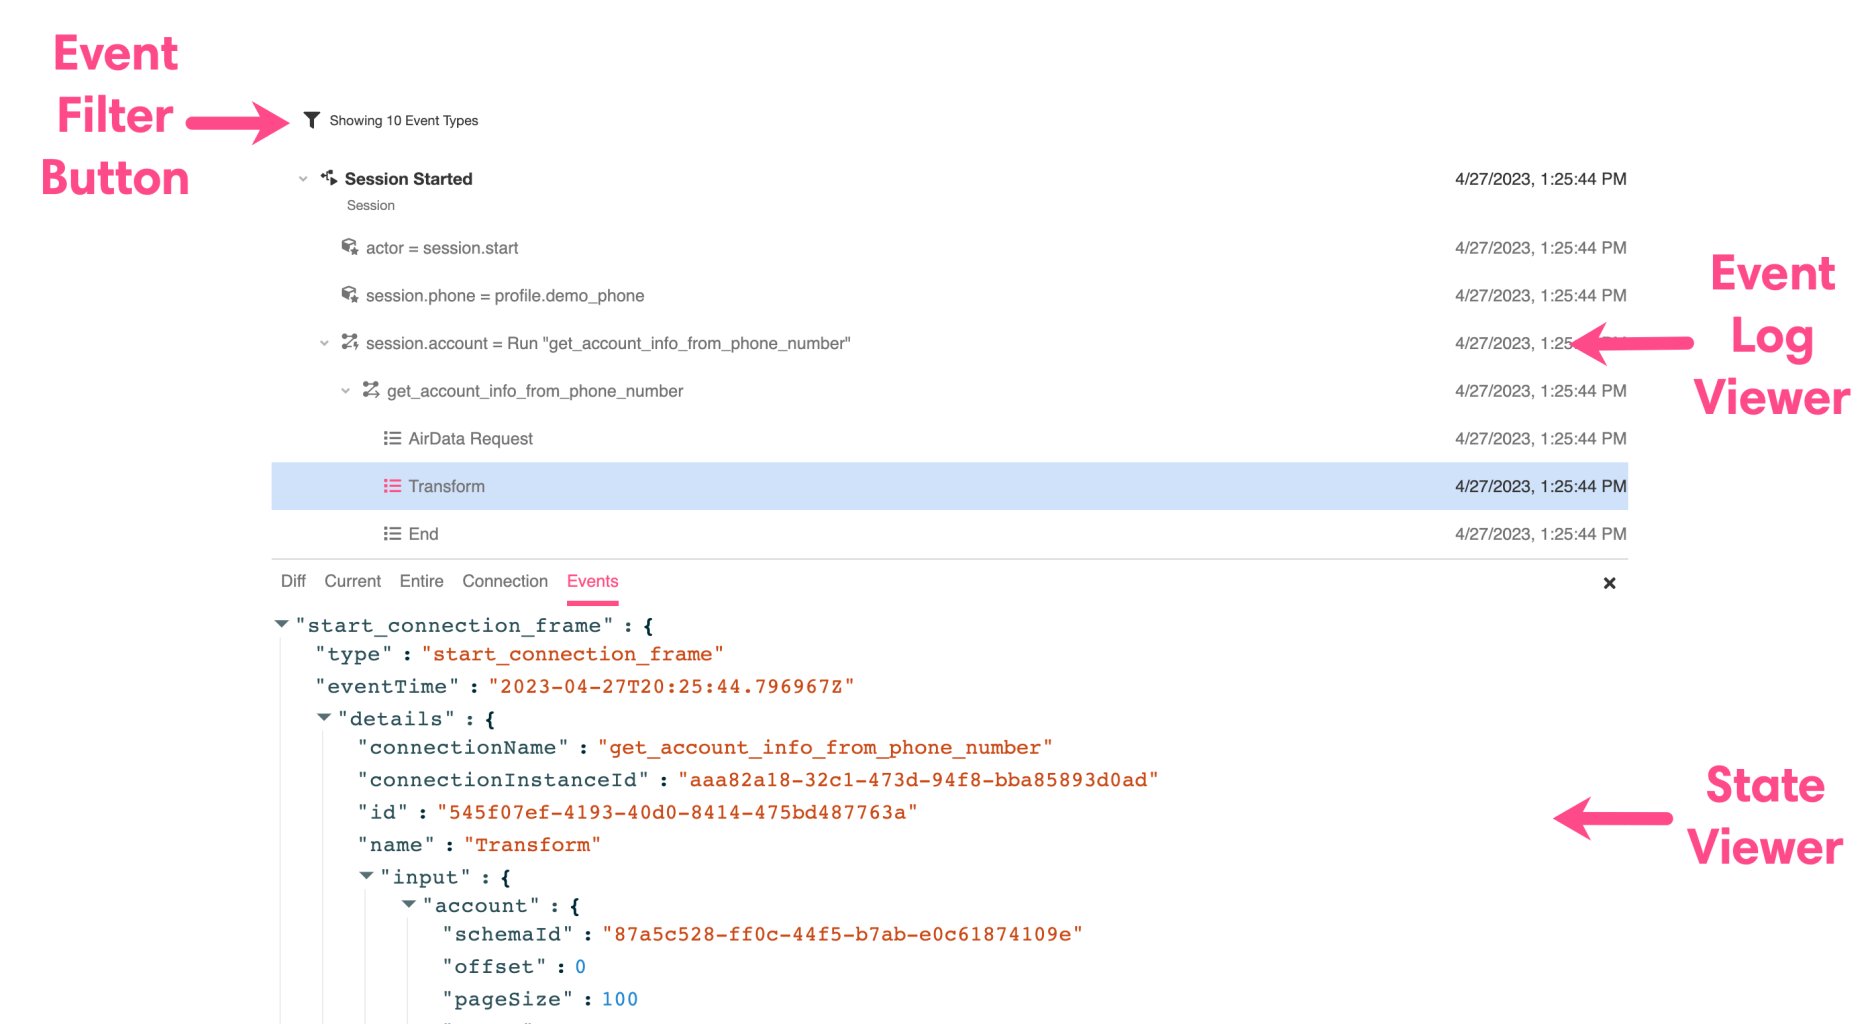
Event Log Viewer
The Event Log Viewer contains a chronological list of all the Events that occur during the simulated execution of your app. Each Event is accompanied by a description and a time stamp. Depending on the nature of an Event, it might also contain an expansion toggle to indicate that the Event is really a combination of multiple steps.
Selecting an event will open its state in the State Viewer.
Event Filtering
To the top left of the Event Log Viewer, there is a Event Filter Button. This allows you to filtered the Events displayed in the Event Log Viewer by type. Depending on what aspect of an application flow you are trying to examine, this can help narrow down the Events you need to search through in order to find what you're looking for.

State Viewer
The State Viewer displays the state of your application at the time of a specific event. Selecting an event to examine is done in the Event Log Viewer.
The State Viewer has three different tabs.
- Diff: displays only the change in state that occurs between the selected event and the previous; accessing the Diff tab cuts down on noise in cases when you are only interested in the state changes immediately associated with the selected Event.
- Current: shows the state within the current context.
- Entire: displays the entire application state at the time of the Event.
Updated 3 months ago