Custom integrations can be used to connect to external data sources that are not a part of the out of the box integrations. Any one of these standard authentication methods can be used for your API and each have different properties that need to be configured.
Redirect URIsIf an external data source requires a Redirect URI, the url will differ based on the realm the organization was provisioned in.
US Realm
https://us.api.prod.airkit.com/internal/sessions/v1/auth/callbackEU Realm
https://eu.api.prod.airkit.com/internal/sessions/v1/auth/callbackAP Realm
https://ap.api.prod.airkit.com/internal/sessions/v1/auth/callback
OAuth 2.0
Properties
Integration Name: Display name for the integration
Key: Unique identifier for the integration. This should only contain letters and numbers.
Integration Parameters
Integration parameters allow you to parameterize the integration when defining a connected account. These parameters can be referenced through any of the custom integration inputs by surrounding the text in curly braces {parameterName}.
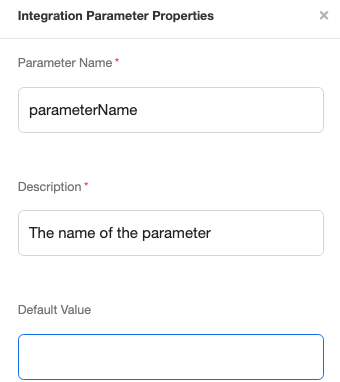
For example, if you want to parameterize a query parameter on the Authorization Endpoint, the url would look like the following:
https://airkit.com/auth?queryparam={parameterName}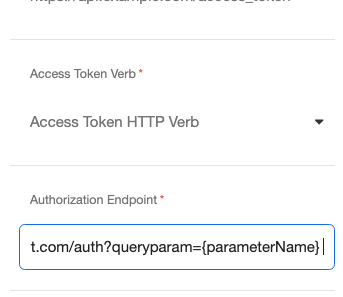
Then, the query parameter would then be accessible when you create the connected account.
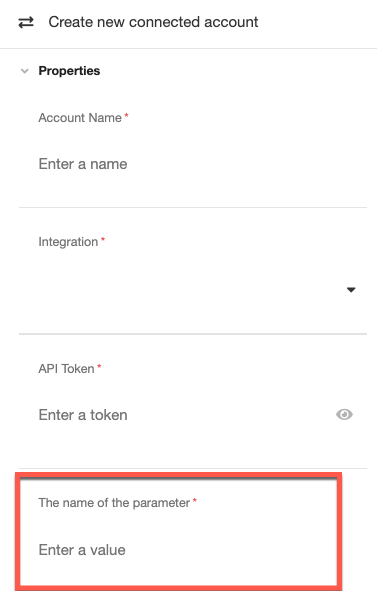
Another example for using integration parameters would be for connections where you have different servers for access token endpoints. You could customize the URL string with the following : {serverName}
https://{serverName}.airkit.com.com/oauth2/v1/tokenThis could then be used to create multiple connected accounts with the same authentication patterns when using multiple profiles (i.e. DEV, QA, PROD)
OAuth2 Configuration
Authorization Grant Type (required) : The way the application will retrieve the access token. The options here are Authorization Code and Client Credentials. This automatically adds the grant_type parameter as part of the OAuth 2.0 protocol.
Access Token Endpoint (required): The URL to retrieve the access token.
Access Token Verb (required): The HTTP verb for the call to retrieve the access token. GET or POST
Authorization Endpoint (required): The URL to obtain authorization from the resource.
Revoke Token Endpoint (optional): The URL to revoke the token
OAuth Scope (required): OAuth 2.0 scopes
Client ID (required): OAuth 2.0 Client ID
Client Secret (required): OAuth 2.0 Client Secret
Auth Token
Token Parameter Type (required) : Where to pass the token with the HTTP Request data operation. Select between URL Parameter and Header.
Token Parameter Name (required): The name to define how the token is specified (i.e. Authorization).

Token Parameter Value Template (required): The format of how to pass the token, once retrieved. The token is denoted as {token} in the input. For example, if the token is passed in the header of the request, with the format Authorization: Bearer <token>, then this field would look like:

Request Parameters
Request parameters are included with every HTTP request that is used in an HTTP Request in Connections Builder.
Advanced
Refresh TokensWhen setting up an OAuth 2.0 integration in Airkit, a refresh token is expected, and the system/endpoint must be configured accordingly. Some systems will automatically account for this and some systems may not.
Refresh Rules
If the token is set to expire within less than 30 minutes, Airkit will refresh the token.
If an API call results in a 401 or 403 error, Airkit will refresh the token before retrying once.
Token TTL (time-to-live)TTL of OAuth tokens has a minimum requirement 5 minutes. If the integration has a token TTL of under 5 minutes, it will cause issues when making requests.
HTTP Status Error 431When creating an OAuth2 integration, sometimes the status error 431
Request header Fields Too Largemay occur. This can be fixed by clearing the cookies in the browser.
API Token
Properties
Integration Name: Display name for the integration
Key: Unique identifier for the integration. This should only contain letters and numbers.
Integration Parameters
Integration parameters allow you to parameterize the integration when defining a connected account. These parameters can be referenced through any of the custom integration inputs by surrounding the text in curly braces {parameterName}.
For example, if you want to parameterize a query parameter on the Authorization Endpoint, the url would look like the following:
https://airkit.com/auth?queryparam={parameterName}Then, the query parameter would then be accessible when you create the connected account.
Another example for using integration parameters would be for connections where you have different servers for access token endpoints. You could customize the URL string with the following : {serverName}
https://{serverName}.airkit.com.com/oauth2/v1/tokenThis could then be used to create multiple connected accounts with the same authentication patterns when using multiple profiles (i.e. DEV, QA, PROD)
Auth Token
Token Parameter Type (required) : Where to pass the token with the HTTP Request data operation. Select between URL Parameter and Header.
Token Parameter Name (required): The name to define how the token is specified (i.e. Authorization).

Token Parameter Value Template (required): The format of how to pass the token, once retrieved. The token is denoted as {token} in the input. For example, if the token is passed in the header of the request, with the format Authorization: Bearer <token>, then this field would look like:

Request Parameters
Request parameters are included with every HTTP request that is used in an HTTP Request in Connections Builder.
HTTP Basic Auth
Properties
Integration Name: Display name for the integration
Key: Unique identifier for the integration. This should only contain letters and numbers.
Integration Parameters
Integration parameters allow you to parameterize the integration when defining a connected account. These parameters can be referenced through any of the custom integration inputs by surrounding the text in curly braces {parameterName}.
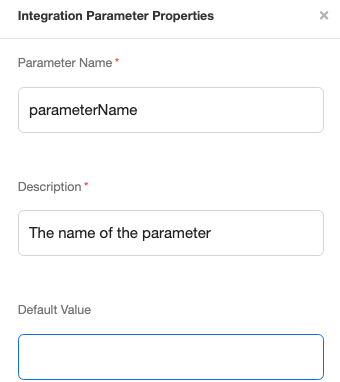
For example, if you want to parameterize a query parameter on the Authorization Endpoint, the url would look like the following:
https://airkit.com/auth?queryparam={parameterName}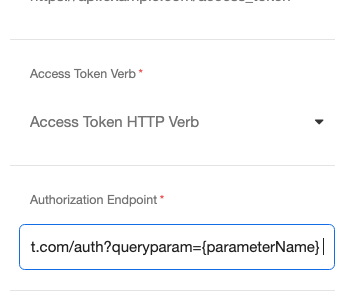
Then, the query parameter would then be accessible when you create the connected account.
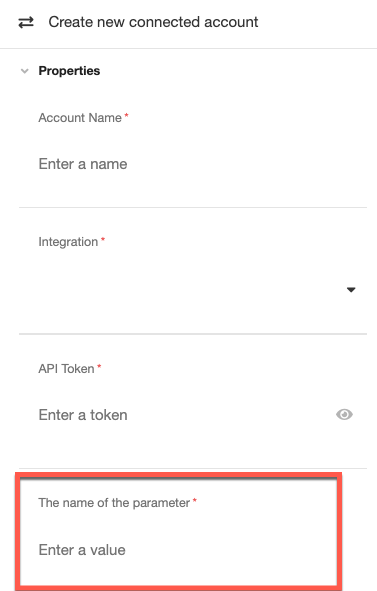
Another example for using integration parameters would be for connections where you have different servers for access token endpoints. You could customize the URL string with the following : {serverName}
https://{serverName}.airkit.com.com/oauth2/v1/tokenThis could then be used to create multiple connected accounts with the same authentication patterns when using multiple profiles (i.e. DEV, QA, PROD)
Request Parameters
Request parameters are included with every HTTP request that is used in an HTTP Request in Connections Builder.
Custom Token
Properties
Integration Name: Display name for the integration
Key: Unique identifier for the integration. This should only contain letters and numbers.
Integration Parameters
Integration parameters allow you to parameterize the integration when defining a connected account. These parameters can be referenced through any of the custom integration inputs by surrounding the text in curly braces {parameterName}.
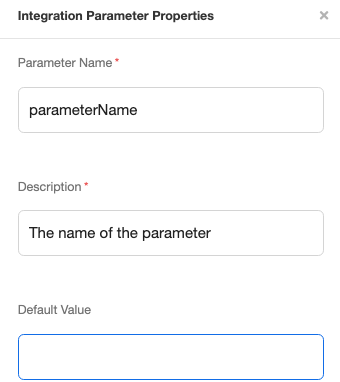
For example, if you want to parameterize a query parameter on the Authorization Endpoint, the url would look like the following:
https://airkit.com/auth?queryparam={parameterName}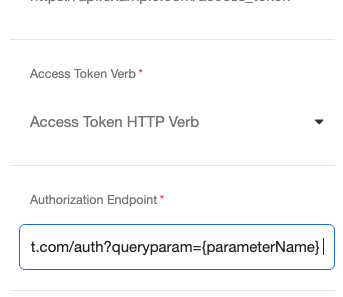
Then, the query parameter would then be accessible when you create the connected account.
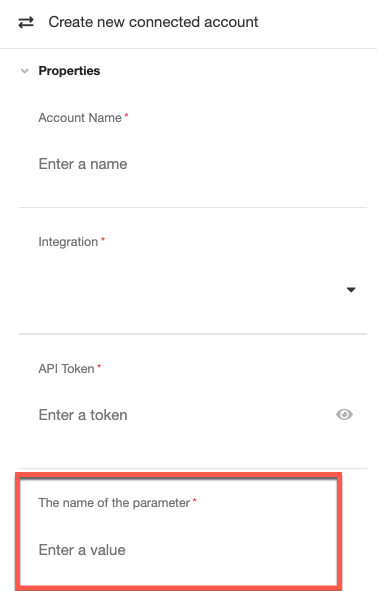
Another example for using integration parameters would be for connections where you have different servers for access token endpoints. You could customize the URL string with the following : {serverName}
https://{serverName}.airkit.com.com/oauth2/v1/tokenThis could then be used to create multiple connected accounts with the same authentication patterns when using multiple profiles (i.e. DEV, QA, PROD)
Custom Token
Access Token Endpoint (required): The URL to retrieve the access token.
Access Token Verb (required): The HTTP verb for the call to retrieve the access token. GET or POST
Access Token Parameters
Parameters to include with the HTTP request that is made to retrieve the custom token.
Auth Token
Token Parameter Type (required) : Where to pass the token with the HTTP Request data operation. Select between URL Parameter and Header.
Token Parameter Name (required): The name to define how the token is specified (i.e. Authorization).

Token Parameter Value Template (required): The format of how to pass the token, once retrieved. The token is denoted as {token} in the input. For example, if the token is passed in the header of the request, with the format Authorization: Bearer <token>, then this field would look like:

Request Parameters
Request parameters are included with every HTTP request that is used in an HTTP Request in Connections Builder.
SFTP
Properties
Integration Name: Display name for the integration
Key: Unique identifier for the integration. This should only contain letters and numbers.
Integration Parameters
Integration parameters allow you to parameterize the integration when defining a connected account. These parameters can be referenced through any of the custom integration inputs by surrounding the text in curly braces {parameterName}.
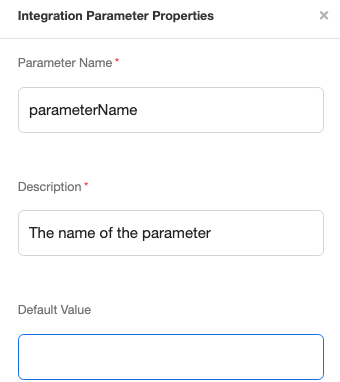
For example, if you want to parameterize a query parameter on the Authorization Endpoint, the url would look like the following:
https://airkit.com/auth?queryparam={parameterName}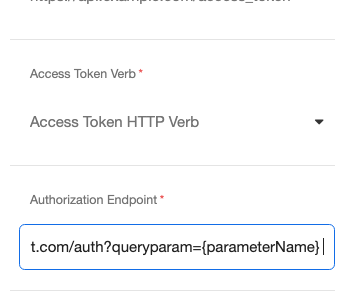
Then, the query parameter would then be accessible when you create the connected account.
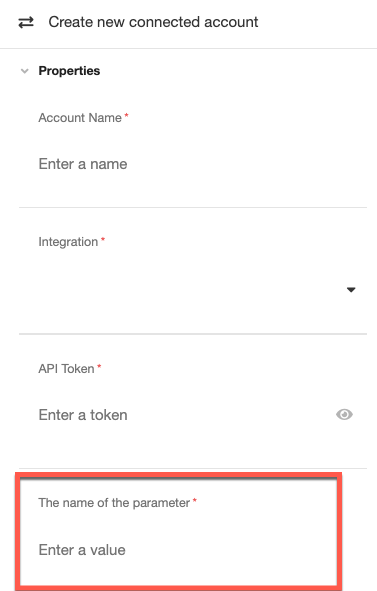
Another example for using integration parameters would be for connections where you have different servers for access token endpoints. You could customize the URL string with the following : {serverName}
https://{serverName}.airkit.com.com/oauth2/v1/tokenThis could then be used to create multiple connected accounts with the same authentication patterns when using multiple profiles (i.e. DEV, QA, PROD)
Request Parameters
Request parameters are included with every HTTP request that is used in an HTTP Request in Connections Builder.