Airkit Lightning Component (Salesforce)
Use the Airkit Lightning Component to embed apps and send events to and from Salesforce
Overview
Airkit apps can be embedded into Salesforce pages using the Airkit lightning component that can be found on the Salesforce App Exchange. This allows developers to quickly build out and launch personalized web apps and omnichannel experiences on top of Salesforce.
Installing the SF Package
1. Install the app into your Salesforce instance from the Salesforce App Exchange.
Configuring CSP Trusted Sites
- Look at the top of any Salesforce page.
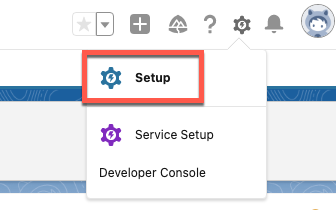
- If you are using Lightning Experience, click on the gear icon, then select Setup Home
- If you’re using Salesforce Classic and you see Setup in the user interface header, click it.
- If you’re using Salesforce Classic and you don’t see Setup in the header, click your name, then select Setup.
-
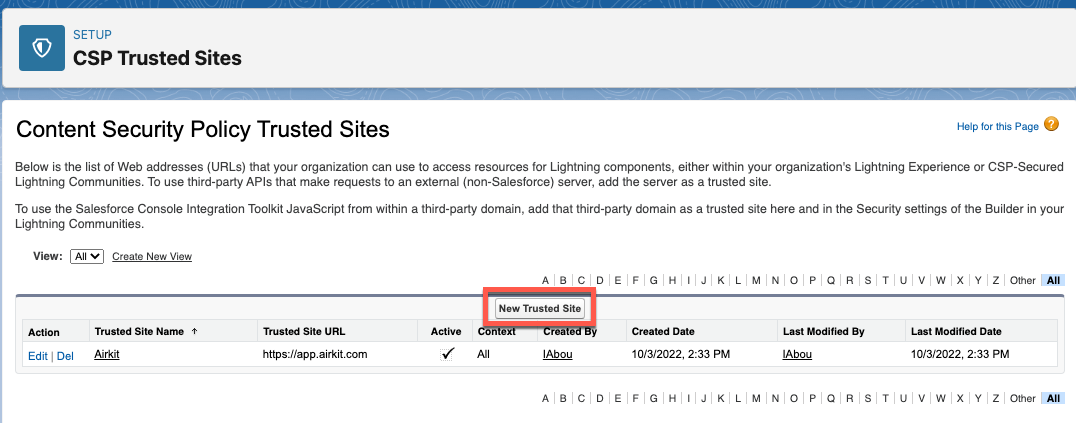
Navigate to Security > CSP Trusted Sites
-
Create a New Trusted Site
-
Fill in the information under General Information
-
Trusted Site URL: This is the base domain of your Airkit application that you would like to pass into the lightning component. To get the base domain, Edit your Airkit app and go to Settings > Base Domain
-
For example:
URL: https://app.airkit.com/{trigger}
Base domain: https://app.airkit.com
-
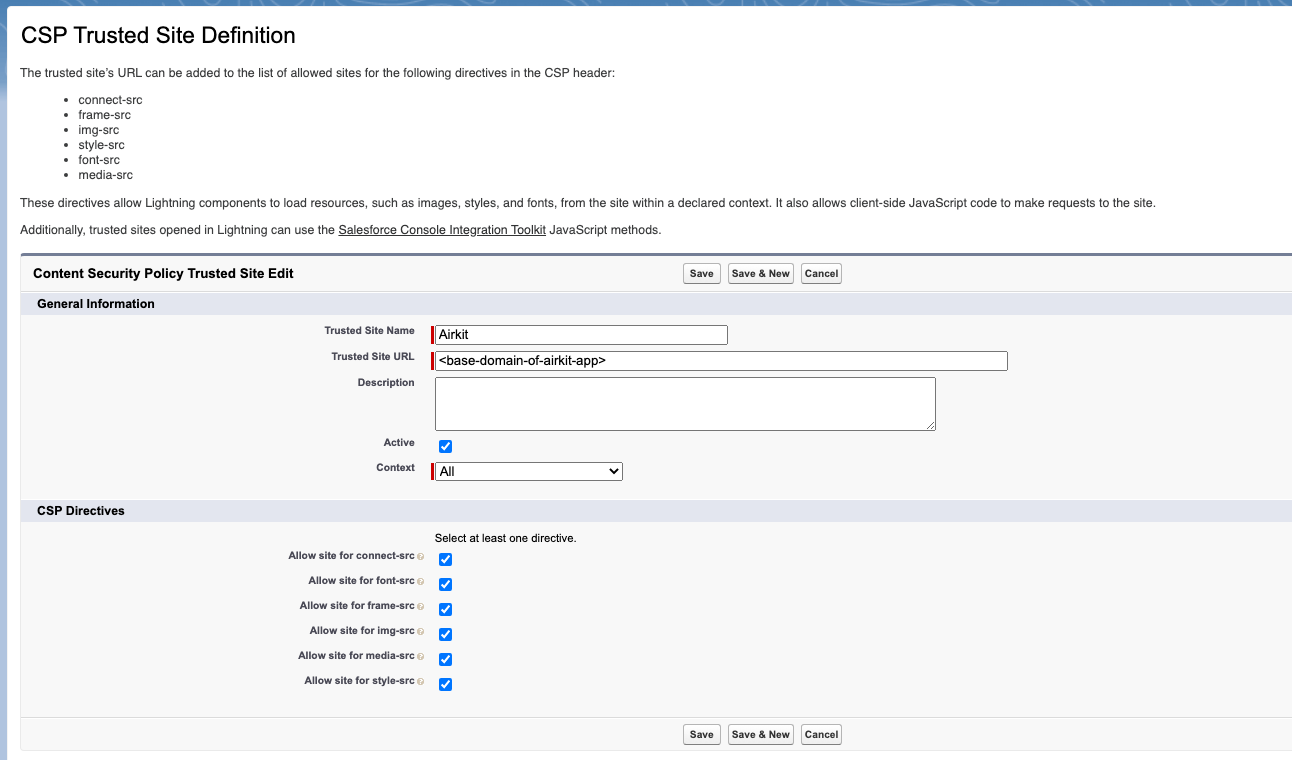
- Select all of the CSP Directives and click on Save
Configuring Target Hostnames
You will need to configure Target Hostnames in your Airkit App in order to allow your app to be embedded into Salesforce.
- Go to studio.airkit.com and Edit your app and go to Settings

- Scroll down until you see Target Hostnames
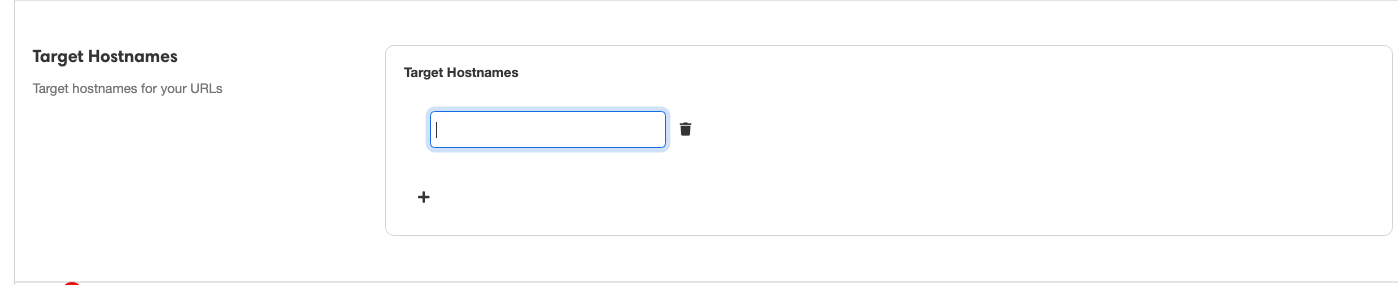
- Add the domain of your Salesforce instance as the Target Hostname
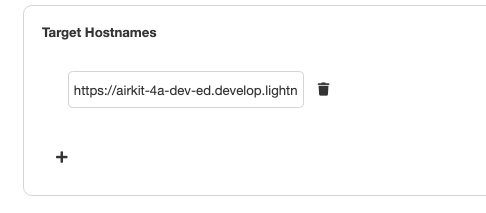
- Save your App
Setting up Airkit App
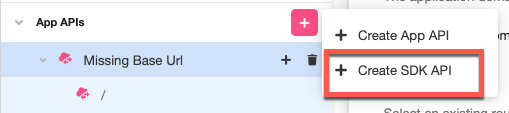
The Airkit lightning component takes in a Configuration Url which needs to be set up as a part of your Airkit application. This requires two API endpoints that you will need to configure, an App API and a SDK API.
Config the SDK API
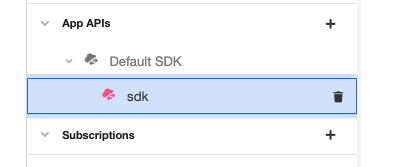
- Navigate to Triggers and create a SDK API
- Create a new URL Route and click on Create. You can also use an existing route as well.
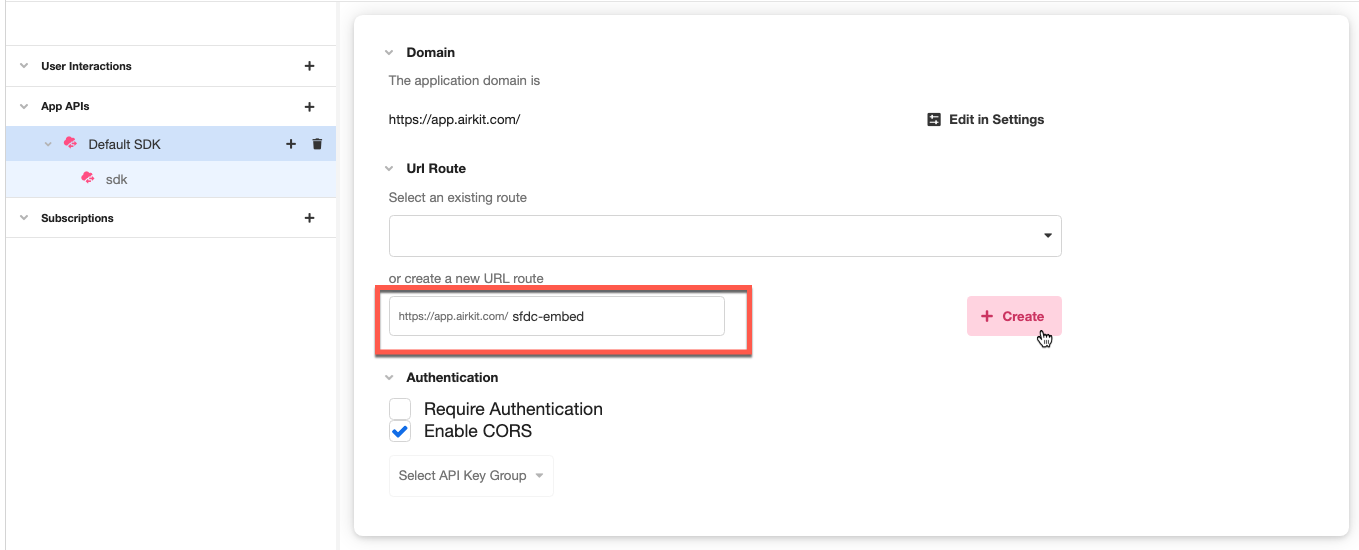
- Click on the
sdkendpoint where you will be able to build out the API
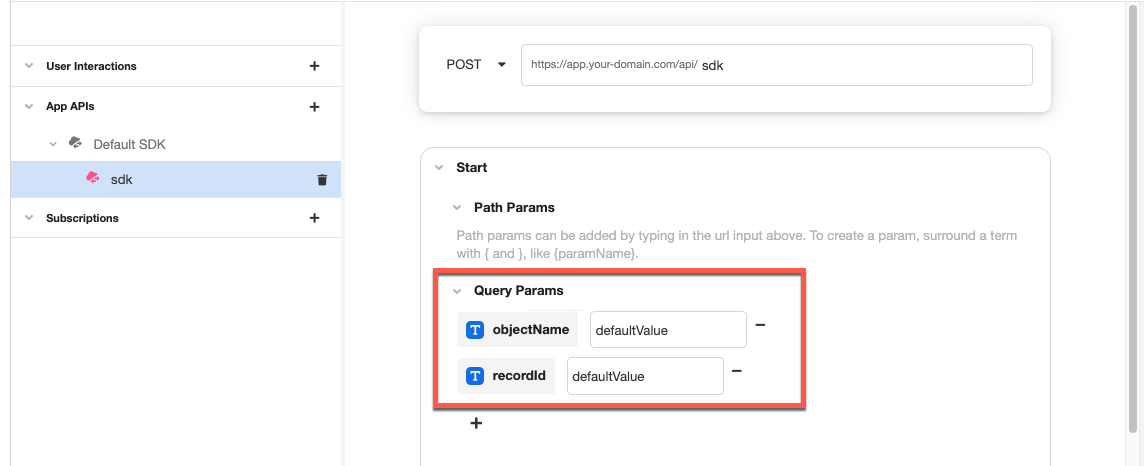
- This is an SDK API which means it has preconfigured headers and properties that allow you to use with Airkit's Web SDK. To get the record's ID and object name when the Airkit lightning component is embedded into Salesforce, the endpoint will need to be modified slightly. Add two Query Params called:
objectNamerecordId
- Then, scroll down to the Start Journey data operation and under the Start Parameters you will need to add the following code block. This will allow you to access the
objectNameand therecordIdusingsession.start.queryParams.
{ "queryParams": payload.queryParams }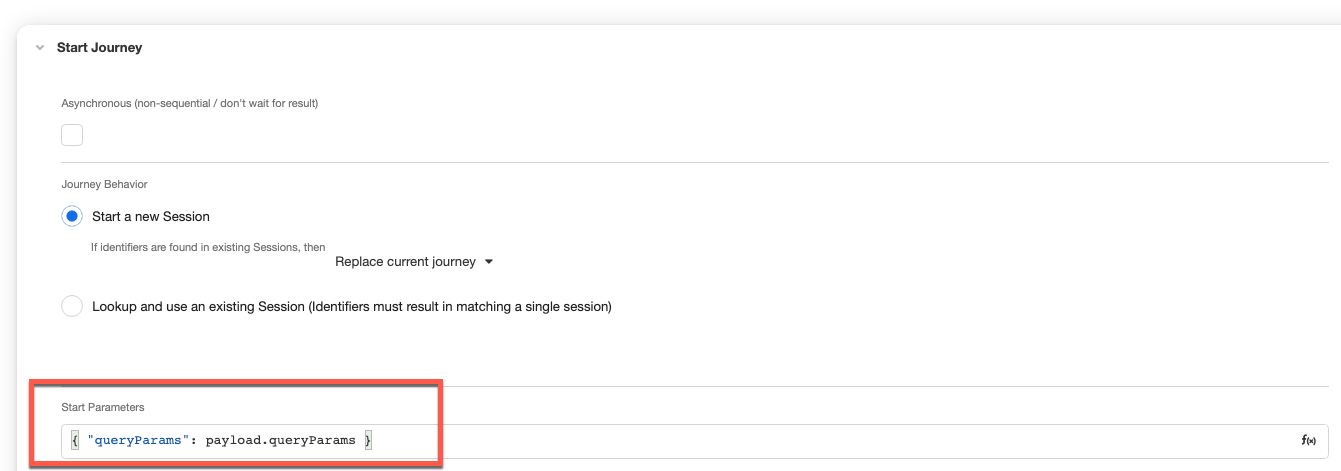
- Save your app
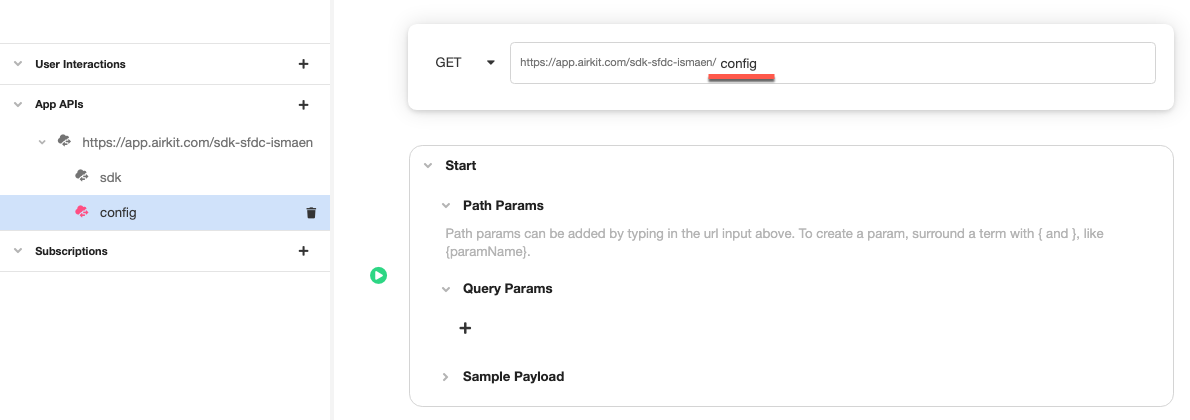
Configure the App API
- Create an App API using the same URL route created in the previous step and add
configto the end of the endpoint
- Add a transform data operation and pass in the following. The
SDK Urlis the url endpoint created in the previous step.
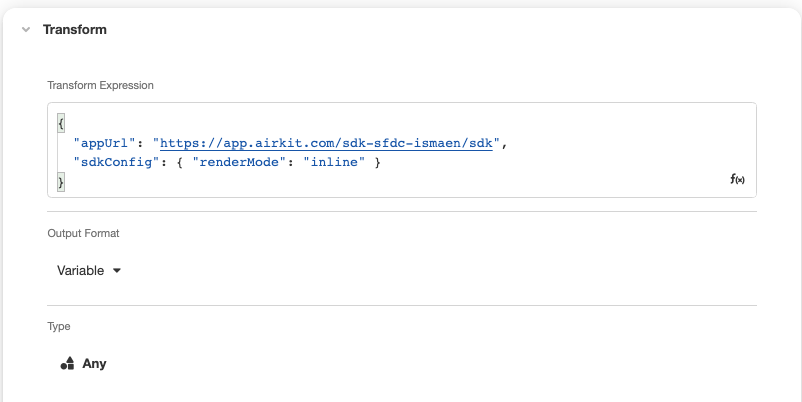
{
  "appUrl": "<SDK Url>",
  "sdkConfig": {
    "renderMode": "inline"
  }
}
- Configure the response of the API:
- Response Headers:
Content-Type:application/json - Response Status :
200 - Response Body:
TO_JSON(transform)
- Response Headers:
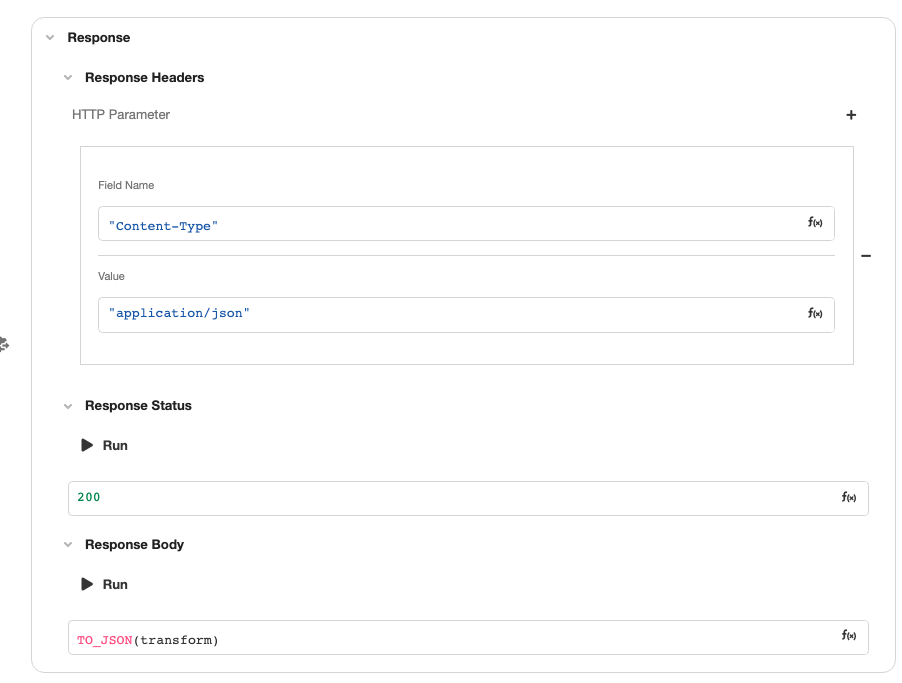
- Save your app
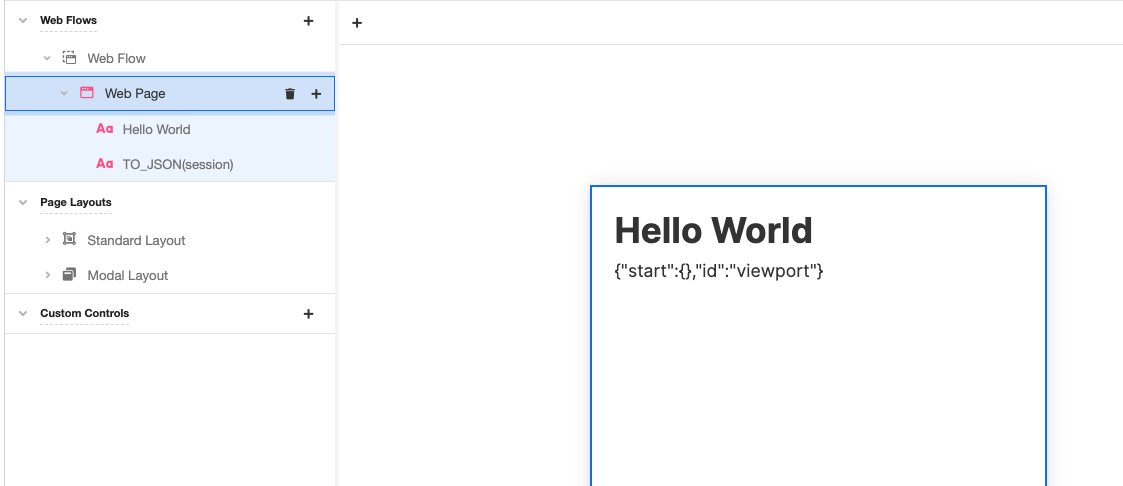
Publishing
- After your App APIs are configured, your app is ready to be embedded and published. In order to see a page render in Salesforce, your app must have a web page with some controls on the page. For this example, the web page will simply say "Hello World" and also pass in the
sessionvariable on the page.
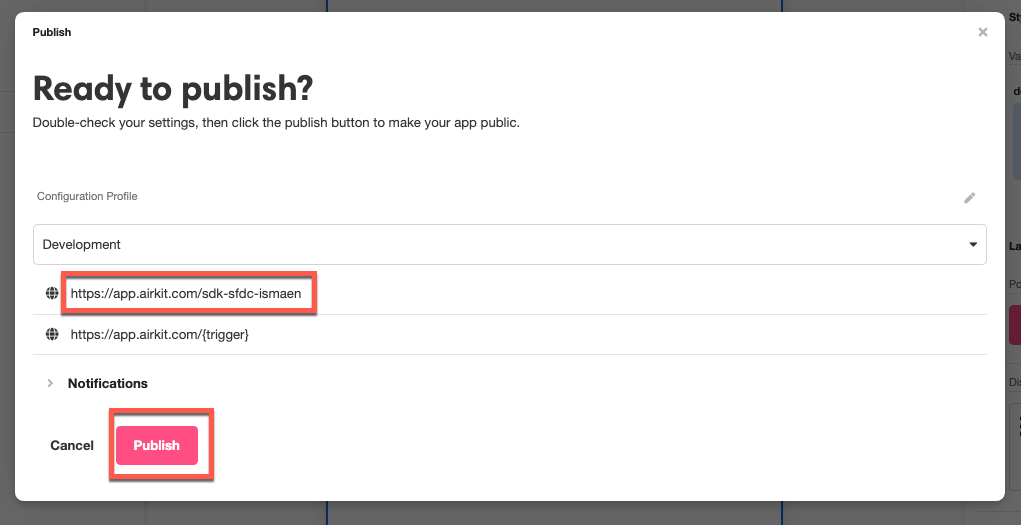
- When ready to publish, click on the "Publish" button in the top right hand corner and publish your application. The API endpoint will also be published when you hit publish. This is important to pass the
configendpoint into the Airkit lightning component in the following steps
Configuring the Airkit Lightning Component
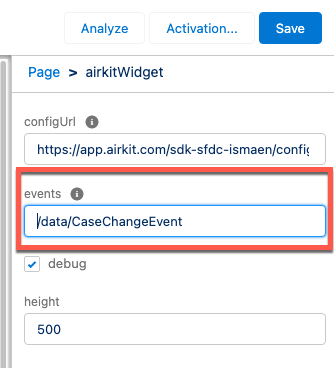
- Add the Airkit lightning component to a page in Salesforce. For this example, the component will be added to the Case Object page. The component has the following properties
- configUrl: The config url of the Airkit app to be embedded
- events: Comma delimited list of change events in Salesforce to emit into Airkit
- debug: When checked, will send events to the console to assist in debugging
- height: A number that determines the height of the lightning component
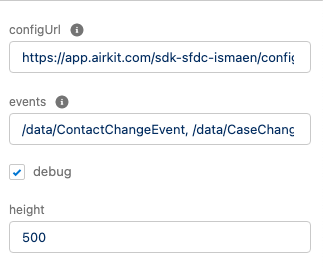
- Take the
configendpoint that was created in this step and pass it into theconfigUrlproperty on the lightning component - Pass in a value for the height
- Save your page
Configuring Incoming Events from Salesforce
You can set up data capture events from Salesforce that can emit events and data into Airkit. For example, you can trigger off an action chain in Airkit that updates the UI and sends a text message, whenever a status changes on a Salesforce case to completed and have it pertain to the existing session that is being run on the lightning component.
Setting up an event when the Case record changes
Change Data Capture setup in Salesforce
- Go to Setup > Integrations > Change Data Capture
- Select the Case entity
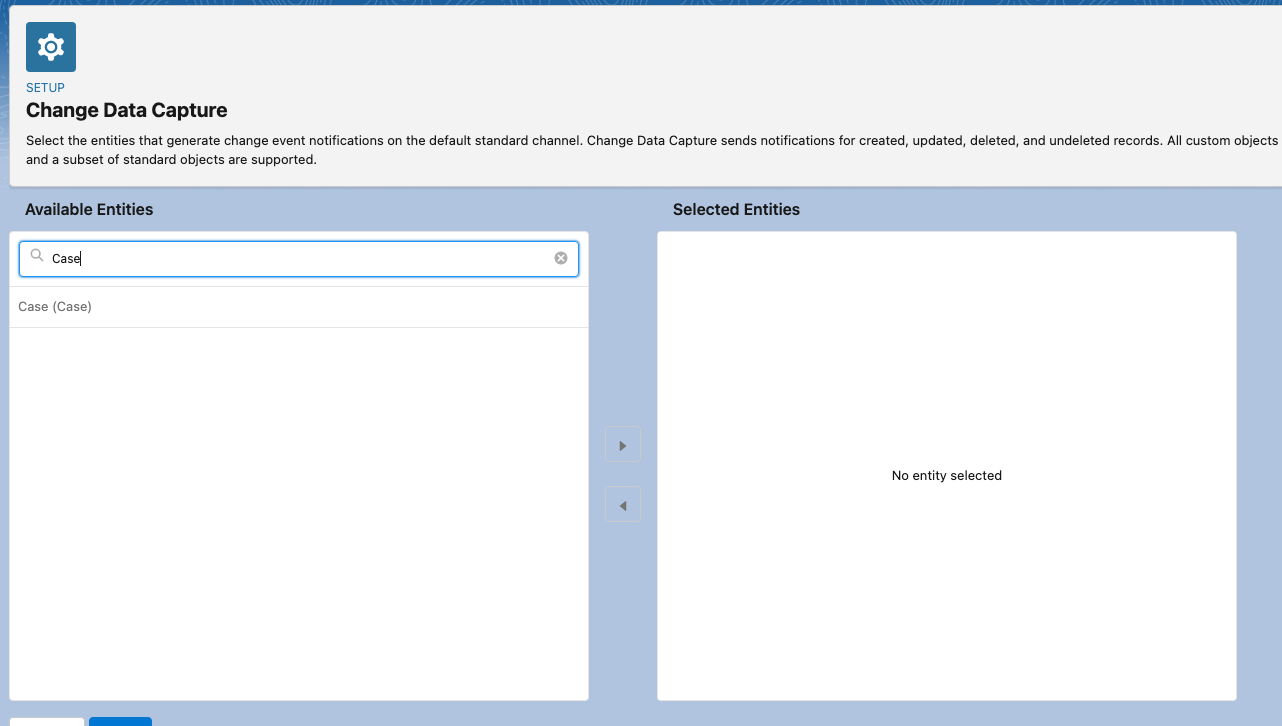
- Save your changes
Configuring the incoming event in Airkit
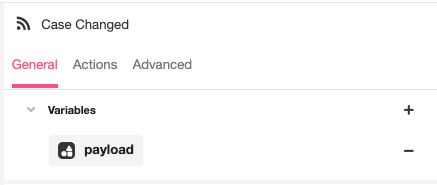
- Navigate to your app in the studio and go to Connections > Embedded Event Sources and add an Incoming Event Source

- Add an
Anyvariable and name itpayload
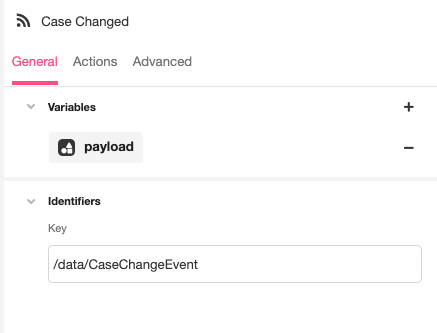
- In Identifiers > Key add
/data/CaseChangeEvent. This key is dependent on what change event object you select. For standard objects, the key will follow the pattern of/data/<Standard_Object_Name>ChangeEventFor more information, see here.
- Add an action to the action chain. This action chain will run whenever there is a change on the case record

- Save and publish your Airkit app
Adding the event to the Airkit Lightning Component
- The last step to tie it all together is to add the key to the events property on the lightning component. Add
/data/CaseChangeEventto the events property
- Save your changes
Configuring Outgoing Events
You can trigger off platform events from Airkit into Salesforce using Airkit's Outgoing events. This allows you to pass data from Airkit back into Salesforce in real-time.
This example will walk through setting up an event to pass data into a Chatter feed on a case.
Setting up the Platform Event
- Go to Salesforce Setup and navigate to Integrations > Platform Events
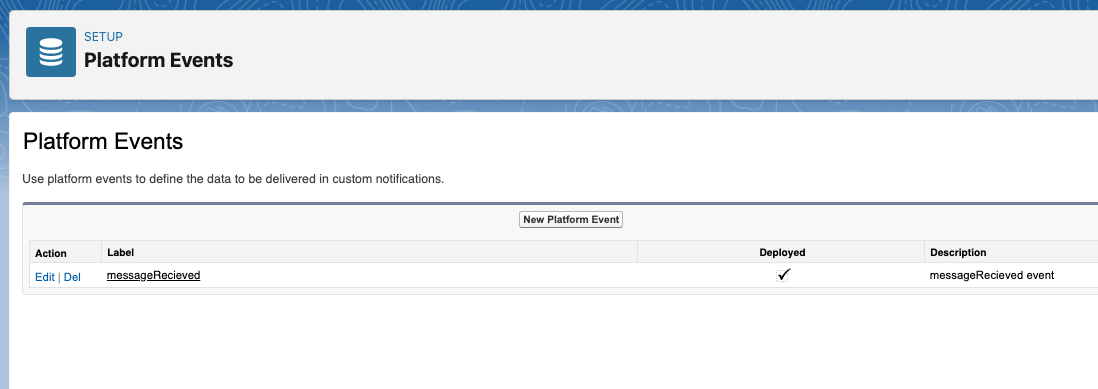
- Create a new Platform event and fill in the Paltform Event Information
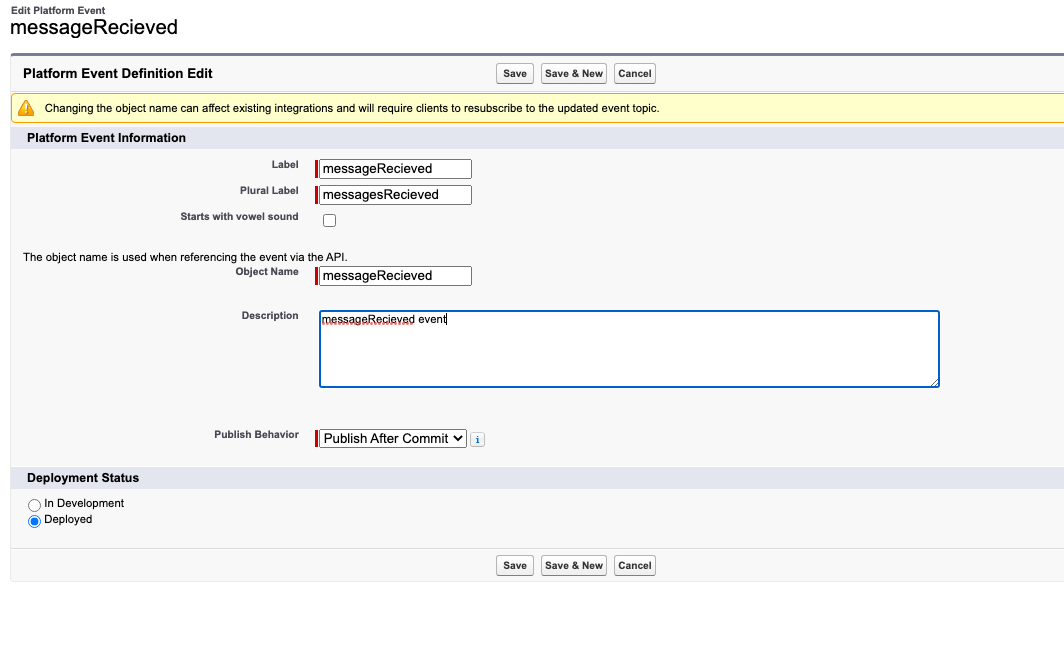
- Save the platform event and you will see the Platform Event Definition Detail. Here you will have an API Name that will be the Identifier Key for the outgoing event in Airkit
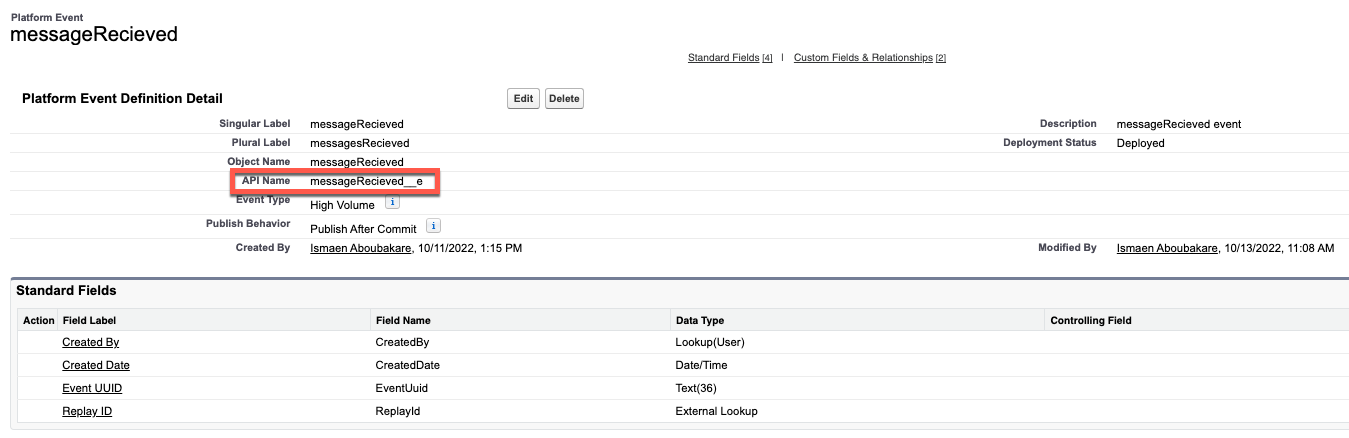
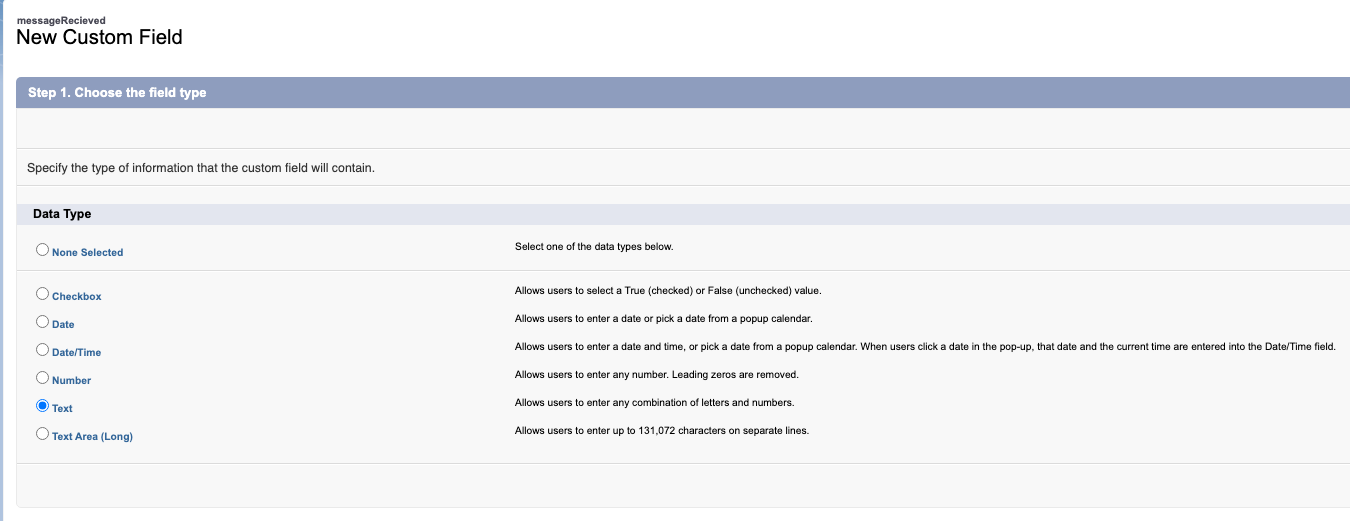
- Next, add custom fields on the platform event. These will be the fields to pass data into Salesforce. The field types should also map to the types in Airkit as well when creating the variables on the outgoing event
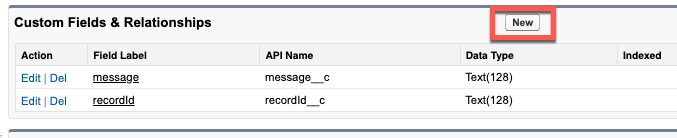
- Fill in the Custom field information
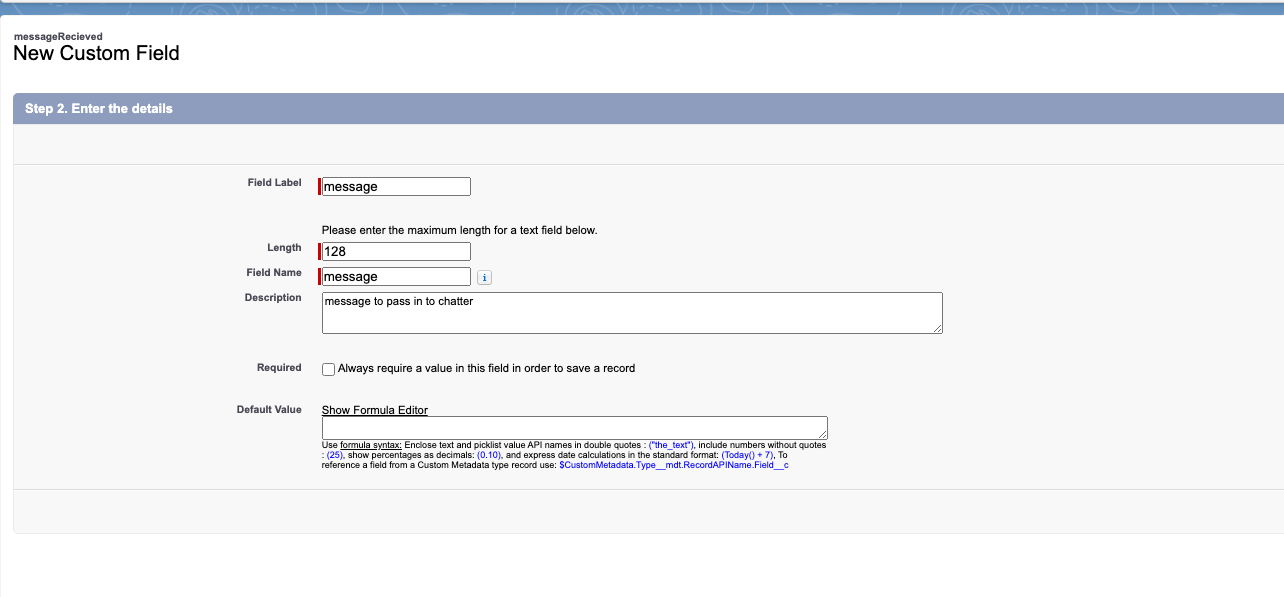
- Save the custom field. Repeat the process for
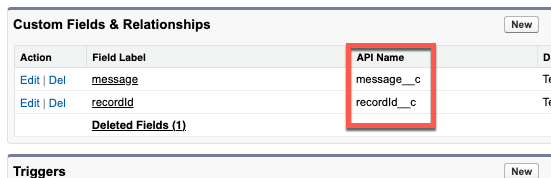
recordId - Once the Custom Fields are created, you will see the API Name that gets generated from the custom fields. These will be used as a part of the Apex trigger and also the Airkit event
Creating the Apex Trigger to write to Chatter
- Create a new Apex Trigger and paste in the following snippet:
trigger CreateMessage on messageRecieved__e (after insert) {
 List<FeedItem> itemsToSave = new List<FeedItem>();
    for(messageRecieved__e ev: trigger.new) {
        FeedItem item = new FeedItem();
        item.ParentId = ev.recordId__c;
        item.Body = ev.message__c;
        itemsToSave.add(item);
    }
    insert itemsToSave;
}
Some specific callouts:
messageRecieved__eis the Platform event API name created.message__cis the message custom field API namerecordId__cis the record custom field API name
- Save the Apex Trigger

Setting up the Outbound Event in Airkit
Configuring the config API
- Navigate to Triggers > App APIs > config endpoint
- Edit the transform data operation that is currently setting the
appUrlandsdkConfigto include the platform event that was created
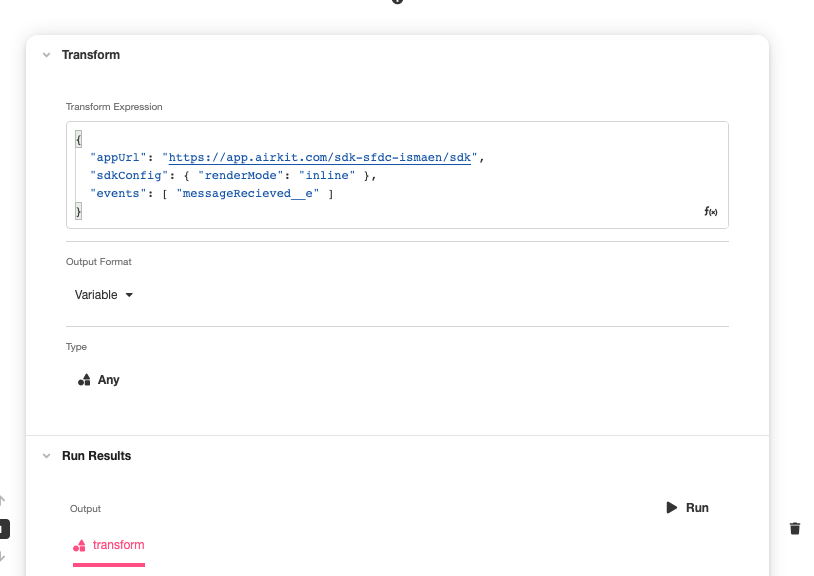
{
  "appUrl": "https://app.airkit.com/sdk-sfdc-ismaen/sdk",
  "sdkConfig": { "renderMode": "inline" },
  "events": [ "messageRecieved__e" ]
}
Configuring the Embedded Outgoing Event
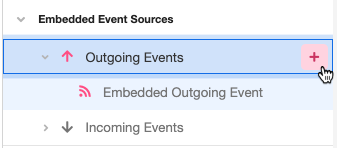
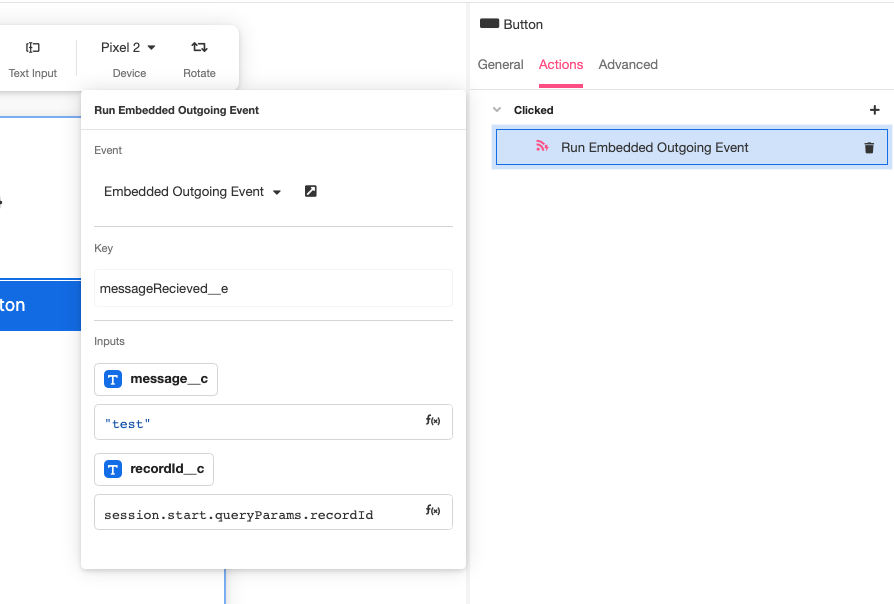
- Navigate to the studio and go to Connections > Outgoing Events > Create new Outgoing event
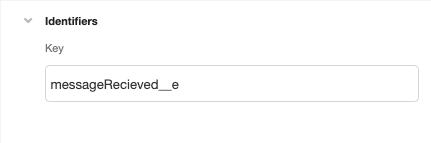
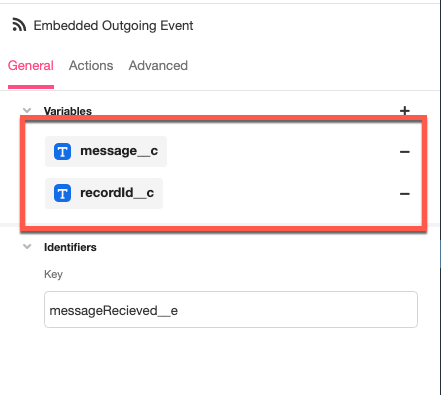
- Click on the event created and add in the Platform Event API name into the Identifiers > Key property
- Then add the variables that map to the custom fields that were created. The names of the variables should correspond to the custom field API Names
- After publishing, you can run this event on any action chain such as a button and pass in values into the inputs to write data from Airkit to the Chatter feed!
Updated 4 months ago