Collecting Contact Information
Part II - Collect contact info and initialize Actor
In Part I, we established what app we were going to build. Now, we're going to establish the Web Flows associated with that app, build out the UI associated with capturing user information, and then apply that information so that we can send users outgoing messages later on.
Establishing the Web Flows
Create a new, blank app from the Console and open it in the Studio to start building. When you first access the app, you’ll land on Web Flows Builder.
You can create new Web Flows by clicking on the '+' icon to the right of Web Flows in the Tree:

Create three new Web Flows and rename them as follows:
- "Capture Customer Info"
- "Schedule Appointment"
- "Collect Feedback"
Building the Capture Customer Info Form
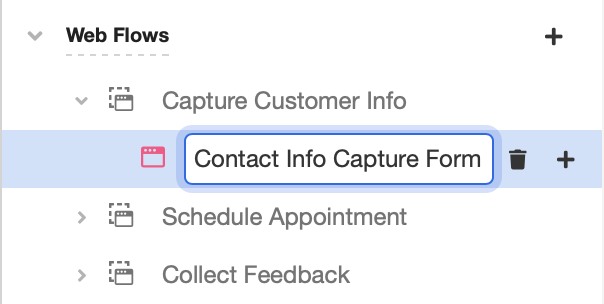
- The Capture Customer Info Web Flow comes with a Web Page already nested underneath. Rename this Web Page "Collect Info Capture Form":
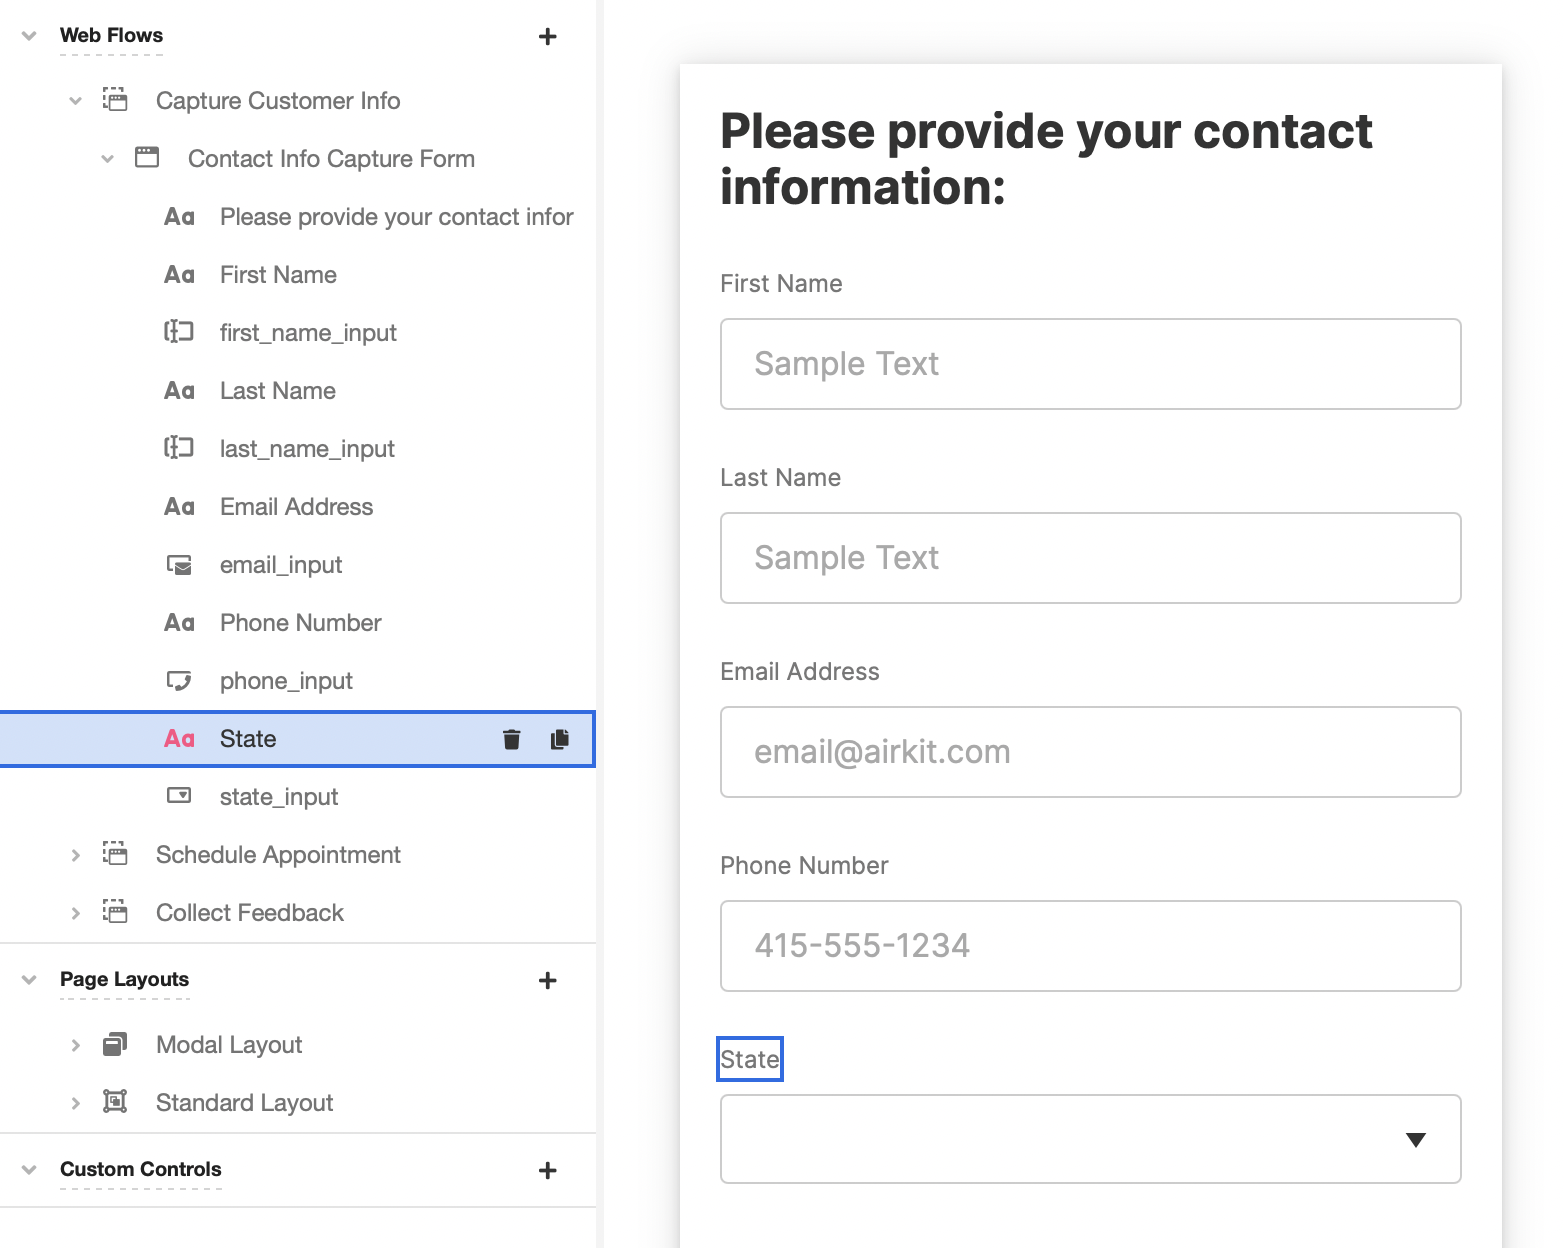
- Add the following Web Controls to the Contact Info Capture Form, in this order:
- Label Control (Variant:headerMedium)
- Change text to: "Please provide your contact information"
- Label Control (Variant:inputLabel)
- Change text to: "First Name"
- Text Input Control
- Change data binding to:
first_name_input
- Change data binding to:
- Label Control (Variant:inputLabel)
- Change text to: "Last Name"
- Text Input Control
- Change data binding to:
last_name_input
- Change data binding to:
- Label Control (Variant:inputLabel)
- Change text to: "Email Address"
- Email Input Control
- Keep data binding as
email_input
- Keep data binding as
- Label Control (Variant:inputLabel)
- Change text to: "Phone Number"
- Phone Input Control
- Keep data binding as
phone_input
- Keep data binding as
The end result should look as follows:

If you want review the fundamentals of Web Controls or Variants, review Building a Contact Form.
- To enforce TCPA compliance when we send text messages to users later on, we're going to need to collect information on what state the user lives in. Add two more Web Controls:
- Label Control (Variant:inputLabel)
- Change text to: "State"
- Dropdown List Control
- Change data binding to
state_input
- Change data binding to
What is TCPA compliance and why does it require collecting a user's state?
TCPA (Telephone Consumer Protection Act) is a series of US legislation that dictates limitations on how automated systems can reach out to customers over phone and SMS. Some TCPA regulations are federal, but states can impose their own requirements, meaning that the rules dictating how phone and SMS messages can be automated vary from state to state. You need to know what state a user lives in before you can send them TCPA-compliant messages.
For more on TCPA regulations, see TCPA.
- With the State Dropdown List still selected, go to the General tab. In Type of List, choose Custom Expression. Under Data, paste the following List to populate the dropdown options:
["AK", "AL", "AR", "AZ", "CA", "CO", "CT", "DC", "DE", "FL", "GA", "HI", "IA", "ID", "IL", "IN", "KS", "KS", "KY", "LA", "MA", "MD", "ME", "MI", "MN", "MO", "MS", "MT", "NC", "ND", "NE", "NH", "NJ", "NM", "NV", "NV", "NY", "OH", "OK", "OR", "PA", "RI", "SC", "SD", "TN", "TX", "US", "UT", "VA", "VT", "WA", "WI", "WV", "WY"]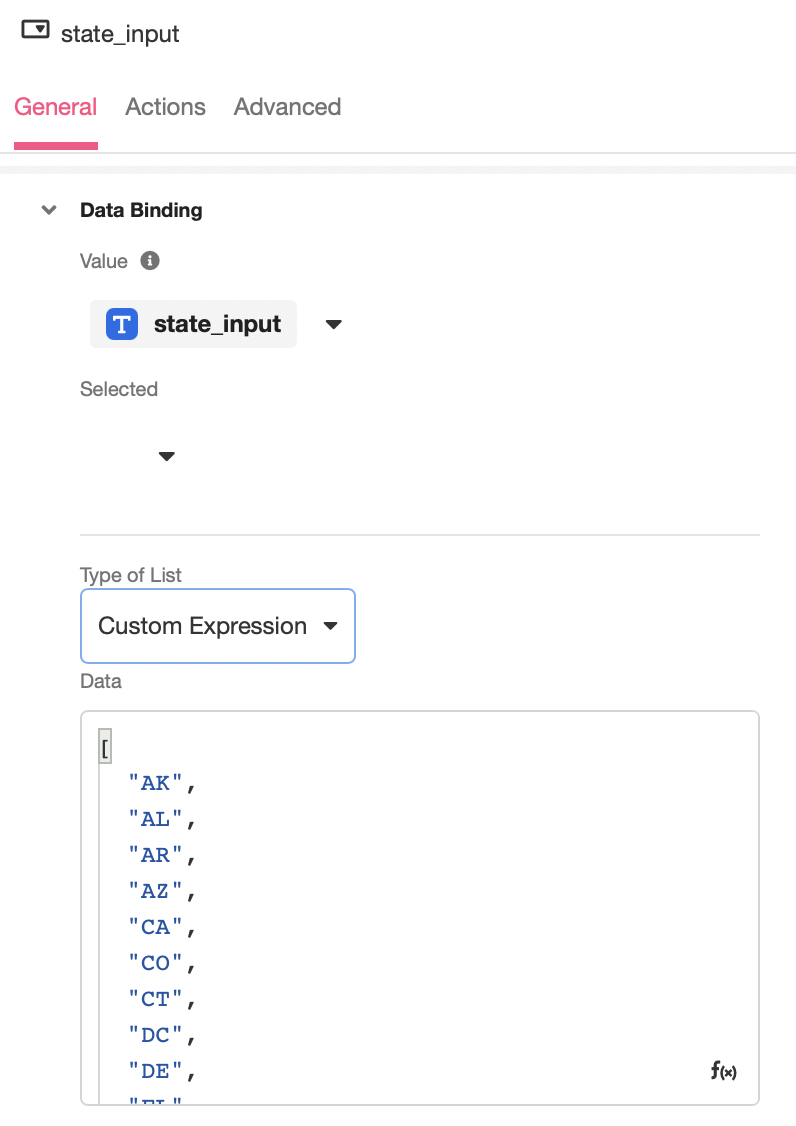
Each item in the List represents a state in the US and will be available for selection in the associated dropdown menu.
Do the states need to be designated by their State Abbreviation Key, as they are in this List?
When designating a user's state (or region, as it is described in the Identity Object), the designation will only be Airkit-parsable if it is described in the correct format. To this end, States/Regions must be described by their State/Province Abbreviation Key.
We'll see how this works in practice later in this tutorial, but if you want to read more about region designation now, you can find a deeper dive into the subject in TCPA.
- Add one more Web Control to the bottom of your Contact Info Form Captured Web Page:
- Button Control (Variant:default)
- Change text to: "Continue"

- Save the app.
Creating the App Object
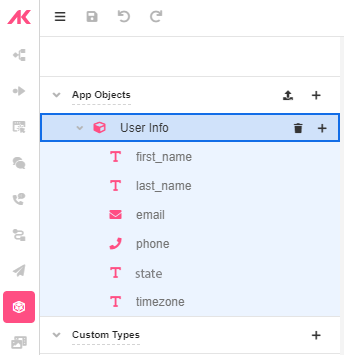
Go to AirData Builder and create a User Info App Object with the following fields to store the captured information:
first_nameVariable of TypeTextlast_nameVariable of TypeTextemailVariable of TypeEmailphoneVariable of TypePhonestateVariable of TypeTexttimezoneVariable of TypeText
Then save the app and confirm all changes this will make to the Datastore.
Creating the Data Flow
In order to save information into the AirData Object we just made, the next step is to create a Data Flow that can save information to AirData.
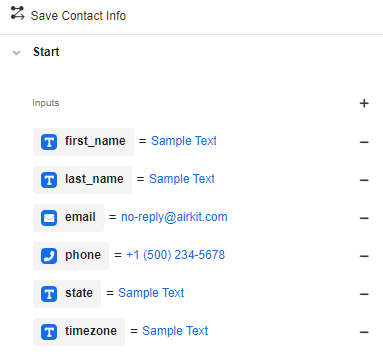
- Go to Connections Builder and create a Data Flow from scratch. Rename it to “Save Contact Info”.
- Then, in Start, add the following:
first_nameVariable of TypeTextlast_nameVariable of TypeTextemailVariable of TypeEmailphoneVariable of TypePhonestateVariable of TypeTexttimezoneVariable of TypeText
-
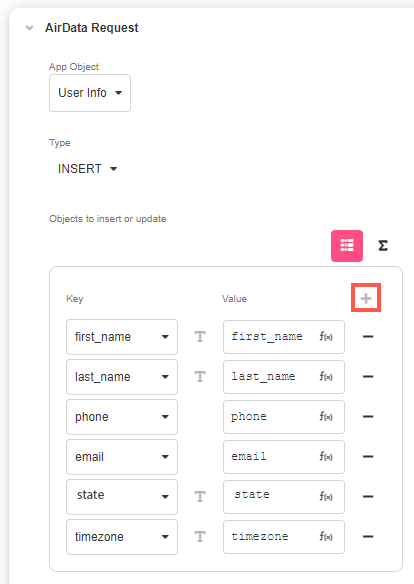
Click on the ‘+’ icon between the Start and End sections of the Stage and add an AirData Request Data Operation.
- In App Object, select the User Info App Object we have just created
- For Type select INSERT
- In Objects to Insert or Update, enter the Keys one by one by clicking on the ‘+’ icon and match each Key with their corresponding Variable:
- In Run Results, click on the Run button to ensure that your Data Flow runs.
- Save the app.
Saving Input and Initializing the Actor
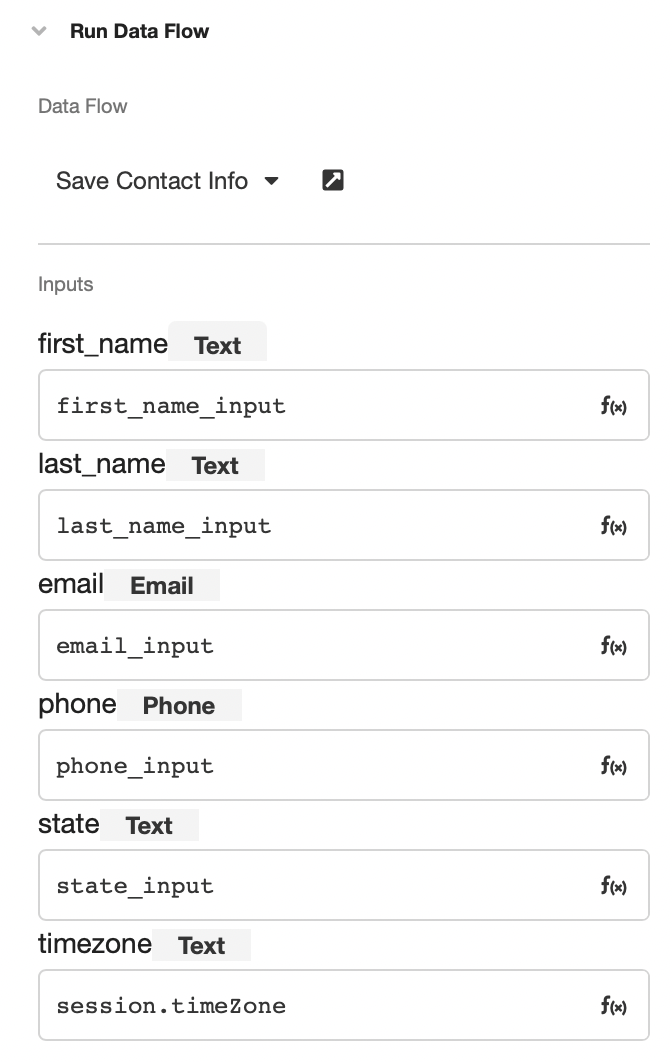
- Return to the Web Flows Builder and Inspect the Continue Button in the Contact Info Capture Form Web Page. In the Actions tab of the Inspector, add a Run Data Flow Action and select the Save Contact Info Data Flow to run. Use the variables given to the Contact Info Captured Event as Web Flow input.
first_name=first_name_inputlast_name=last_name_inputemail=email_inputphone=phone_inputstate=state_inputtimezone=session.timeZone
Where did session.Timezone come from?
session.timeZone is an automatically collected and managed global variable. For more on what data is automatically collected and managed, see Standard Journey Data.
Like all global variables, session.timeZone is referenced by referring to the Session namespace.
- In order to send Notifications to users, we need to initialize the Actor.
What is the Actor and why does it need to be initialized?
An Actor represents someone who goes on an Airkit Journey. They can be identified by their phone numbers and their email addresses, because they serve as unique properties that are tied directly to the app user.
Out of the box, Actors are structured such that the Actor namespace has the following properties:
- first_name (
string) - the Actor's first name. - last_name (
string) - the Actor's last name. - full_name (
string) - the Actor's full name. - email (
string) - the Actor's email address. This cans serve as a unique identifier. - phone (
string) - the Actor's phone number. This can serve as a unique identifier. - timezone (
string) - the Actor's timezone. Timezones must be described by their TZ database names, or the Actor will not parse them as meaningful timezones. - region (
string) - the Actor's region. Regions must be described by their State/Province Abbreviation Key, or the Actor will not parse them as meaningful regions. - calendar_restriction (
string, Availability Schedule Key) - defines when Notifications can and cannot be sent to the Actor from the Journey Builder. For the sake of TCPA compliance, this value is automatically generated out of timezone and region when applicable.- Availability Schedule Keys are made in the Schedules Builder. For more on how to conceptualize calendar restrictions, see Using Availability Schedules.
You can use dot notation when referencing a property within the Actor namespace. For instance, to reference the Actor's phone number, access actor.phone wherever Airscript is accepted.
Variables saved in the Actor namespace are just that: locally-stored variables. They do not automatically establish communication channels any more than other locally-stored variables do.
In order to automatically parse and establish communication channels, relevant Actor properties must be copied into Airkit's actor_internal database. This is what is done in the process of Initializing the Actor. Once an Actor has been initialized with a value for actor.phone, it will send all outgoing calls and SMS messages to that phone number.
For more on Actors and the process of initializing them, see Actors.
To begin the process of Actor initialization, let’s set a few Variables with the data from the form into the actor namespace.
Staying in the Actions tab associated with the Contact Info Captured Event, add six Set Variable Actions:
actor.first_nameas Variable andfirst_name_inputas Valueactor.last_nameas Variable andlast_name_inputas Valueactor.phoneas Variable andphone_inputas Valueactor.emailas Variable andemail_inputas Valueactor.regionas Variable andstate_inputas Valueactor.time_zoneas Variable andsession.Timezoneas Value

- Add an Initialize Actor Action.

You've now finished building the first Web Flow of your Journey. Not only does it collect contact information from users and save it to AirData, this Web Flow also uses the collected information to initialize the Actor. This will have powerful implications later on, when we program our application to send automated messages.
Save your progress and get ready build out the appointment-scheduling portion of your application.

Updated 4 months ago