Saving Appointment Information
Part IV - Finalizing the Availability Schedule
In Part III, we built the Availability Schedule designating when appointments were available for selection. Now, we will tie it to the Scheduler Control in order to save the selected appointments and let users know that they were successfully selected.
Creating the Schedule object
In AirData Builder, we will create an object to store the scheduled appointments.
- Select Add Schedule and rename it to “Appointment Information”.
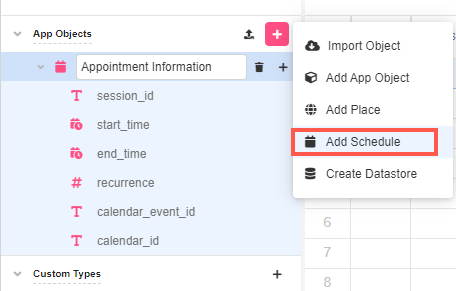
What is a Schedule in the context of AirData?
A Schedule Object is a type of App Object with a pre-defined structure intended to capture all relevant information pertaining to a scheduled appointment. Schedule Objects are used in tandem with a Scheduler Web Control; when a Schedule Object is associated with a Scheduler, all relevant information collected by users from the Scheduler will be automatically inserted into that Schedule Object in AirData.
A Schedule Object must contain the following six properties:
- session_id (
string) - indicates the Journey that the appointment is associated with. This corresponds the Session ID (designated session.id) automatically assigned as a session-level variable at the start of each Journey - start_time (
DateTime) - refers to the beginning date and time of the appointment. - end_time (
DateTime) - refers to the ending date and time of the appointment. - recurrence (
number)- indexes the block of time selected for the appointment. Count begins at 0 and on the first occurrence of a potential appointment window, as defined by the Time Slots that make up the Availability Schedule tied to the associated Scheduler Web Control. - calendar_event_id (
string) - serves as an identifier for the Time Slot (as defined in the Calendar Builder – note that this is not the same as the selected block of time which is indicated by recurrence) that defined the selected appointment block. - calendar_id (
string) - serves as an identifier for the particular instance of Schedule Web Control used to make the appointment. This becomes particularly relevant in cases a Journey contains multiple schedulers associated with the same Schedule Object.
For more on Schedules Objects, see Schedule Objects.
- Save the app and confirm all changes this will make to the Datastore.
Tying the Availability Schedule and Schedule Object to the Scheduler Control
- Go to Web Flows Builder. Navigate to the Schedule Appointment Web Page and add a Label indicating the users that appointments are in PST.

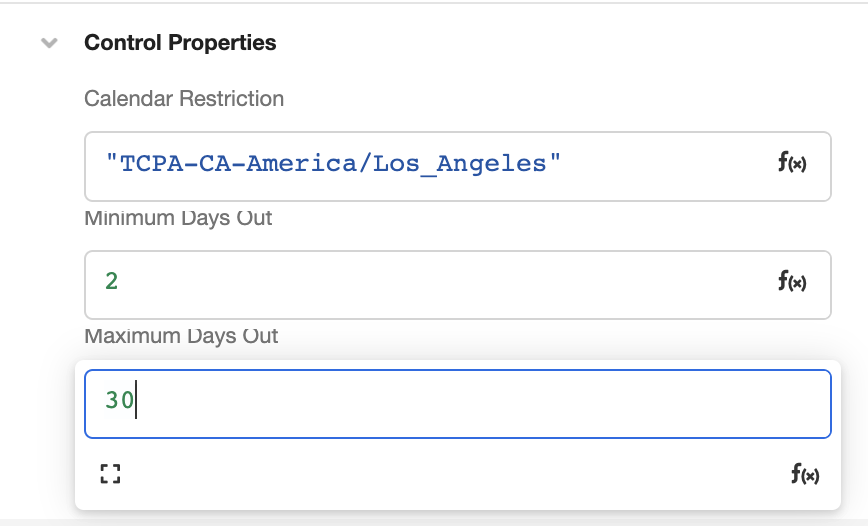
- Inspect the Scheduler Control. Under in Control Properties > Calendar Restriction, add the following Availability Schedule Key:
"TCPA-CA-America/Los_Angeles"This references an out-of-the-box Availability Schedule that encompasses all the times that California/Los Angeles TCPA regulations allow automated messages to be sent within. This accounts for local holidays, so when we reference this Availability Schedule as the Calendar Restriction, it prevents appointments from being made on these local holidays (as well as Sundays).
Availability Schedule Keys are found the in Schedules Builder, when Inspecting the Availability Schedule in question. You actually designated you own Availability Schedule Keys in the Part III of this tutorial!
Also, adjust the Maximum Days Out to fit our 30-day display of the calendar, and change Minimum Days Out to 2, preventing anyone from making a same-day or next-day appointment:
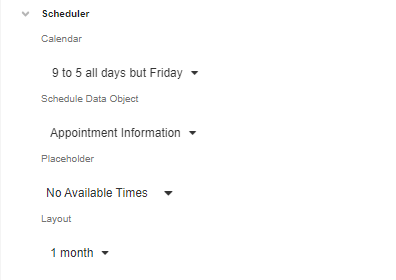
- Under Calendar, select “9 to 5 all days but Friday”. Under Schedule Data Object, select “Appointment Information”.
Save appointment information as a local variable
Tying the Scheduler Web Control to a Schedule Object automatically saves the information associated with selected appointments to AirData. Often, however, it is necessary to save this information more locally as well, so as to be able to reference it more seamlessly in the downstream Journey. To this end, we'll create a global variable to store appointment information locally.
What is the difference between saving data to AirData and saving data as a global variable?
If you're familiar with the difference between saving data to the back-end and the front-end, that's precisely the difference between saving data to AirData and saving data as a global variable.
Saving data to AirData saves it to a database. This database can be queried, but the information stored within it is not by default available to be called on with the application. There's simply too much information stored in databases, and storing all that information so that it's readily available at all times wouldn't be very secure. To use data from Airdata within an application, you need to query AirData first, then save the returned information to a local variable.
Global variables are a type of local variable. They can be referenced within the application without needing to query anything, because they are stored locally.
- Open the Variables Tree by clicking the Variables button at the bottom left of the Studio. Create a global variable of type
objectthat matches the structure of Appointment Information. Name this variableappointment.

- Back In Web Flows Builder, with the Scheduler Control selected, go to the Actions tab in the Inspector and add a Set Variable Action passing defining the newly-made global variable
session.appointmentasvalue.

Why does this global variable need to be referenced using the Session namespace when most of the previous variables we used could leave their namespace implied?
The Session namespace must be used to reference all global variables. This prevents bugs from arising should a global variable and a smaller-scope variable be assigned the same base name.
What does value refer to?
Some Control Events – such as the Value Changed Event associated with the Scheduler Web Control – have associated values. This information can be accessed within the associated Action Chain by referencing event.value or simply value, as Action Chains within Events implicitly default to referencing the Event namespace.
The format of the information stored in event.value changes depending on the nature of the Event, but in the case of the Scheduler Web Controls, its formatted according to the associated Schedule Object.
For more on Control Events, see Control Events.
- Add a Navigate to Web Page Action so that once an appointment time is selected, users are led to a Web Page the confirms their appointment time. Click on Add Web Page to do so:

Building the Thank You Web Page
-
Go to the new Web Page and rename it to “Thank You”. Then add two Labels. In the first one, type the message to the user, for example: "Thank you for scheduling your appointment!"
-
In the second one, enter the following appointment confirmation string:
"Your appointment is at {{
FORMAT_DATETIME(
session.appointment
 .start_time,
 "h:mm A z on MMMM Do, YYYY",
 "en-US",
 actor.time_zone
 )
}}
."
This string confirms the selected appointment time by referencing the DateTime saved as session.appointment.start_time. It also utilizes the Airscript function FORMAT_DATETIME in tandem with the previously-set variable actor.time_zone to display the appointment time in the user's own timezone.
You've now finalized the Scheduler Web Control so that it saves the information associated with each selected appointment, both in AirData and locally. You've also used that information to customize the copy associated with a Label.
Save your progress and get ready to schedule some Notifications to send based on each user's selected appointment time.

Updated 3 months ago