Automating Proactive Follow-Up
Chapter VI - Creating a Follow-Up Notification
In Part V, scheduled a TCPA-compliant Notification to remind users of their upcoming appointment. Now, we will create and schedule another Notification that will be sent if and only if a user submits their contact information but doesn't schedule their appointment within the 24 hours.
Creating the follow-up Notification
- In Notifications Builder, create a second SMS Notification and rename it to “Schedule Appointment”.

-
Add a text reminding the user to schedule the appointment and personalize the message by referencing their first name name (saved as
actor.first_name) in an Airscript Expression. -
Click on the ‘+’ sign below the message and add a separate Link to Journey. This will direct the user back to the web app, wherever they left off:

Precisely what is link is being sent in the Link to Journey text?
The links sent in Link to Journey SMS messages are Journey Links. A Journey Link leads to the most recently accessed Web Page within an existing Journey. It is capable of doing so because it contains a unique Journey identifier in the URL path.
For a deeper dive into how to conceptualize and use Journey Links, see Linking to Sessions.
Why send this link as a separate text message?
Most apps that process and display SMS messages come with a previewing functionality that displays a thumbnail of the associated web page when a link is sent. However, in order to do so, the link usually has to be sent as its own isolated SMS message. In sending this link as a separate text message, we're making it easier for the end user to see a preview of the application before clicking on the link, ultimately resulting in a better use experience.
Setting the Notification’s timer
-
In Web Flows Builder, go to the Capture Customer Info Web Page. With the Continue Button Control selected, go to the Actions tab in the Inspector and add a Start Timer Action. Complete it as follows:
- Change the key to “follow-up”
- Set a 1-day execution time after the timer is triggered

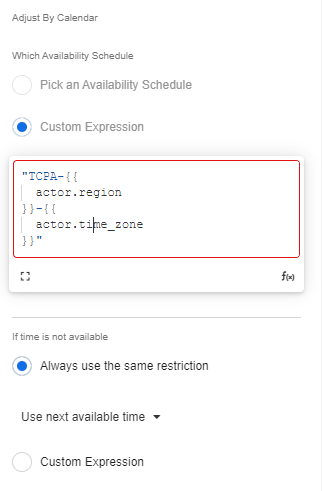
- To remain TCPA compliant, in Which Availability Schedule > Custom Expression, add the following Availability Schedule Key:
"TCPA-{{actor.region}}-{{actor.time_zone}}"- In If time is not available select the Use next available time option.
- Under the Start Timer Action, add a Send SMS Action and select the Schedule Appointment Notification.

- Save the app. You have now scheduled the "Schedule Appointment" Notification to send 1 day after the user submits their contact information, assuming that lands at a TCPA-compliant time. If not, the follow-up text will be sent a little more than a day after, the soonest TCPA compliance allows.
Canceling the follow-up Notification when unnecessary
In cases where users schedule their appointment shortly after submitting their contact information, there's no need to send them a reminder message. Upon the selection of an appointment time, then, we should cancel the scheduled reminder.
- Go to the Scheduler Control in the Schedule Appointment Web Page. In the Actions tab of the Inspector, add a Stop Timer Action.
- Enter the key "follow-up" to cancel the timer.

- Save the app
Previewing the follow-up timer
Let's go to App Preview to test the progress we have built so far.
-
After emulating submitting our contact information, click on the Timers tab to see the timers that are available at that stage of the Journey.
-
Select the timer you want to test and, from Actions, click on Activate Scheduled Trigger. By doing so, the timer will be triggered even though it is not yet the designated execution time.

- Go back to the Device tab and click on the chat icon at the bottom to see the Notification's message.
You've now automated the process of following up with users who begin the process of signing up for an appointment without selecting an appointment time. Next, we're going to build out the last step of the Journey: collecting feedback after the appointment is over.

Updated 4 months ago