Subscriptions (Web Hooks)
Inbound Requests with Subscriptions (web hooks)
Subscriptions are a mechanism that allows Airkit apps to catch information sent by external systems as a consequence of an action taken by the external system rather than the Airkit app. They come configured with two of Airkit's first-part integrations: Zendesk and Salesforce.
For example, say you want to build an Airkit app that automates some of the follow-up process whenever a new lead is added to Salesforce. Using the Salesforce Subscription allows your Airkit app to catch the information Salesforce sends whenever a new lead is added, allowing the Airkit app to respond promptly and appropriately.
Subscriptions can only be used to catch information from Zendesk and Salesforce. To catch information from other external systems, you will need to configure an App API that expects POST requests in the corresponding format.
In this document, we'll walk through the process of setting up a Salesforce Subscription. A Zendesk Subscription can be configured with a similar methodology.
Setting up a Subscription
In this example, we'll be setting up a subscription to Salesforce whenever a Lead is added.
- Before creating a subscription, set up a connection to Salesforce and then add the integration to your Airkit Application. Once connected, go to Settings and add the Salesforce adapter in Integrations. Click on +New and then Adapters, and select Salesforce.

- Select the Credential associated with Salesforce that you would like to use and Save. This will enable your app to use the Salesforce integrations when creating a Subscription.

- Go to Triggers Builder and click on the '+' icon next to Subscriptions in the Tree to add a Salesforce subscription.
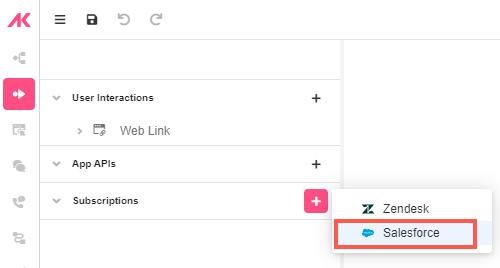
- Select a webhook category. For this example, we'll be starting a Journey when a new record is added.

- Choose an Object Type. This example will be using the Lead object type.

After selecting the Object Type, you can define what happens after a lead is added by configuring the journey mapping.
Configuring the Journey Mapping
If you have created an API for your Airkit App, then the journey mapping configuration may look familiar.
Sample Payload
This is a sample so you can use to know how to build your request. After expanding the Sample Payload, you can hit the Play button to see what that payload would look like.
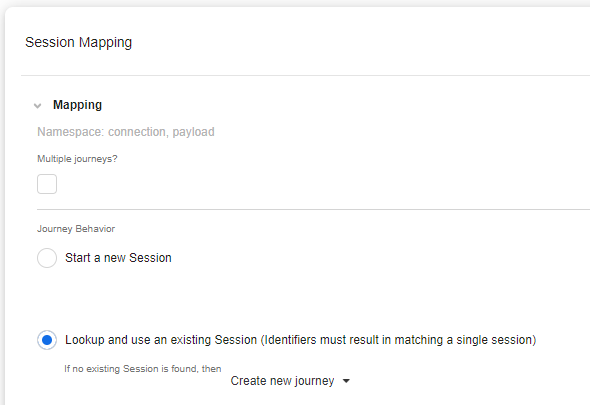
Mapping
The mapping section is where you can specify what happens once your subscription receives an event. For example, when a lead gets added into salesforce, you can:
- Start a new journey
- Replace a current journey
- Abort a journey if a match is found
- Lookup and use an existing journey
Start Parameters

Start parameters is where you can pass any type of data that is available from your subscription to the journey to session.start. Start parameters are only applicable when your Journey Behavior is 'Start or Create a new Journey'.
session.startSession Identifier Expression

The journey identifier expression is where you can map an identifier on a session from a piece of data out of the payload or connection namespace. For example, if there was a specific Salesforce ID that came out of the request payload, you could then use that Salesforce ID as the journey identifier. You are given the options of what type the identifier is as well -- Text, Journey ID, or Phone.
Journey Event Payload

Journey event payload is where you can pass data from your subscription into the event namespace.
For example, if you pass
payload.resultinto the Journey event payload, then on your subscription event, you can access the data via
event.property_nameResponse
This is where you can define what your subscription will return after the actions are executed.
Response Status is where you can perform validation using Airscript to have your subscription return a particular response status code. This example checks to see if the Phone property is empty, and returns a 200 if it is not empty.
.png)
Response Body is the response from the subscription. The response body accepts data from the metadata, payload, and connection namespace.
How Publishing an App subscribes and unsubscribes from an external webhook
When publishing an app, the subscription (web hook) is set on the external system. So when creating the subscription, the subscription has not actually been registered yet until the app has been published. Alternatively, when the app is unpublished, the web hook is unset from the external system.
Updated 4 months ago