Building the Form’s UI
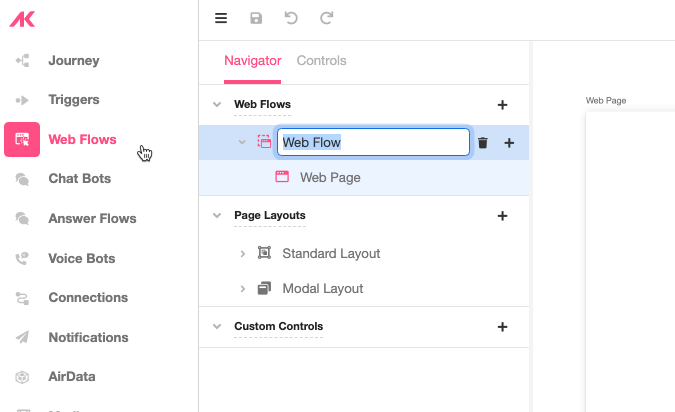
In Web Flows Builder you’ll find the Web Flow you initially created. This will be the Form that users will be directed to upon starting their Journey. Now let's build out the UI that will be contained in that Web Flow.
Working with Web Flow level Variables
- Rename the Web Flow to “Form” by double clicking on the Web Flow in the Tree.
- Click on Variables at the bottom of the screen and in Activity Group Variables, click on the ‘+’ icon. Select the Variable of Type Object that you have created before.
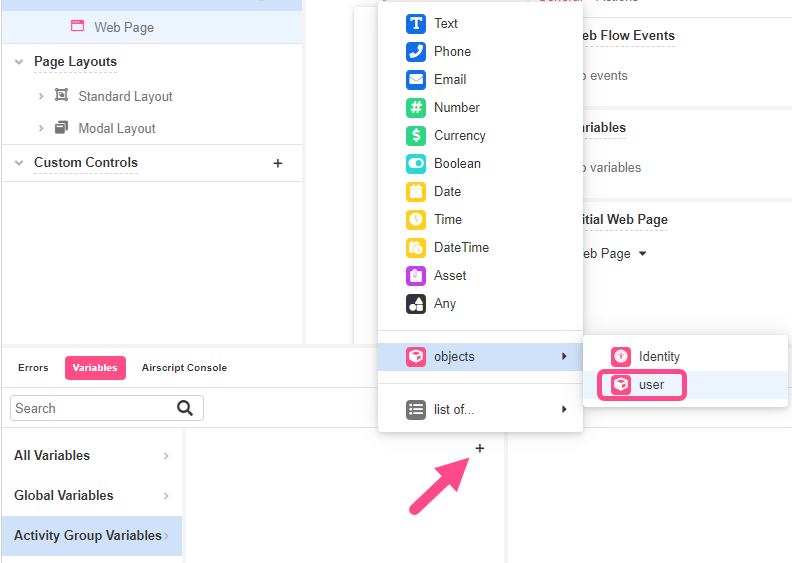
- Change its name to “user_input”. Make sure Form is selected when creating this Variable.
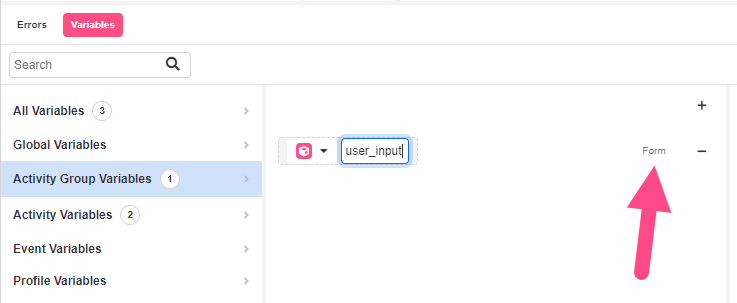
This way, the user Variable of Type Object will be now available at a Web Flow level. This means that it can be called from any of this Web Flow’s Web Pages.
Building the Web Pages
This Form Web Flow will include three Web Pages: a Personal Info Web Page, an Additional Info Web Page, and a Review Web Page.
Personal Info Web Page
- Rename the nested Web Page to "Personal Info" by double clicking on it.
- Add a Container and rename it to “Title”.
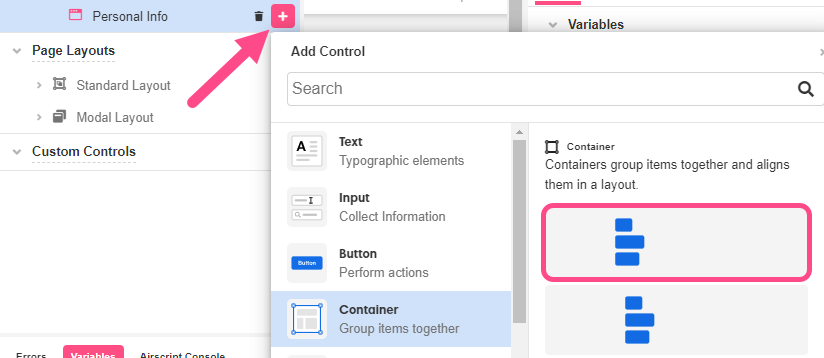
Containers help with the organization of the Form by grouping controls and can be styled to distribute them or make them sit side by side.
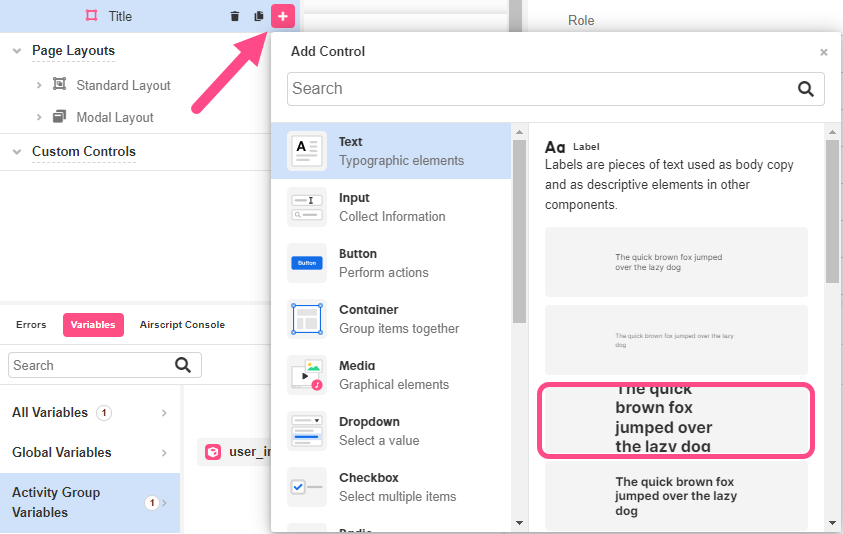
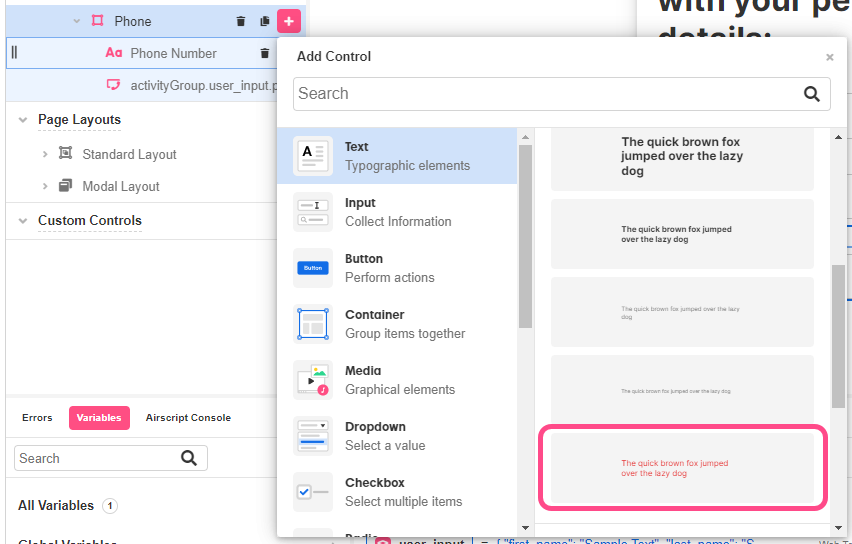
- Nest a Label by clicking on the ‘+’ icon next to the Container.
-
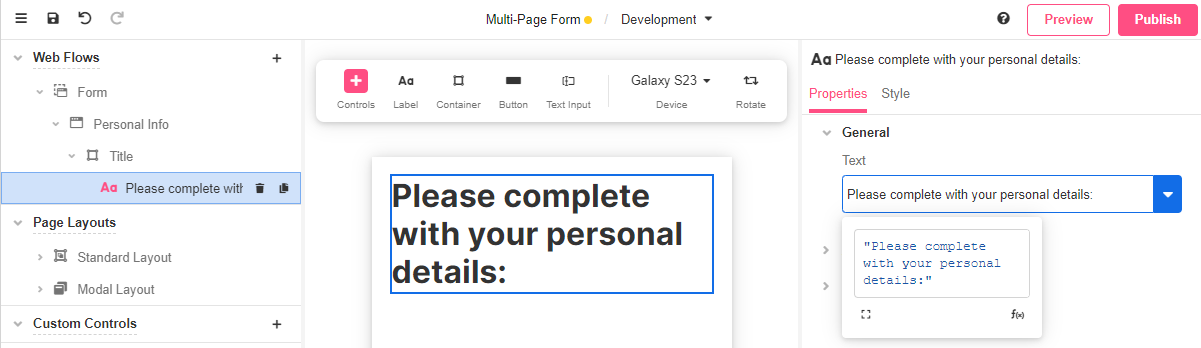
With the Label selected, go to the Properties tab of the Inspector, and in Text, enter the Form’s title: "Please complete with your personal details:"
-
Add another Container and rename it to “Name”. Add a Label and a Text Input Control nested underneath.

- With the Text Input Control selected, go to the Inspector section and, in Data Binding, under Value, change the auto generated Variable. In order to tie it to the
userVariable of Type Object we have created before, enter:
activityGroup.user_input.first_name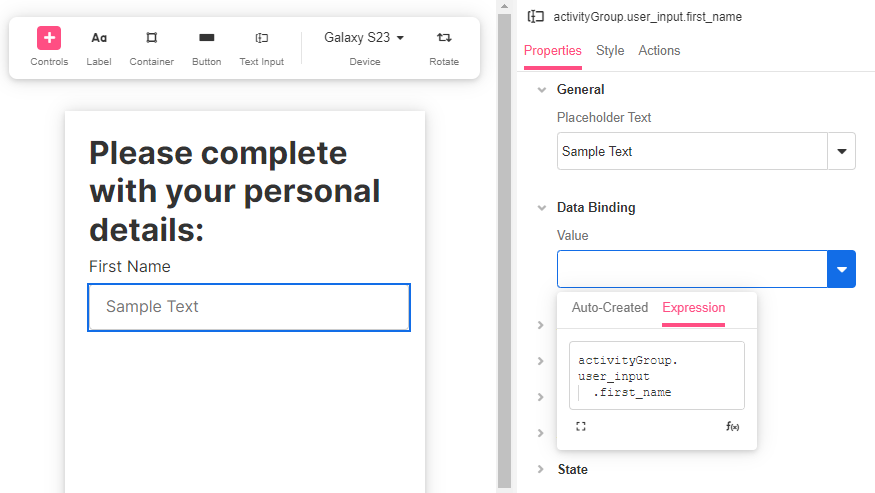
This way, the value the user enters in this field, will be bound to the App Object in AirData later on.
Why use the activityGroup namespace?
Using the corresponding Variable Namespace is a best practice to make sure Variable work in the scope we need. For example, the namespace corresponding to the Web Flow scope, is called by using activityGroup before the Variable name.
Each scope includes the ones below, that is to say, if working with a Variable at a Web Flow level, it will also be available in all Web Pages, but it won’t be available globally to use on a different Web Flow.
Check the table below:
| Variable scope | Namespace |
|---|---|
| Global | session.value |
| Web Flow | activityGroup.value |
| Web Page | activity.value |
- Duplicate the previous container and rename it to “Last Name”. Change the Label to “Last name” as well.
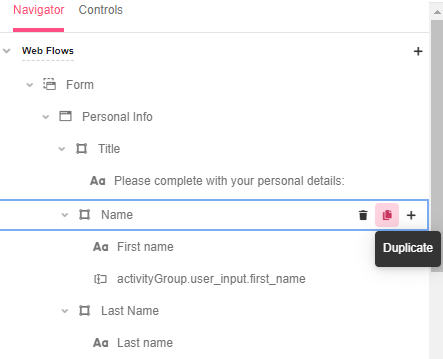
- With the Text Input Control for Last Name selected, in Data Binding enter the following:
activityGroup.user_input.last_name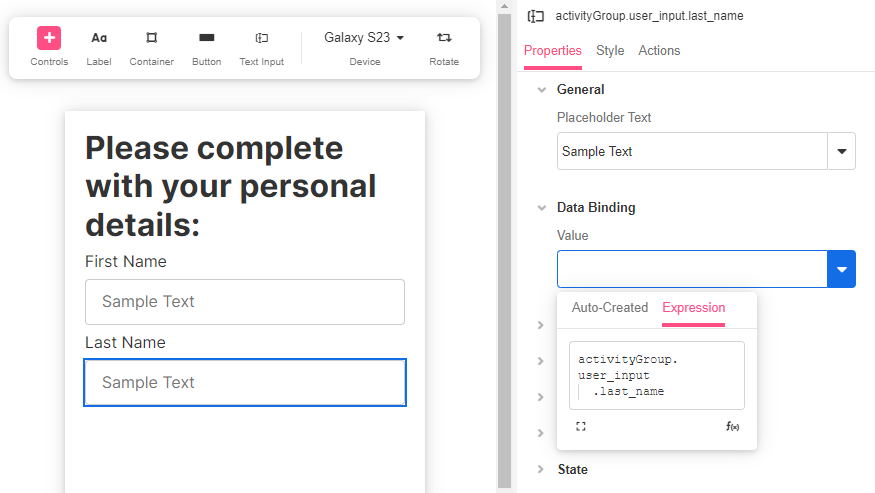
-
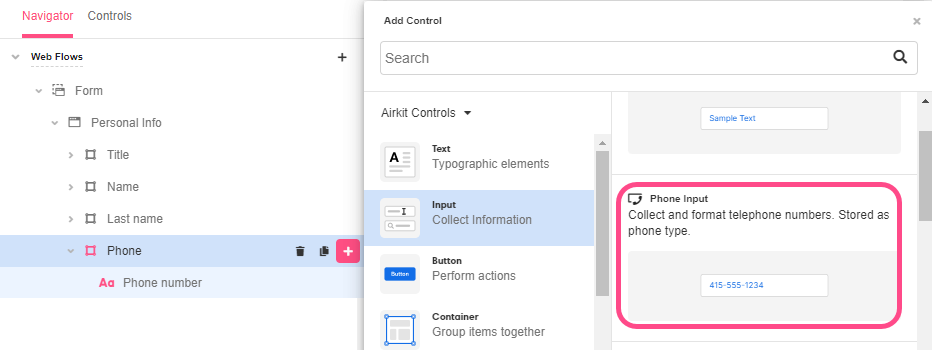
Duplicate the previous Container and rename it to “Phone number”. Rename the Label to “Phone”.
-
Delete the Text Input and add a Phone Input Control.
-
In Data Binding enter the following:
activityGroup.user_input.phone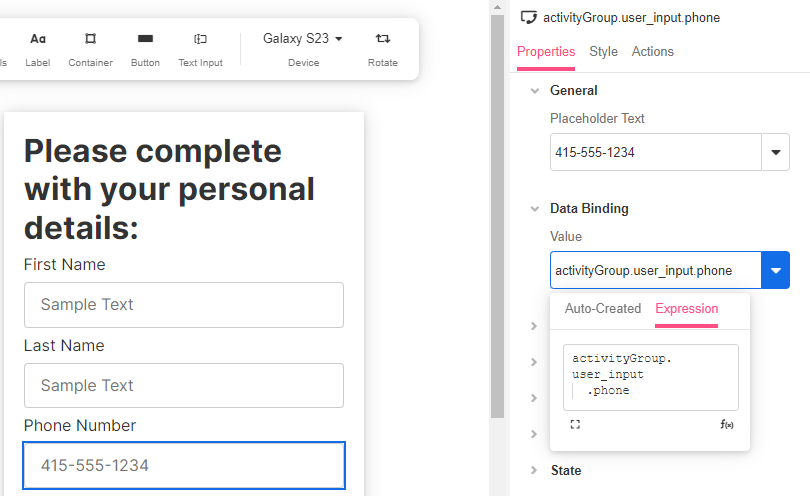
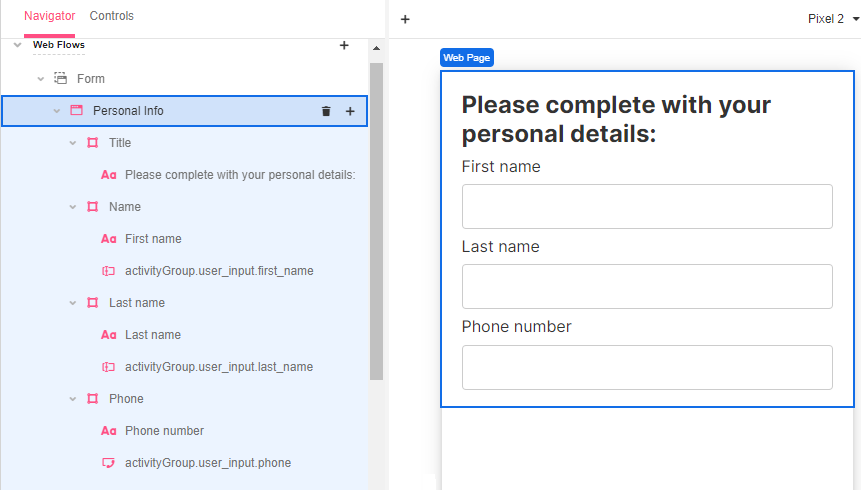
This is how the Web Page should look like so far:
Add Validation to your Web Page
- Add a Label Control to type the following error message: “
Phone number cannot be empty.” Use the "+" icon to add a control next to the phone Container name, and select Text. Scroll down the text style options and select theerrorTextstyle.
You can also use the Inspector section by selecting the label and going to Style > Variant, to change the Variant for the anerrorTextstyle.
- Go to the Properties tab and under the section State > Is Visible, set up the ISEMPTY Expression so that this error message displays only when the Phone field is incomplete:
ISEMPTY(activityGroup.user_input.phone)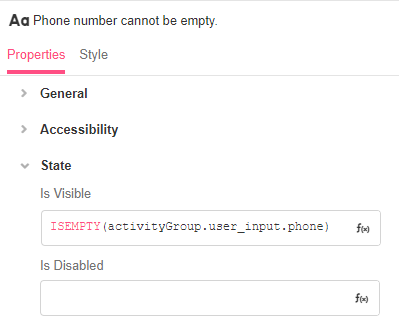
Why use the ISEMPTY function?
In this case, the ISEMPTY function allows you to confirm whether the user completed a required field, hence stopping them from advancing until the information is entered. On the other hand, this function works in tandem with the Phone Input Web Control ensuring that the numbers entered are actually a valid phone number.
-
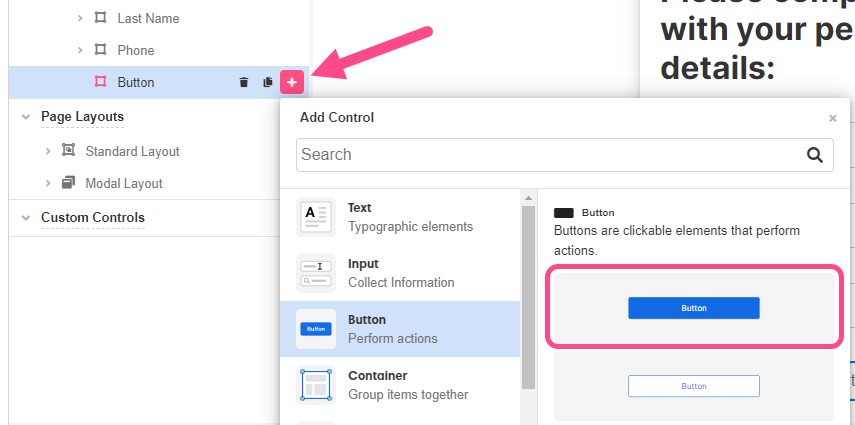
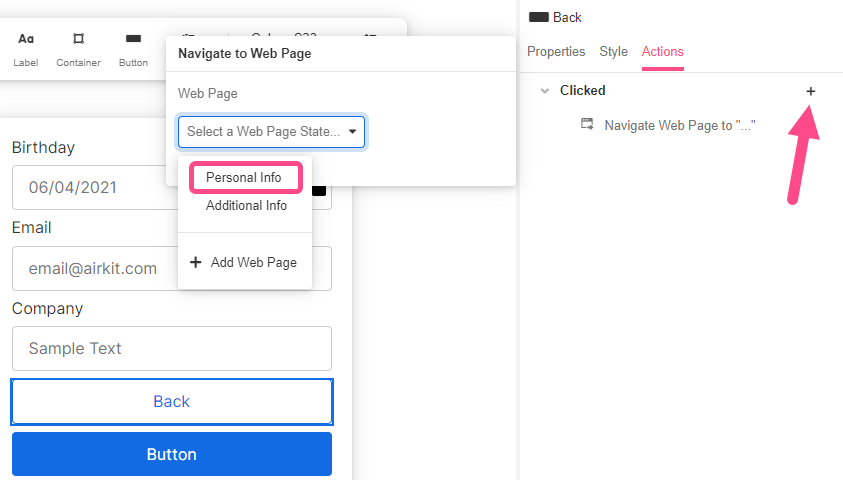
Add a Container and nest a Button Control underneath. Rename it to “Next”.
-
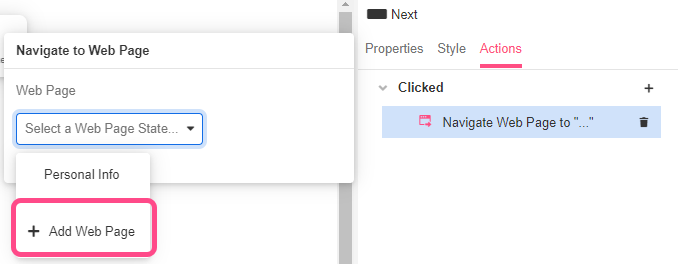
Go to the Actions tab in the Inspector section and add a Navigate to Web Page Action. Select Add Web Page.
- Save the app
Additional Info Web Page
- Rename the new Web Page to "Additional Info" by double clicking on it.
- Add a Container and rename it to “Birthday”. Add a Label and a Date Input Control nested underneath.

- With the Date Input Control selected, go to the Inspector section and, in Data Binding, change the auto generated Variable to:
activityGroup.user_input.birthday
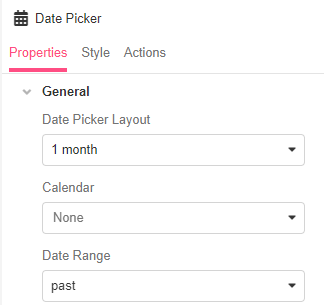
Date Input Controls contain a Date Pîcker subcontrol for further configuration nested under the Date Input Control in the Tree. Select it and, in the Inspector section, change the Date Picker Layout to “1 month” for a clearer calendar view. Also, set Date Range to “past” so that the user can pick their date of birth.
- Add another Container and rename it to “Email”. Add a Label, rename it to “Email” as well.
- Add a Email Input Control nested underneath. With the Email Input Control selected, go to the Inspector and, in Data Binding, enter the following:
activityGroup.user_input.email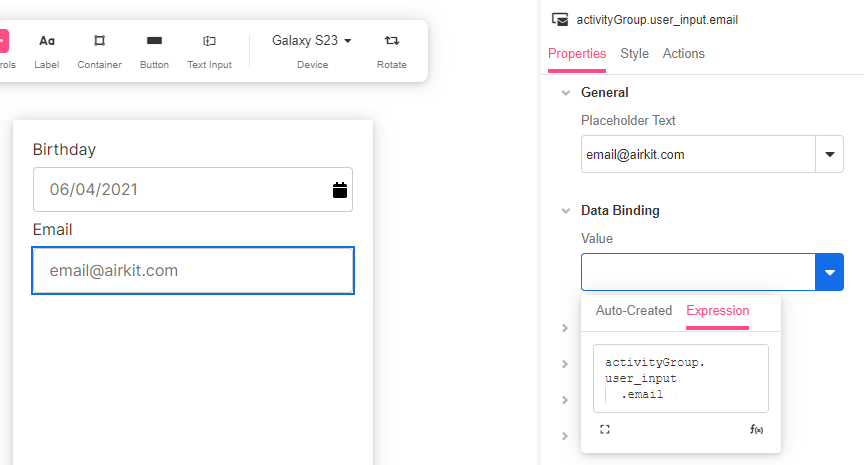
- Duplicate the previous Container and rename it to “Company”. Rename the Label to “Company”. Delete the Email Input Control and create a new Text Input Control. Select that Control and, in Data Binding, enter the following:
activityGroup.user_input.company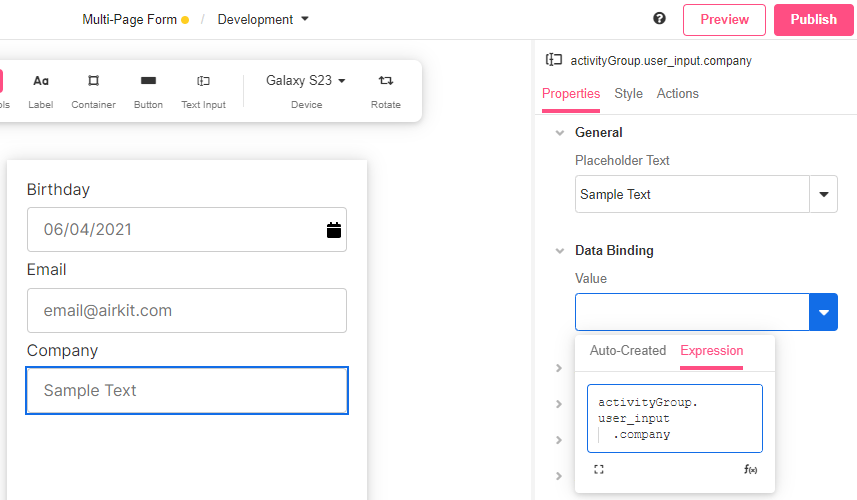
-
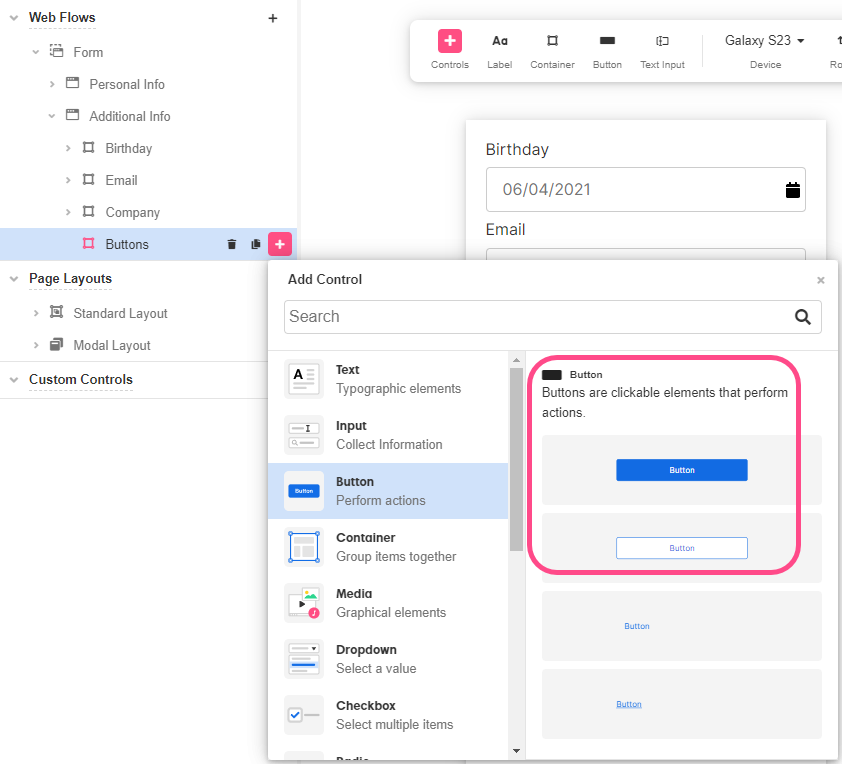
Add a Container and rename it to "Buttons".
-
Nest two Button Controls of different styles underneath.
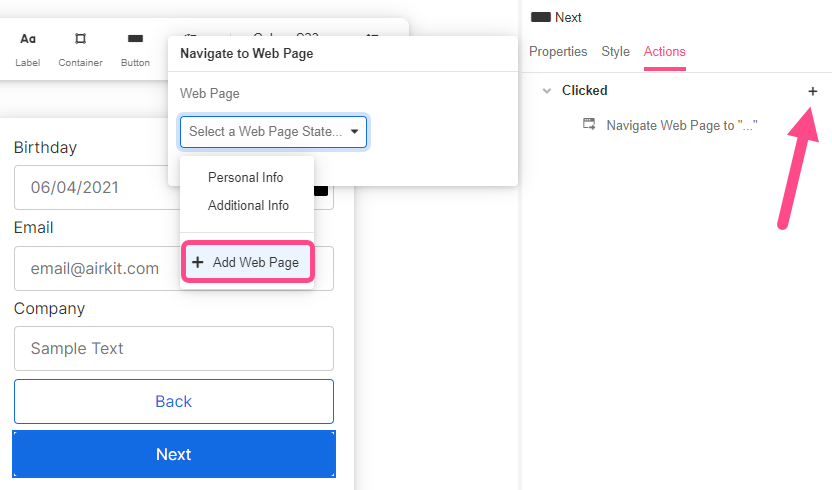
- Rename the first one to “Back”. Go to the Actions tab in the Inspector section and add a Navigate to Web Page Action. Select the “Personal Info” Web Page.
This way, if the user wants to edit a field from the previous page, can go back to it.
- Rename the second one to “Next”. Go to the Actions tab in the Inspector section and add a Navigate to Web Page Action. Select the Add Web Page option for the user to move forward.
-
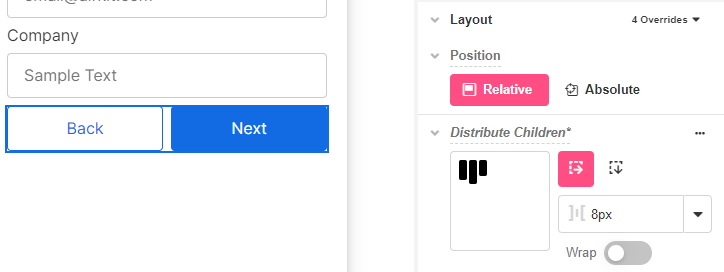
To make Button Controls sit side by side, select the Buttons Container and go to the Style tab of the Inspector section. In Layout > Distribute Children click on Stack Horizontal. You can also change the spacing to your liking, in this case, the space between the buttons is set in 8px:
-
Save the app.
Review Web Page
-
Rename the new Web Page to "Review" by double clicking on it.
-
Add a Container, rename it to "Title" and nest a Label underneath.
-
With the Label selected, go to General> Text in the Properties tab of the Inspector and add a title.
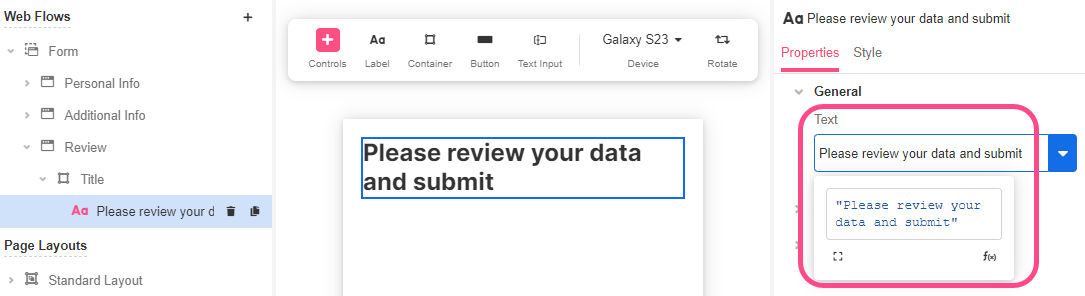
-
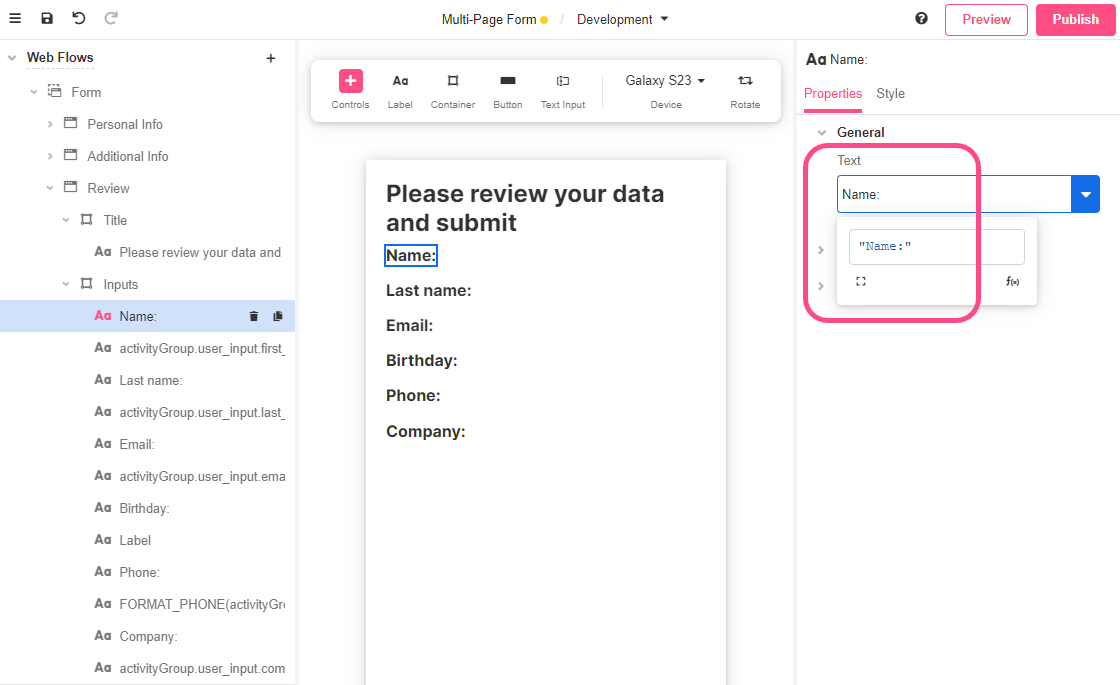
Add another Container and rename it to “Inputs”. Nest six Labels, one for each of the Input Controls you added in the previous Web Pages.
-
Select the Labels one by one and in General > Text add the following Variables to bind the Values of the Input fields:
For the fields of type Text:
activityGroup.user_input.first_nameactivityGroup.user_input.last_nameactivityGroup.user_input.emailactivityGroup.user_input.company
For the field of Type Phone add the following Expression:
FORMAT_PHONE(
activityGroup.user_input.phone,
"INTERNATIONAL"
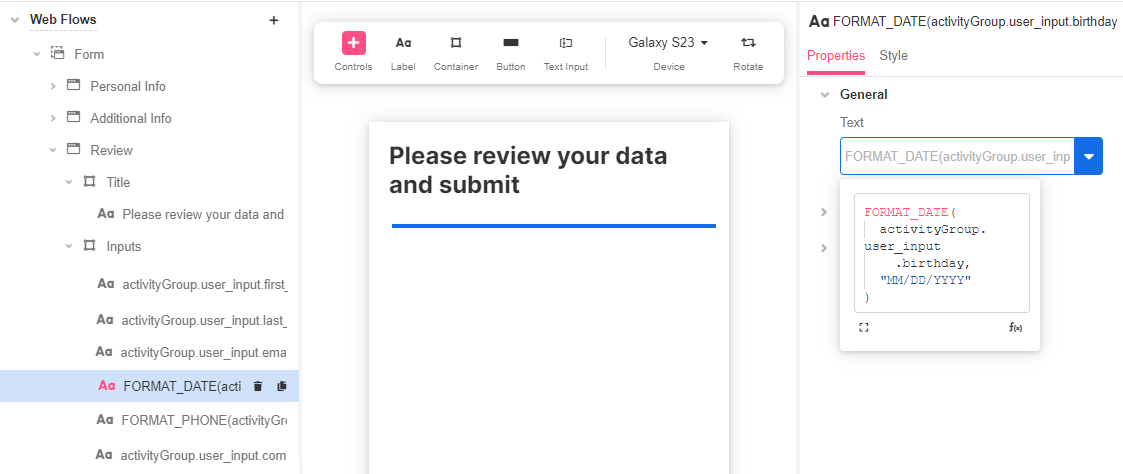
)For the of Type Date add the following Expression:
FORMAT_DATE(
  activityGroup.user_input.birthday,
  "MM/DD/YYYY"
)
Why use the FORMAT function?
The FORMAT function allows you to convert an input into a specific output format.
In this case, we are using FORMAT_PHONE to take the inputted phone number and return a string containing the same phone number but in an international format.
Also, we are using FORMAT_DATE to convert the inputted date into the desired format, in this case: MM/DD/YYYY.
You’ll notice that the Web Page looks blank, but you’ll be able to see the entered information once checking the app in the App Preview or by assigning dummy data to this Variables in the Variables Tree.
- Then add six more Labels and drag them over each of the Labels containing the Variables with the inputted data. In Text enter the name of the field so that data is displayed in a more orderly fashion once captured:
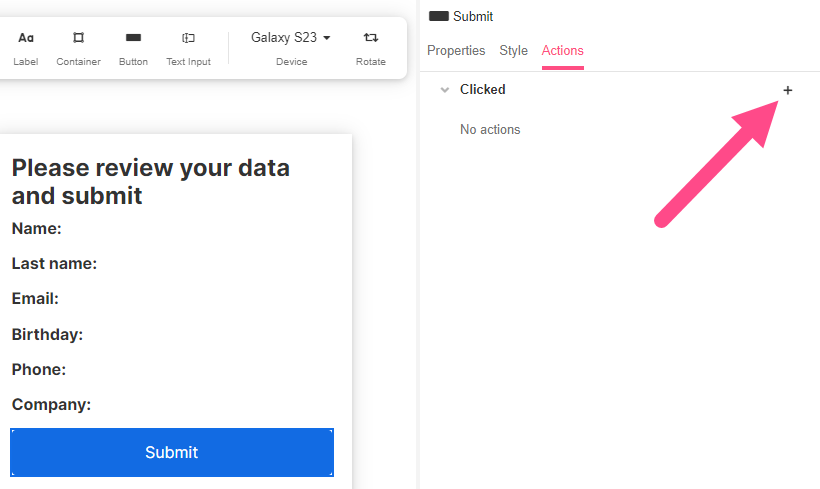
- Add a Container and nest a Button Control underneath. Rename it to “Submit”.
We are going to link two actions to our Submit button: one to submit the contact information into Airdata and another action to display a Thank you message after submitting said information.
- Click on the “Submit” button and go to the Actions tab in the Inspector and Click on the '+' icon. The Actions menu will be displayed.
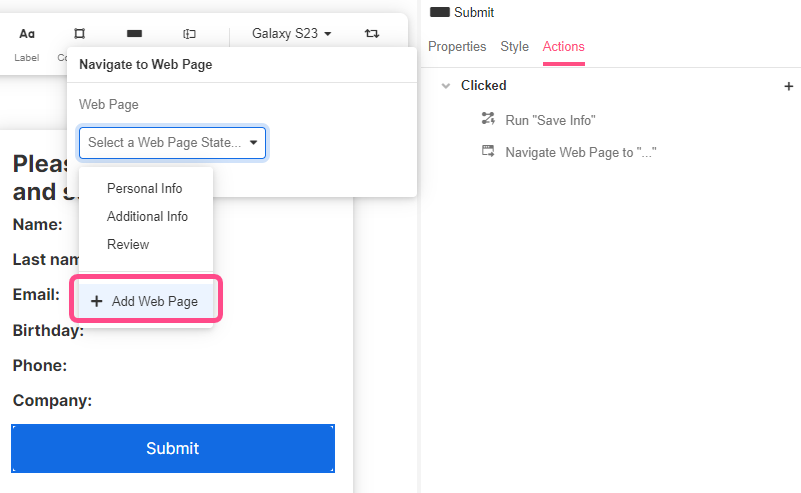
- Select the Navigate to Web Page action. Choose "+ Add Web Page", to create a new page so that users are directed there when clicking on the button.
- Rename this page as Thank you and add a label with the following text: Thank you for entering in your information!
- Go back to the Review page and select the Subtmit button. Go to the Actions tab in the Inspector and add a Run Data Flow Action.
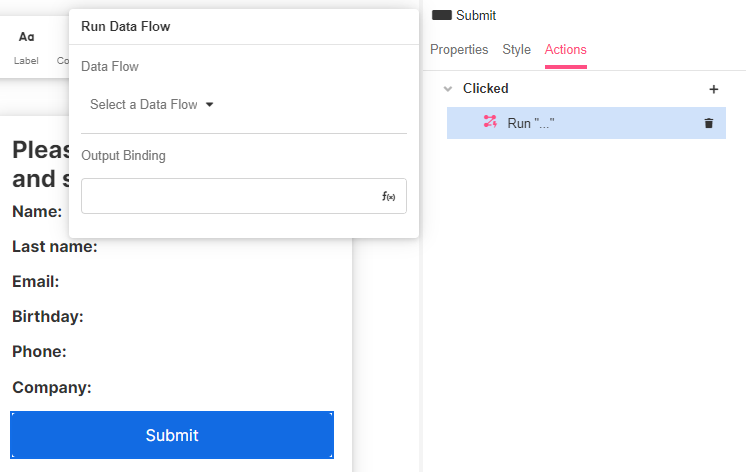
After building the Data Flow, we’ll come back here to tie it.
- Save your app.

Updated 4 months ago