Querying the Petfinder API
Part II - Building the Home Web Page
Building the Home Web Page’s UI
It's time to start building the pet adoption app’s UI. In this section, we will focus on the first Web Page.
- Toggle over to Web Flows Builder, and double click on the recently-created Web Flow to rename it to “Adopt a Pet”.
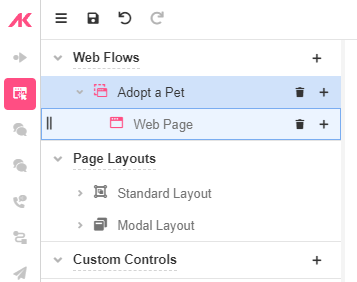
- Rename that first Web Page to "Home Web Page" and click on the ‘+’ icon next to it to add new Web Controls. First, we're going add a Label.
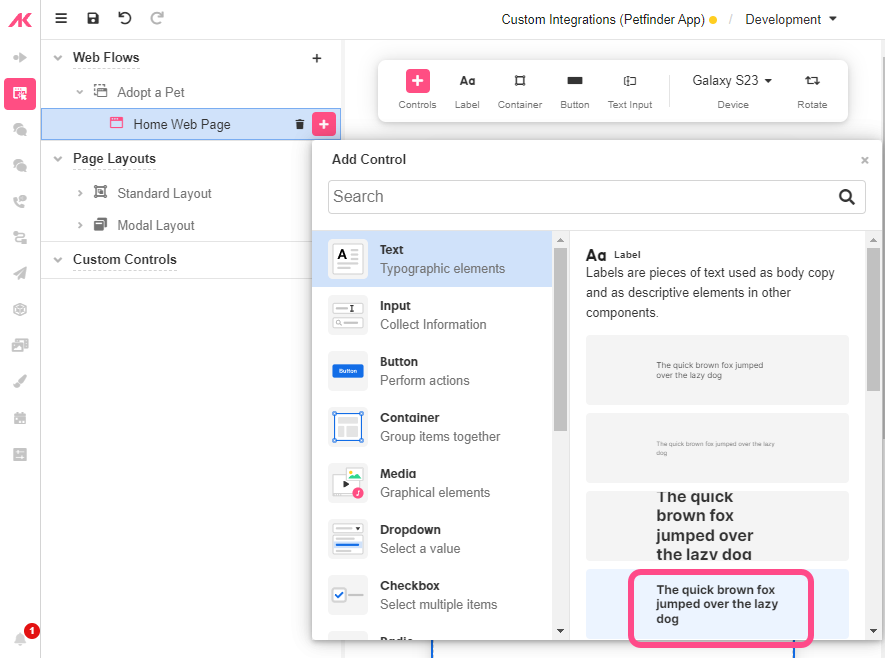
- Since the first Label will be for the title, let’s change its text to “Adopt a Pet”. In the Inspector, go to General > Control Properties > Text and change the text in the associated string.
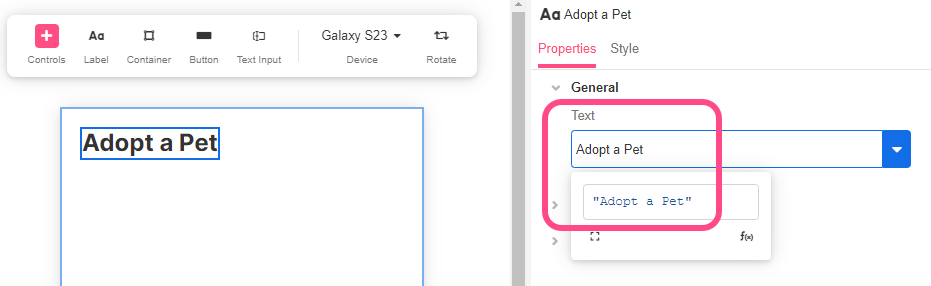
You can also change the Variant of the Label under Style > Variant.
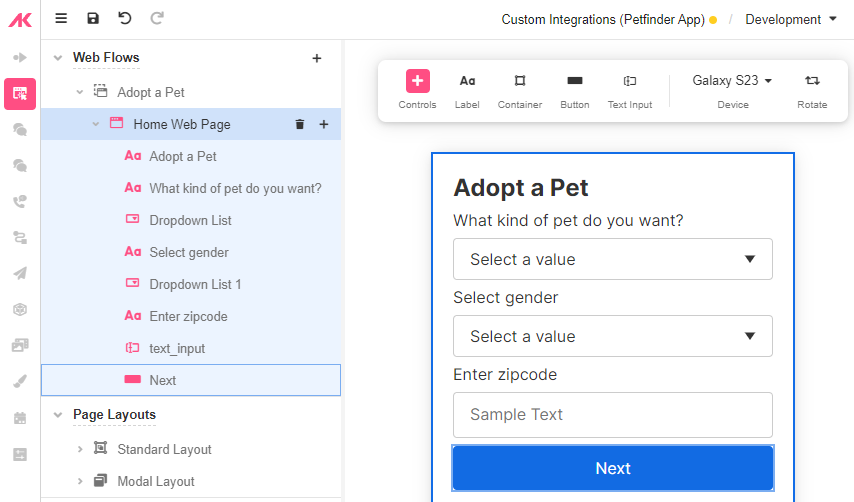
- This Web Page will include three prompts:
- The first one will be used to ask users what type of pet they're looking to adopt, so:
- Add a Label and change the text to “What type of pet do you want to adopt?”.
- Add a Dropdown List Web Control underneath.
- The second one will be used to choose the pet’s gender, so:
- Add a Label and change the text to “Select gender”.
- Add a Dropdown List Web Control underneath.
- The last one will ask users for their zipcode, so:
- Add a Label and change it to “Enter zipcode”.
- Add a Text Input Web Control underneath.
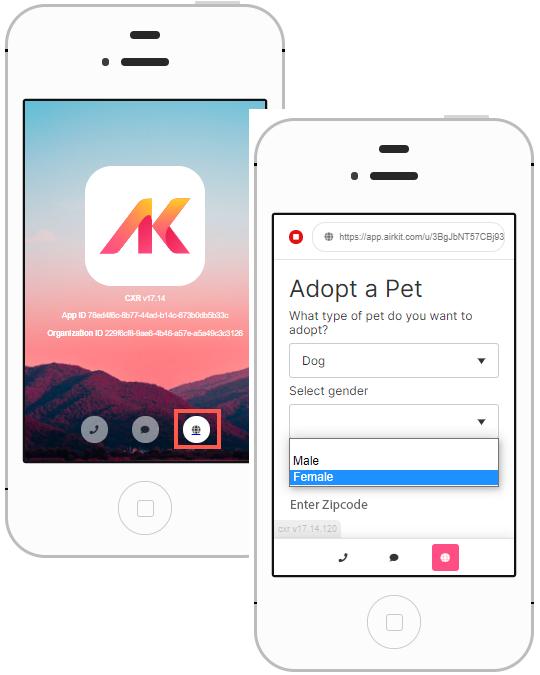
- Add a Button that reads "Next". Your Home Web Page will look something like this:
You can change the Variant of each Web Control by Inspecting the Control and selecting one of the Variant under Style > Variant.
The dropdown lists will be later populated with information from the Petfinder API.
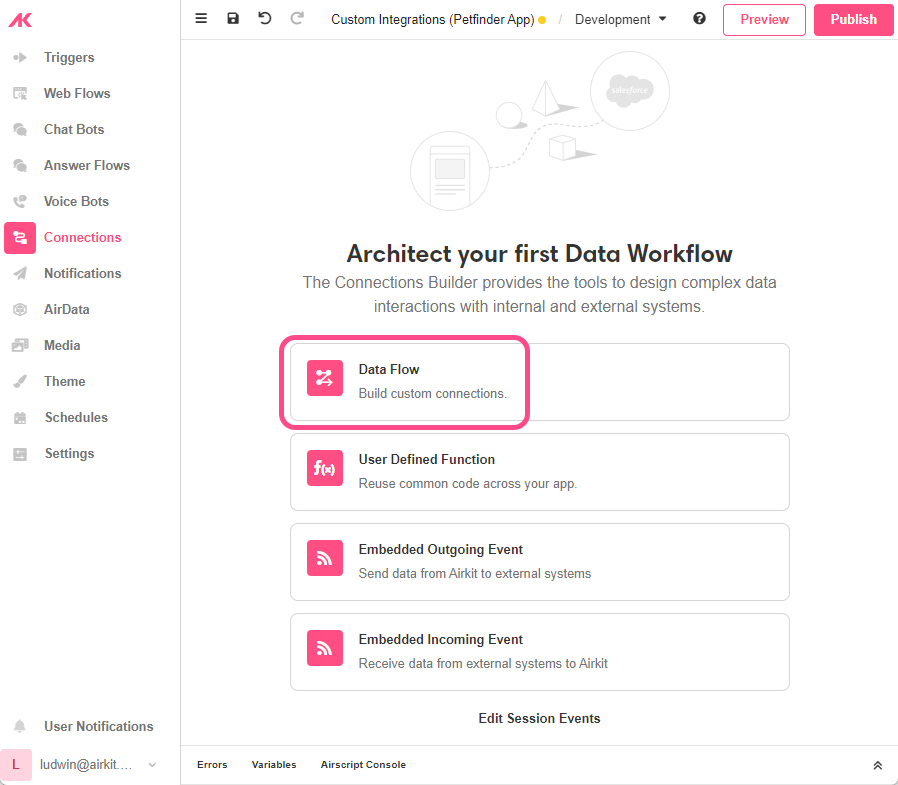
Creating a Data Flow that Queries the Petfinder API
In this section, we will create a Data Flow that returns the data we want to use to populate the Dropdown List Controls. It will do so by querying the Petfinder API.
- Toggle over to to Connections Builder and click on Data Flow to create your first Data Flow. Then select Create Blank and rename it to “Get Pet Types”.
- Click on the ‘+’ icon between the Start and End sections of the Stage. From the Data Operation options that appear, select the HTTP Request Data Operation.
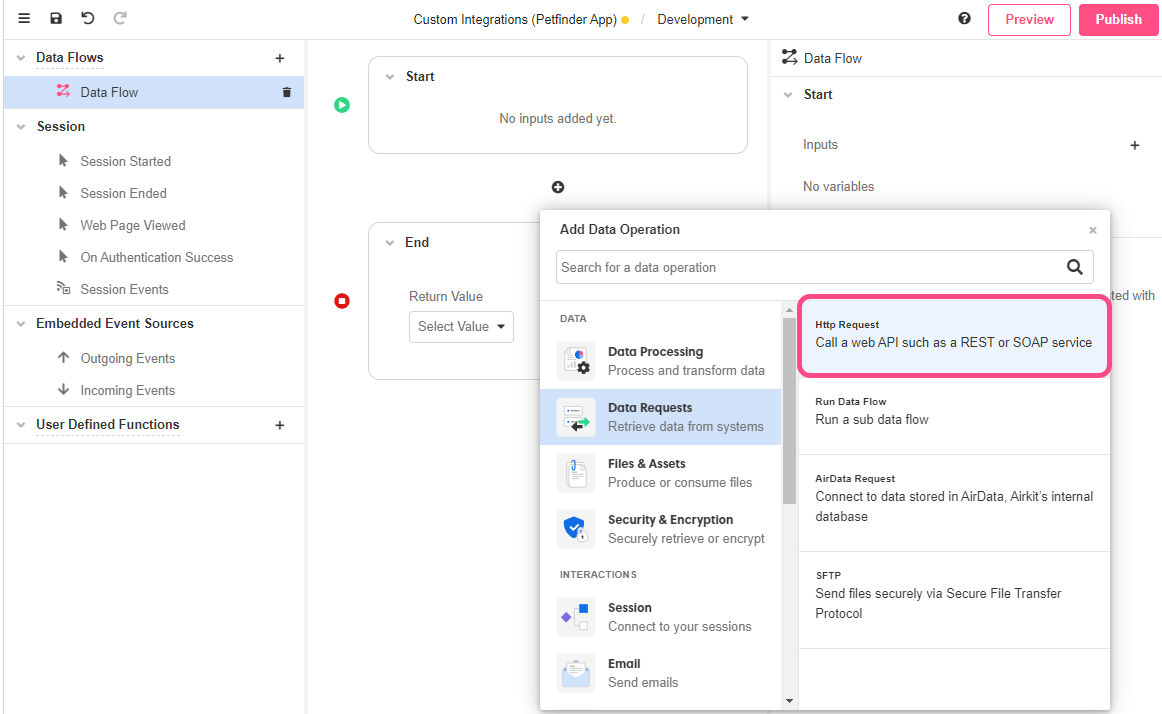
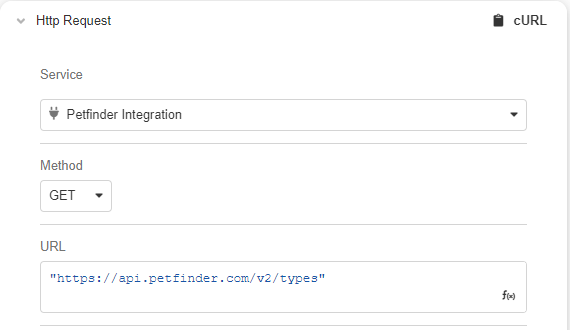
- Select the Petfinder Integration as the Source and GET as the method. Then designate "https://api.petfinder.com/v2/types" as the URL.
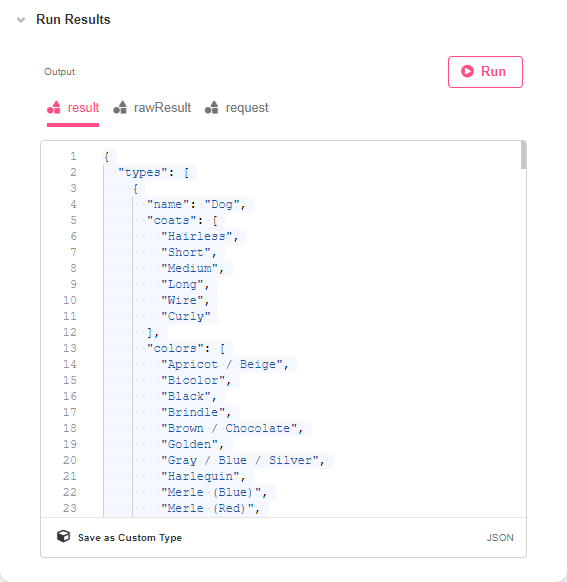
- Under Run Results, press the Run button. The Data Operation should retrieve a list of pet details:
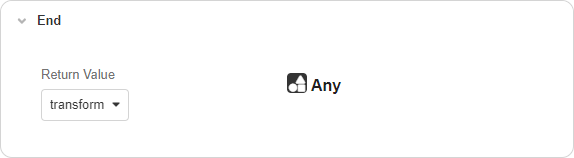
- Follow the HTTP Request Data Operation with a Transform Data Operation by clicking on the ‘+’ icon directly below. In the Transform Expression, enter:
result.types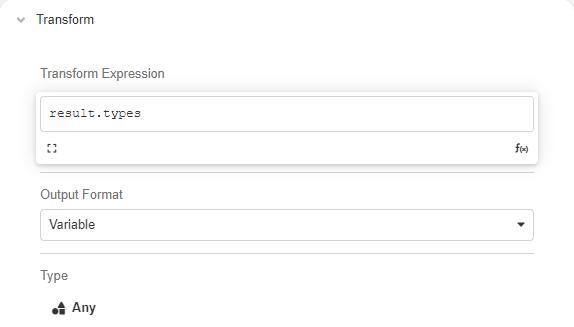
- In the End section, pass
transformas the output.
Creating the Variables
The Variable Tree is accessible in all parts of the Studio, regardless of which Builder you're in. We're going to use it now to add six Variables to our application.
-
Open the Variable Tree by clicking on the Variables button at the bottom of the Studio, to the right of the Builder Bar.
-
Click on Activity Group Variables.
-
Click on the ‘+’ icon and then select the corresponding variable type and Web Flow for each of them.
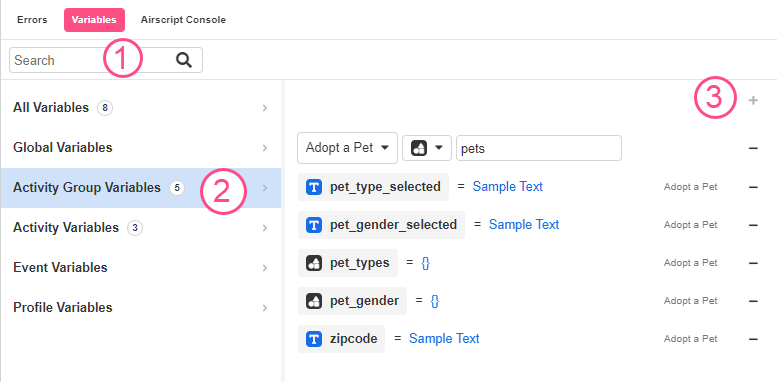
Rename them as follows:
Three Variables of type Text to be renamed as:
- pet_type_selected
- pet_gender_selected
- zipcode
Three Variables of type Any to be renamed as:
- pet_types
- pet_gender
- pets
What is an Activity Group Variable?
An Activity Group is a container of smaller Activities. A Web Page is a type of Activity, and a Web Flow is a type of Activity Group.
An Activity Group Variable is a variable that is only accessible within a particular Activity Group. An Activity Group Variable that's associated with a particular Web Flow, for instance, can only be referenced within that Web Flow. This contrasts with, for instance, global variables, which can be referenced at any point throughout a Journey.
Technically, Activity Group Variables can be accessed under the activityGroup namespace, but this is the presumed namespace by default. An Activity Group Variable designated pets can be accessed both as activityGroup.pets or simply pets, provided it's been referenced within the appropriate Activity Group.
This application flow consists of only a single Web Flow, "Adopt a Pet", and so this is the Web Flow that all these Activity Group variables will be associated with.
When you're done, Variable Tree should appear approximately as follows:
Binding Data
-
Toggle back to Web Flows Builder. Select the “Adopt a Pet” Web Flow and click on the Actions Tab in the Inspector.
-
Click on the ‘+’ icon next to Web Flow Added and select Run Data Flow from the Action options. This will run the data flow when the Web Flow is navigated to.
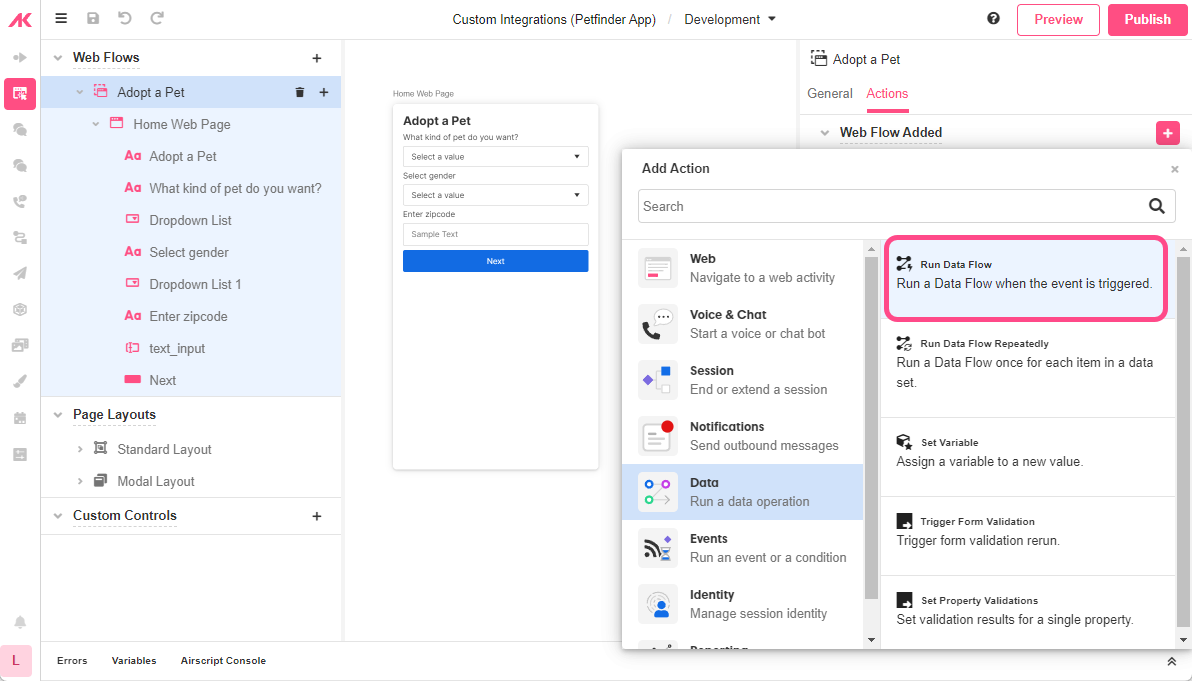
- Then choose the Get Pet Types Data Flow you created previously and bind the output to:
activityGroup.pet_types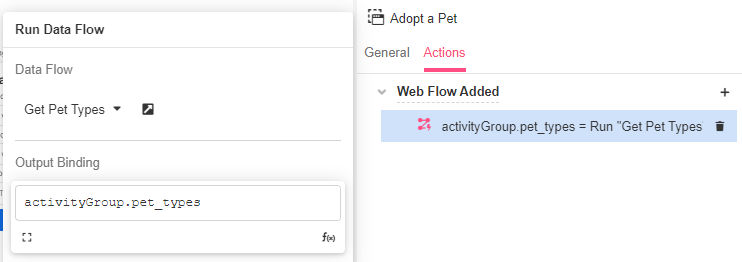
The output of the Data Flow will now be stored to the pet_types Activity Group Variable as soon as the user navigates to this Web Page.
Configuring the Home Web Page Controls
The next step is to configure the Dropdown List, Text Input, and Button Controls.
Pet type Dropdown List
- Either on the Stage or Tree section, click on the Pet Type List Dropdown List.
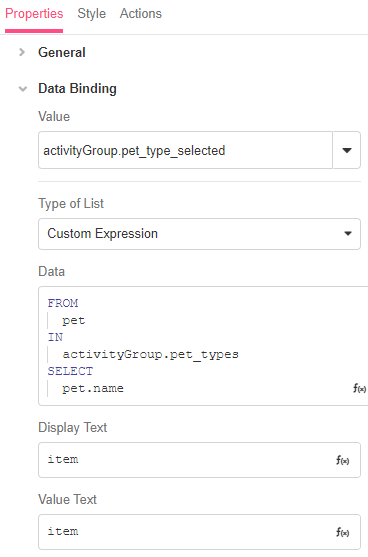
- Go to the Properties tab in the Inspector and in General > Data Binding > Value, select
activityGroup.pet_type_selected. - Then change the Type of List to Custom Expression and, under Data, add the following syntax:
FROM
  pet
IN
  activityGroup.pet_types
SELECT
pet.name- Then for both Display Text and Value Text, enter the variable
item.
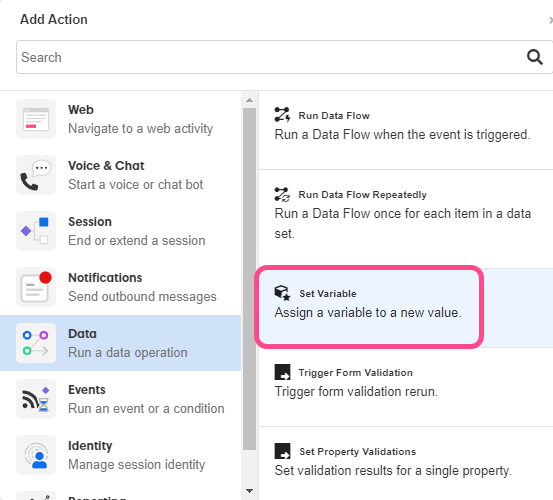
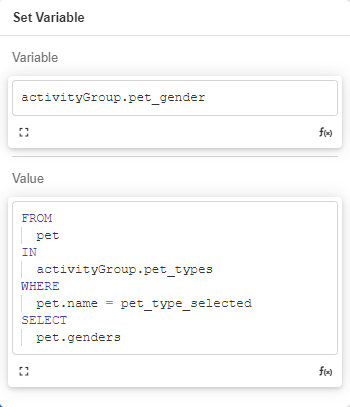
- Now go to the Actions tab and click on the ‘+’ icon next to Value Changed to add the Set Variable action from the Data options.
- Enter
activityGroup.pet_genderas the Variable and add the Value as follows:
FROM
  pet
IN
  activityGroup.pet_types
WHERE
  pet.name = pet_type_selected
SELECT
  pet.genders
Once the information has been entered, the fields will look this way:
Gender Dropdown List
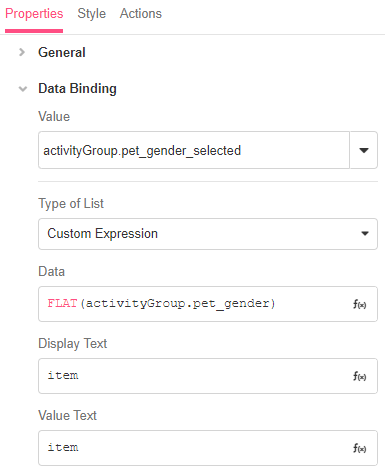
- Either on the Stage or Tree, click on the Gender List Dropdown List.
- Go to the Properties tab in the Inspector and, under General > Data Binding > Value , select
activityGroup.pet_gender_selected. - Then change the Type of List to Custom Expression and, in Data, add the following syntax:
FLAT(
  activityGroup.pet_gender
)- Then for both Display Text and Value Text, enter the variable
item.
Zipcode Text Input
- Either on the Stage or Tree, click on the Zipcode Text Input.
- Go to the General tab in the Inspector and in Data Binding add:
activityGroup.zipcode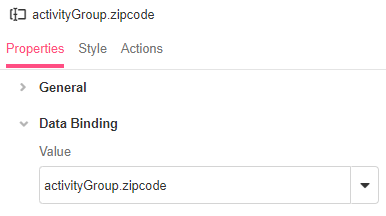
Next Button
-
Either on the Stage or Tree, click on the "Next" Button.
-
Go to the Actions tab and click on the ‘+’ icon next to Clicked. Select the Navigate to Web Page Action.
[block:image]
{
"images": [
{
"image": [
"https://files.readme.io/77ea6fe-image.png",
null,
null
][ "https://files.readme.io/77ea6fe-image.png", null, null ],
"align": "center"
}
]
}
[/block] -
Choose Add Web Page. A new Web Page will appear under the Home Web Page for you to continue building.
[block:image]
{
"images": [
{
"image": [
"https://files.readme.io/ebe2c58-image.png",
null,
null
][ "https://files.readme.io/ebe2c58-image.png", null, null ],
"align": "center"
}
]
}
[/block]
Previewing the Home Web Page
Save your progress and click on the Preview to check that the Home Web Page of your app is running smoothly. Click on the website icon and check what options are available for selection from the Dropdown menus.
You've now built out a homepage that behaves dynamically based on the data provided by an external system! Next, we're going to build a second page that displays pets of interest based on the information users provide in the homepage.

Updated 4 months ago