Requesting Feedback
Part VII - Sending a link to new Web Flow once the appointment is over
In Part VI, we configured a follow-up Notification that was sent only conditionally, which ensured app users made an appointment. Now, we'll build out a flow that collects user feedback once the appointment they made is over.
Configuring the Collect Feedback Web Flow
- In Web Flows Builder, select the Collect Feedback Web Flow and rename the associated Web Page to “Collect Feedback”.
- Add a Label asking the user how the appointment went.
- Add a Text Area Input Control.
- Add a Button Control and change its text to “Submit Feedback”.

- Inspect the "Submit" Button selected, and toggle over to the Actions tab. Add a Navigate to Web Page Action and select Add Web Page.

- Go to the new Web Page in the Tree and rename it to “Thank you”.
- Add a Label to thank the user for their feedback. Personalize the message by including the
actor.first_namevariable:
"Thank you for your feedback, {{actor.first_name}}!"
- Save the app
Creating the App Object to save users’ info
Let’s create an app object for the fields we want to store.
- Go to AirData Builder and create a Feedback App Object with the following fields:
feedbackVariable of Type TextphoneVariable of Type Phone. This attribute is the same one as the actor’s since it serves to identify the user.
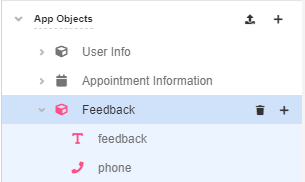
- Save the app.
Creating the Data Flow to save feedback
In order to save the information into AirData, the next step is to create a Data Flow.
- Go to Connections Builder and create a Data Flow from scratch. Rename it to “Save Feedback”.
- In Start, add the following:
phoneVariable of TypePhonefeedbackVariable of TypeText

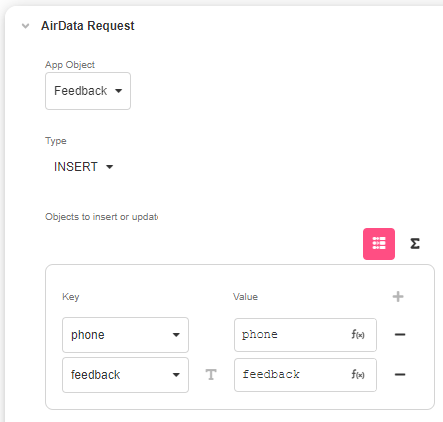
- By clicking on the ‘+’ icon, add an AirData Request Data Operation.
- In App Object, select the one we have just created
- For Type select INSERT
- In Objects to Insert or Update, enter the Keys one by one from the ‘+’ icon and match them with their corresponding Variables:
- In Run Results, check that your Data Flow runs.
- Save the app.
Passing the Information to the Data Flow
- Go back to Web Flows Builder. With the Submit Feedback Button selected, go to Actions and add a Run Data Flow Action.
- Select the Save Feedback Data Flow and pass the following Variables:
actor.phonefor the phone inputtext_areafor the feedback input as that was the auto generated variable we got when adding the Text Area Input control to the Web Flow.

Informing the user
Now we need to configure is a Notification inviting users to submit some feedback once their appointment is over.
- In Notifications Builder, add another SMS Notification and rename it to “Ask for Feedback”.
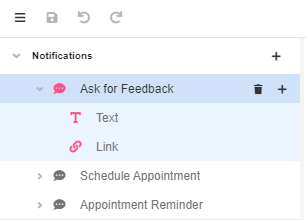
- Add a text inviting the user to submit some feedback. Personalize the message by entering
actor.first_namein Custom Airscript Expression. - Click on the ‘+’ sign below the message and add a separate Link to Journey step to direct the user.

Requesting Feedback after the appointment ends
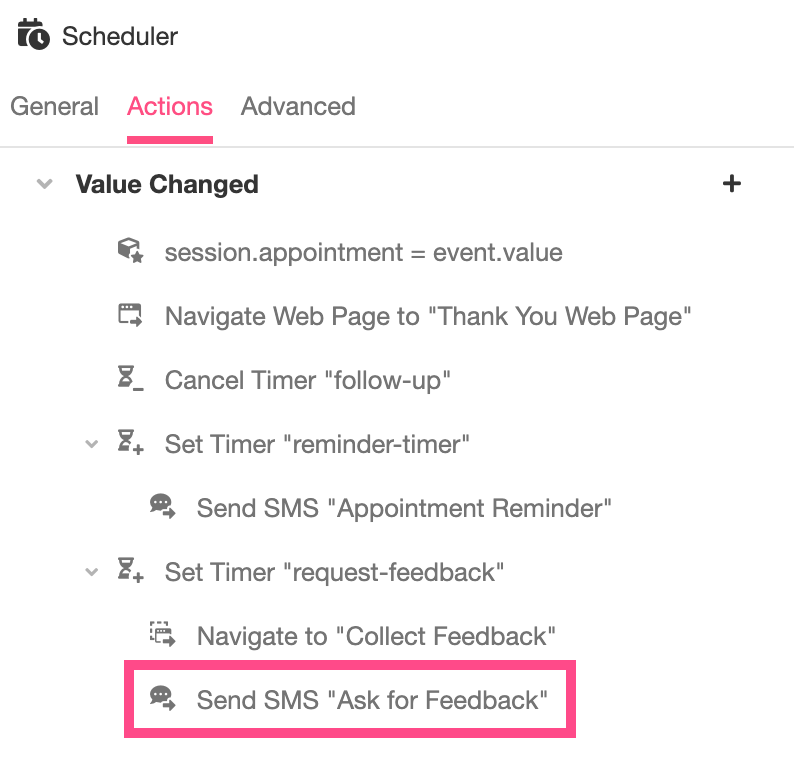
- In Web Flows Builder, go to the Scheduler Control in the Schedule Appointment Web Flow. In the Actions tab of the Inspector, add a Start Timer Action and complete it as follows:
- Change the key to “request-feedback”
- Set an execution of 5 minutes after the appointment by adding the following Custom Expression:
ADD_TO_DATETIME(
  session.appointment.end_time,
  5,
  "m"
)
This uses the Airscript function ADD_TO_DATETIME to return a DataTime indicating a time five minutes after the appointment ends.
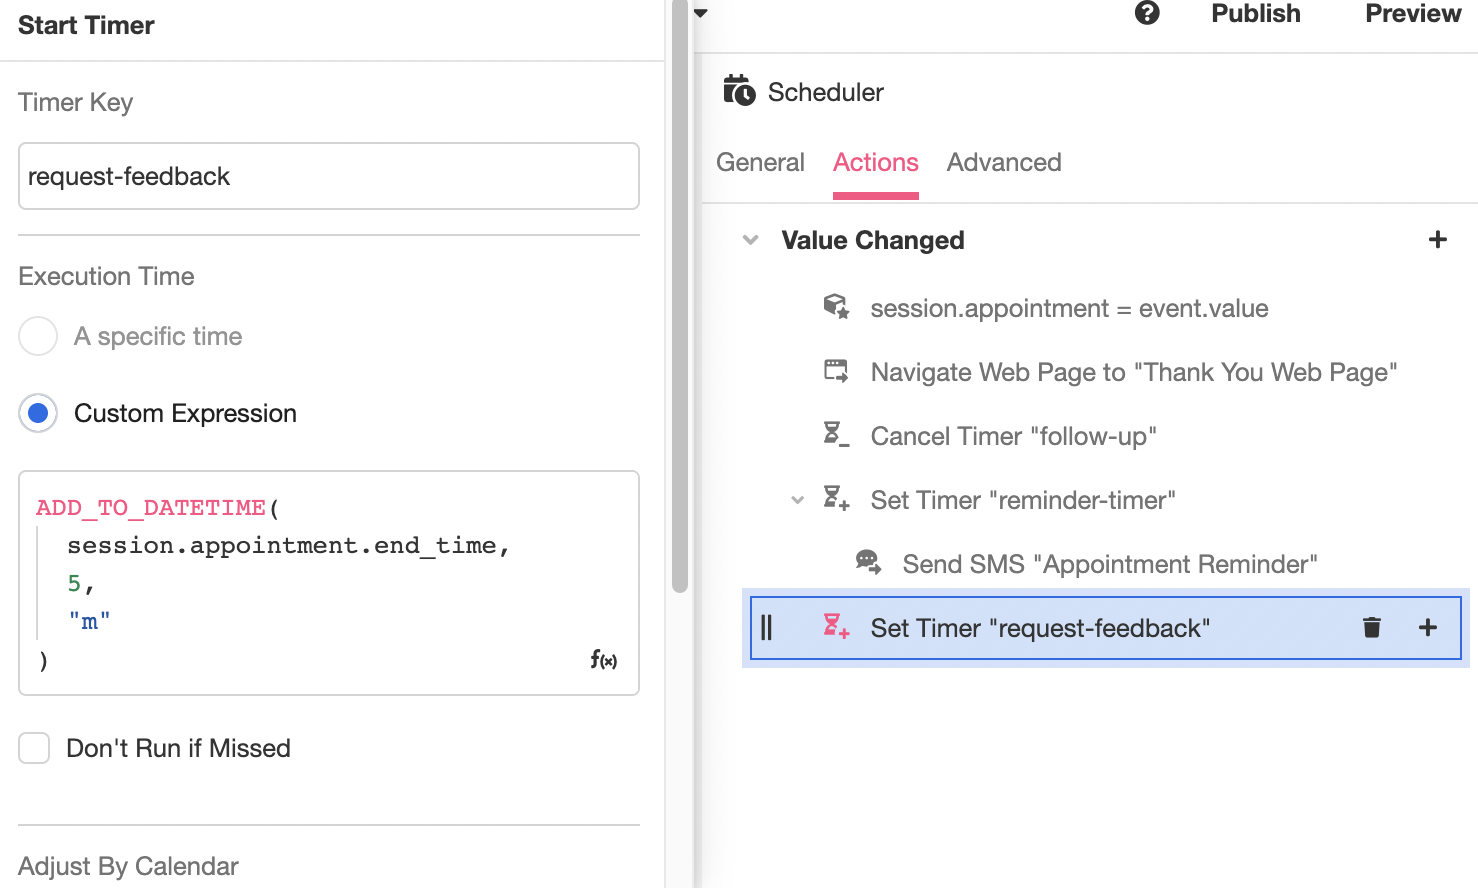
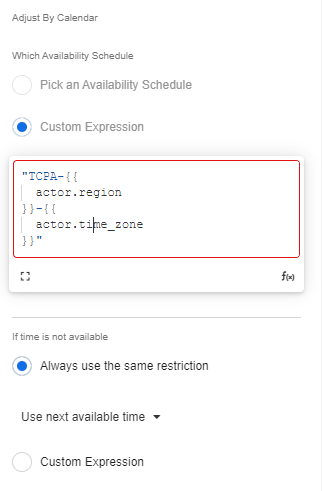
- To remain TCPA compliant, under Which Availability Schedule > Custom Expression, add the following Availability Schedule Key:
"TCPA-{{actor.region}}-{{actor.time_zone}}"- In If time is not available select the Use next available time option.
- Beneath the Start Timer Action, nest a Navigate to Web Flow Action and select the "Collect Feedback" Web Flow.
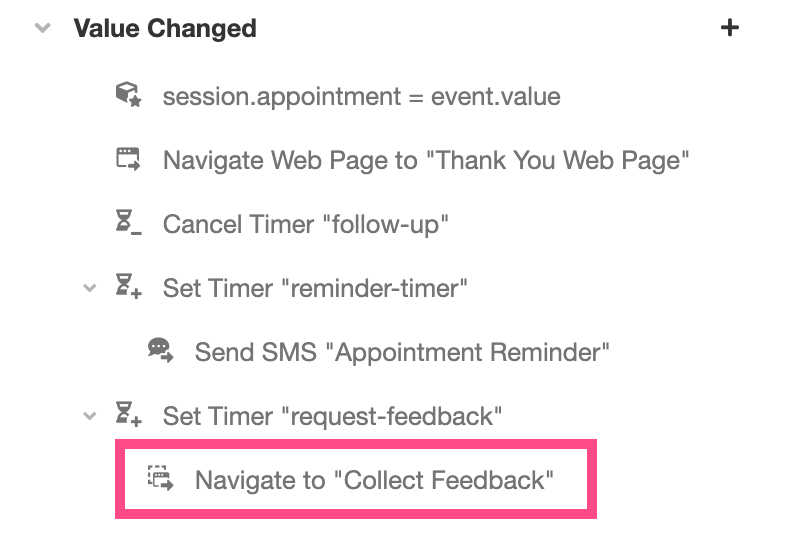
- Nested underneath the Start Timer Action, add a Send SMS Action and select the Notification we just created, Ask for Feedback.
Previewing the request-feedback timer
Let's go to App Preview to preview the finalized application.
-
After emulating selecting an appointment time, click on the Timers tab to see the timers that are available at that stage of the Journey.
-
Select the timer you want to test and, from Actions, click on Activate Scheduled Trigger. By doing so, the timer will be triggered regardless of the time it was set for.

- Go back to the Device tab and click on the chat icon at the bottom to see the Notification's message.
Congratulations! You've now built out an application capable of scheduling appointments and sending a variety of TCPA-compliant messages.
A note about publishing
There's one important element of sending SMS Notifications that went largely unaddressed throughout this tutorial: when outgoing text messages are sent, we've established that they're sent to the Actor, but what number are they sentfrom? This question is primarily important in the context to of publishing your application; see Publishing Your Application to learn more.
The Console provides the means to connect your Twilio numbers to your Org. Once connected to an Org, phone numbers will become available in Settings when accessing your application in the Studio. Under the Chat Bot section, you can select an available number to manage the texts associated with your application. Once a phone number is configured, your outgoing SMS Notifications will be sent from the configured number.
For more on how to associate your phone numbers with Airkit apps, see Connecting Your Twilio Numbers To Airkit.
Updated 4 months ago