Making Forms from Data Models
The Form Web Control generates forms out of Data Models, creating appropriate Labels, Input Controls, and even error messages based on how the Data Model is configured. While it is possible to manually create each of these elements of a form individually, digitizing forms using the Form Control greatly expedites the process, especially if the form in question has many or complicated validation requirements.
In this document, we'll walk through how to create Forms from Data Models. We'll also discuss the elements of Form Controls that come pre-configured and dive into how to configure those elements yourself.
Data Models
Data Models and their properties are managed directly in the Data Model Editor. To open the Model Editor, click on the Model Button to the bottom left of the Studio. This will pull up the Model Editor in the bottom of the Studio regardless of which Builder you're working in.
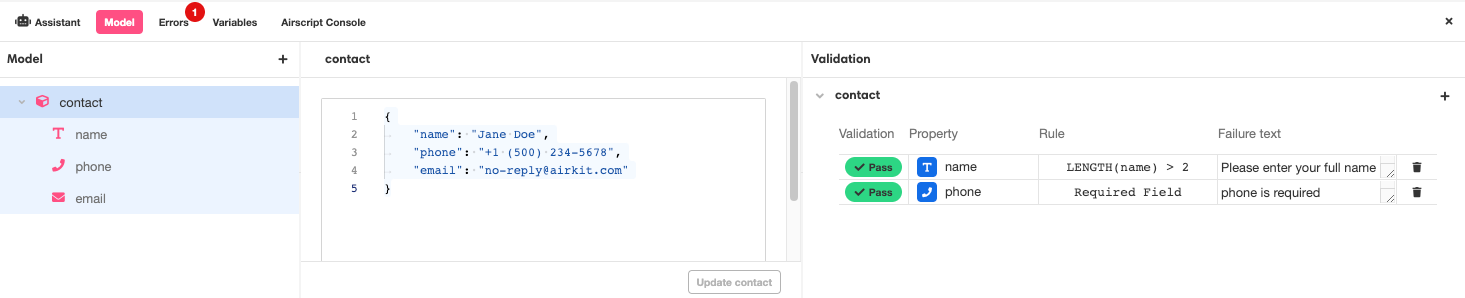
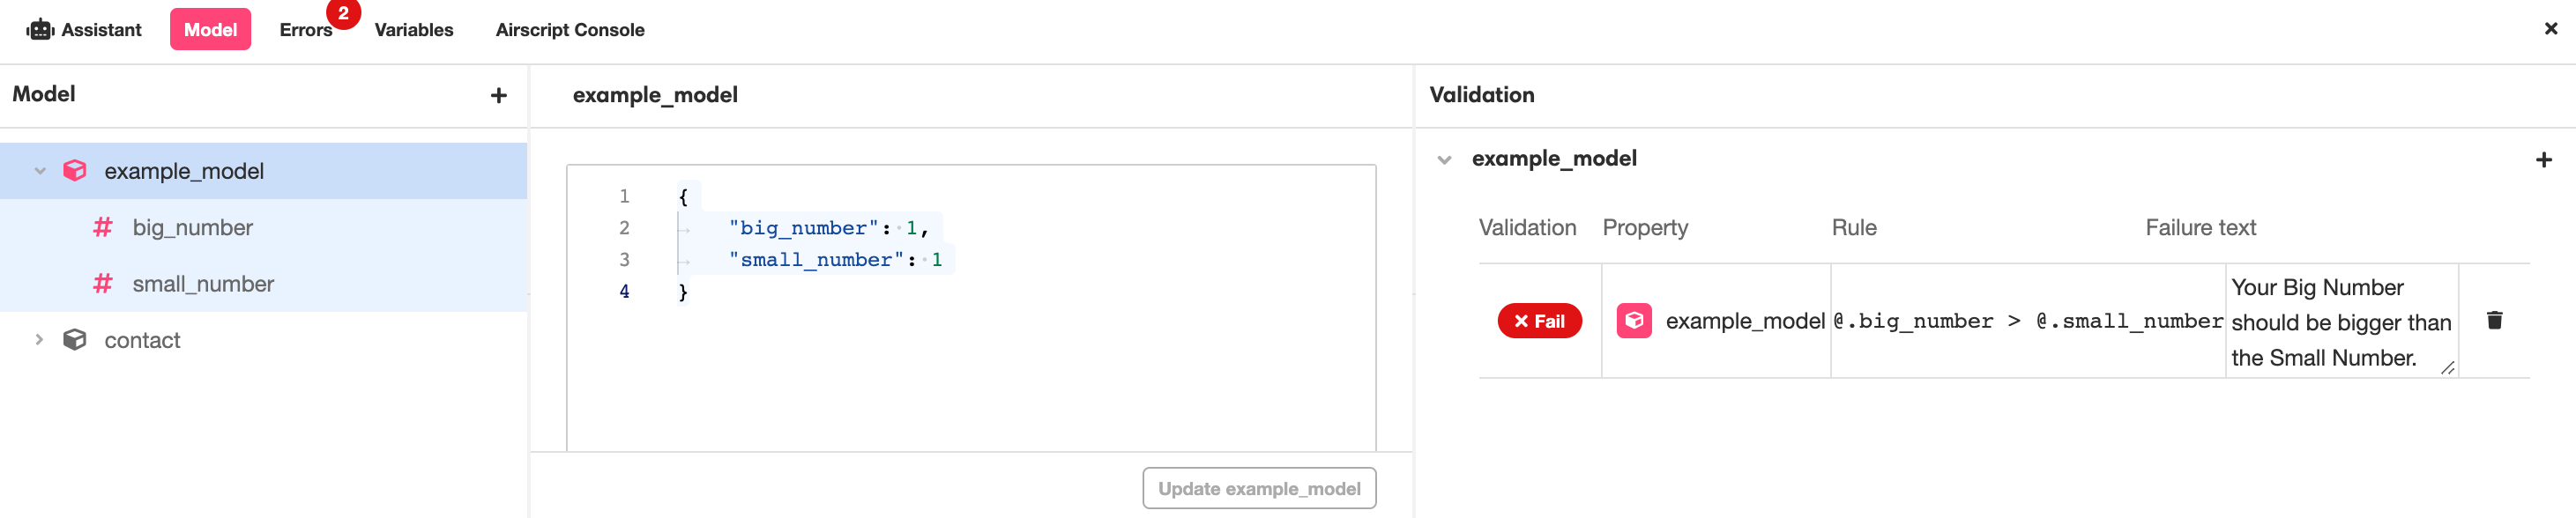
On the left of the Model Editor is the Model Tree. This is where Models and their properties can be added, deleted, and renamed. In the center of Model Editor is the Model Stage, which displays a sample Object structured according to the Model. To the right of the Model Editor is the Model Inspector. This is where Validations, tied either to individual Model properties or to the Model as a whole, are configured. Click on the '+' icon to the upper right of the Model Inspector to add a new Validation. Once added, the Rule and Failure Text columns of a Validation can be edited directly where they appear in the Model Inspector. When the Data Model is tied to a Form, each Rule defines valid data values, and each Failure Text will be used to generate user-facing errors should its associated Rule fail.
In addition to Rule and Failure Text columns, each Validation also has a Validation column, which shows how each Rule will evaluate if given the Object displayed in the Model Stage. To test how your Validation Rules might behave under different circumstances, you can edit the values of the sample Object properties directly.
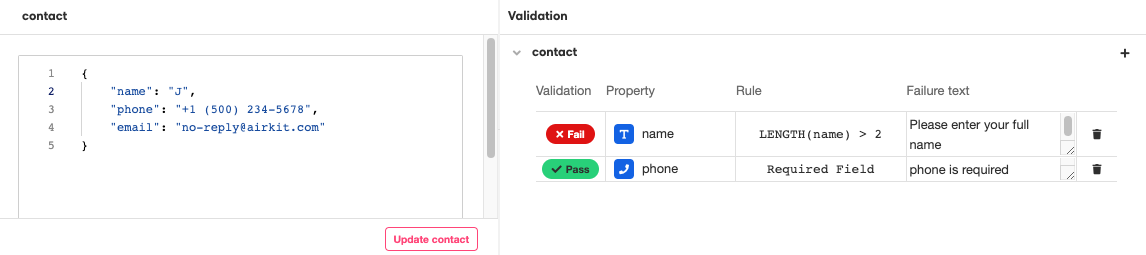
For example, say we edit the name property of the example contact Object so that it has the value "J". The string "J" is not greater than 2 characters long, and so the associated Validation Rule fails, as indicated by the red "Fail" icon under the Validation column:
While Validations can be edited, added, and subtracted from a Data Model even after the Model has been used to create aForm, the properties of the Data Model cannot be. Make sure the structure of your Data Model is finalized before you use use the Form Control to generate UI from it. For a deeper dive into how to create and manage Data Models, see Data Model Editor.
Tying a Form to a Data Model
For the sake of this example, assume we have already structured a Data Model, contact, as follows:
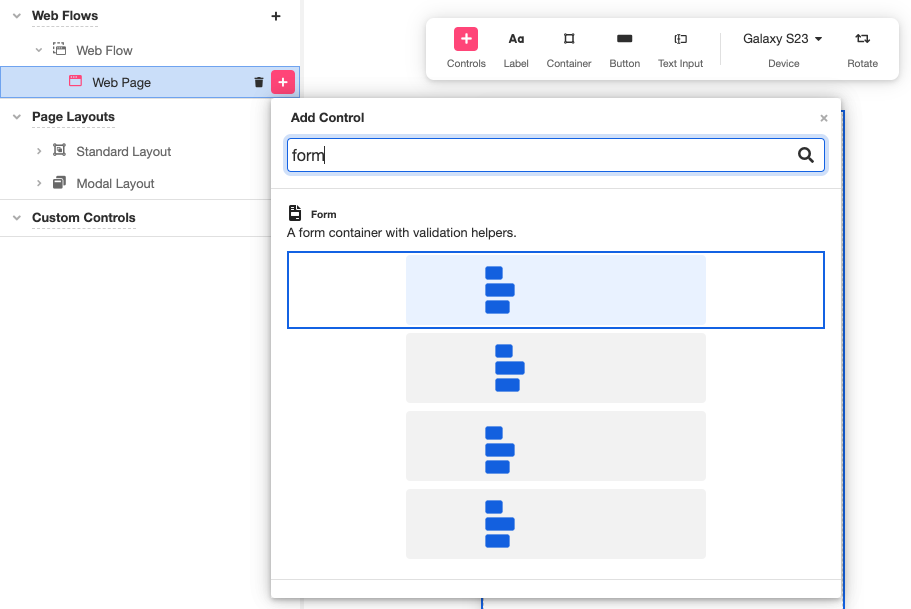
To generate a form from this Data Model, toggle over to the Web Flows Builder and add a Form Web Control the same way you would add any other Web Control:
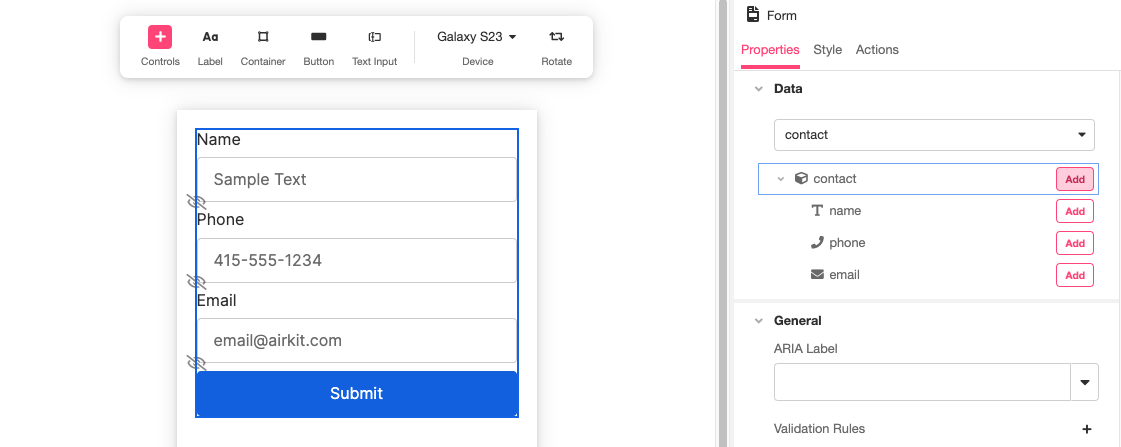
Once a Form Web Control has been added, it can be tied to a Data Model by Inspecting it and selecting a Model from the dropdown menu under Properties > Data. Once a Model has been selected, it or its individual properties can be added to the Form by clicking on the Add button next to the Model or Property. Note what this generates in the Stage:
Adding properties to the Form from the Inspector nests associated Containers under the Form in the Tree. Each Container consists of:
- a Label for the property name
- an appropriate Input Box, and
- a Label to manage any Validation Messages.
For instance, in our example, the Phone Container comes out-of-the-box containing:
- a Label that reads "Phone"
- a Phone Input Web Control, tied to the same automatically-generated variable,
phone_input, that come out-of-the-box with any Phone Input Web Control, and - a Label to manage the Validation Messages.
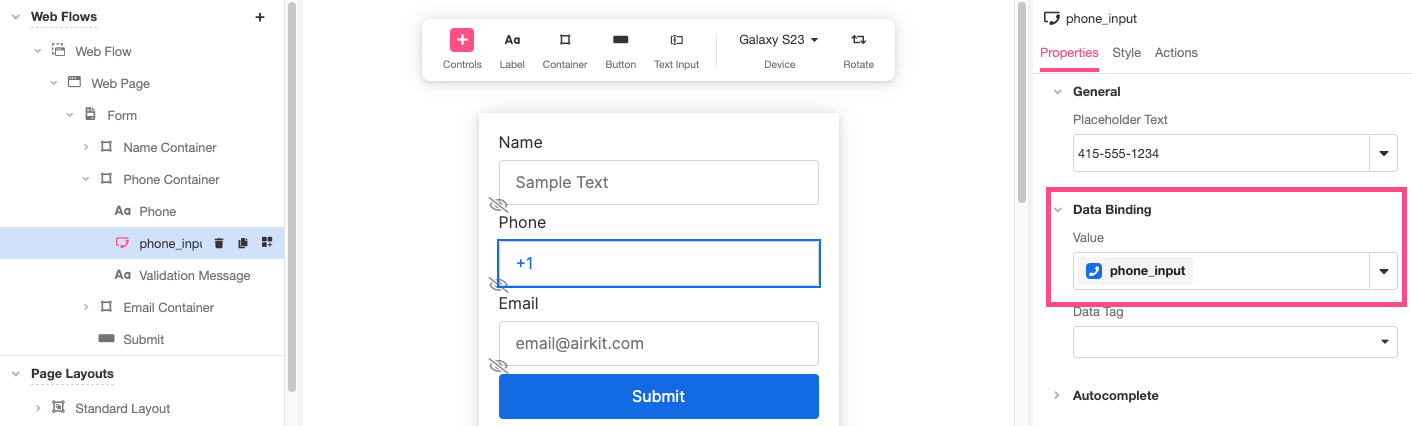
The property name Label and the Input Box associated with each property can be edited just like any other Label or Input Box. The Labels that manage Validation Messages, however, depend on the Validation Rules configured in the Model Editor, and are automatically configured to work out-of-the-box.
To see how these Labels behave, save your form and Preview its behavior. Note how error messages corresponding to the Failure Text configured in the Model Editor appear when invalid values are given to the relevant properties:
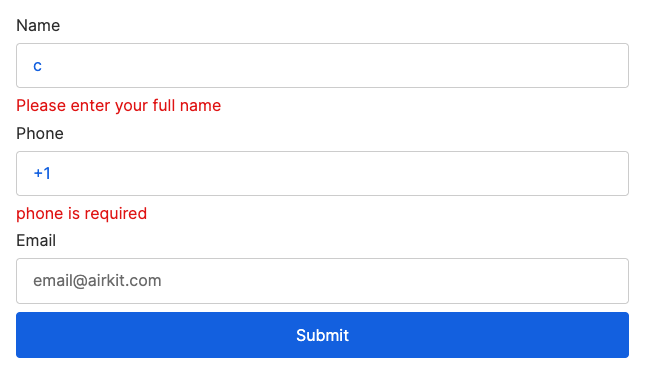
When the "Submit" Button is pressed, the Web Page will automatically focus on the first invalid field, which is relevant for Accessibility.
While it is possible to manage the Validation Messages within the Text of their Label Web Controls, best practice is to manage them as part of the Data Model. To make changes to the associated error copy or edit the Validation, reopen the Model Editor and make your changes there. Any saved changes made to the Data Model in this way will be immediately reflected in UI of the Form.
Incorporating Model-level Validations
As shown above, Form Controls come configured such that Property-level Validations are handled automatically. This works because a Trigger Form Validation Action is configured as part of the On Blur Event associated with each input box. Each of these Actions runs the Validation Rules associated with the relevant property. You can see the Validations Rules themselves configured as part of the Form Control, in the Inspector, under Properties > General > Validation Rules.
Validation Rules are tied to but NOT the same as the Rules associated with the Validations configured in the Data Model.For more information on the difference, see Form.
Managing Model-level Validations requires more customizing. Form Controls do not come with them pre-configured because many digitized forms span multiple Web Pages, and Model-level Validation Rules can only reasonably be run after all relevant information has been gathered. Managing Model-level Validations must therefore be configured manually.
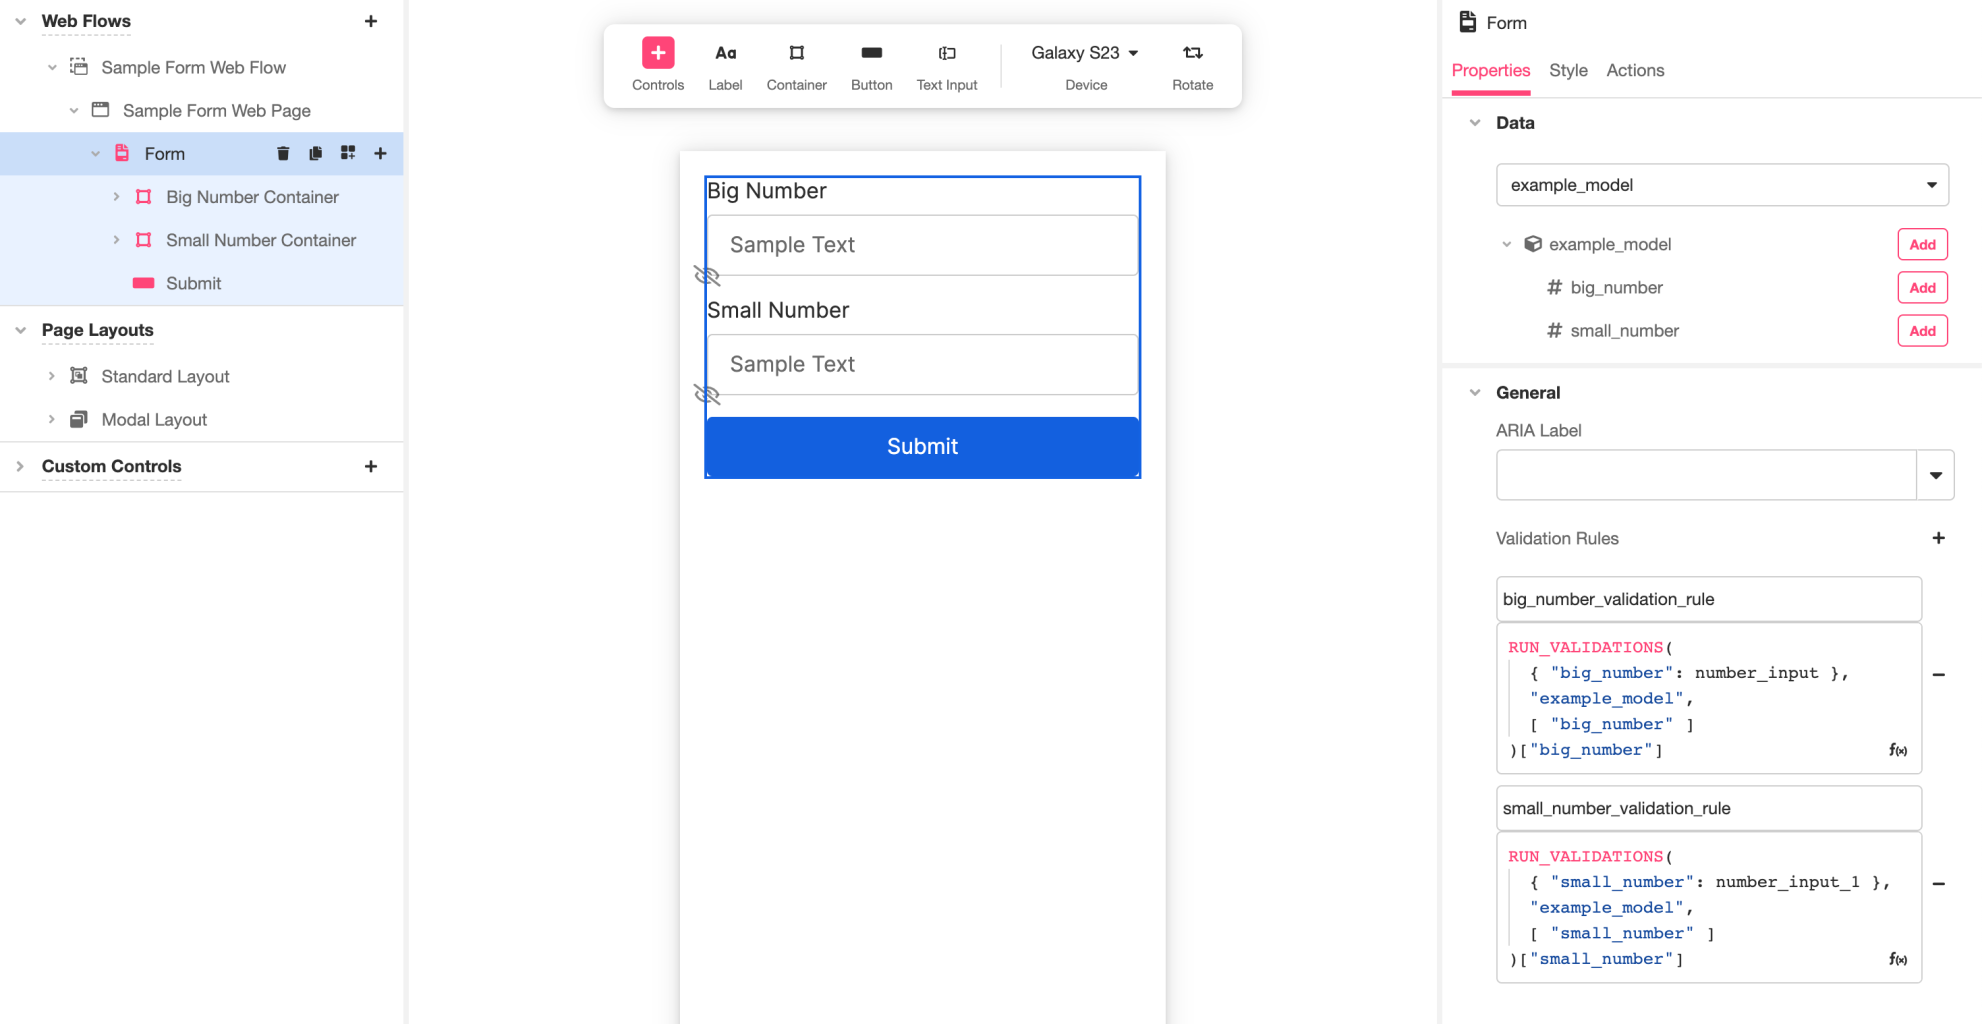
For the sake of this example, assume we have already structured a Data Model, example_model, as follows. Note that it has a single Validation, and it is Model-level:
Upon tying example_model to a Form Control and adding both of its properties to the Form, the end result will looks as follows. Note how the Form generates a Validation Rule for each of the added properties, but not the Model as a whole:
If there are no property-level Validations configured in the Data Model, why are property-level Validation Rules automatically configured in the Form Control?
Data Model Validations can be changed after the Data Model is used to generate a Form. This makes it straightforward to make changes to the Validations if it doesn't behave as intended during testing. It is most common to change individual elements about existing Validations, such as making a copy change to the Failure Text, but whole Validations can be added or subtracted to the Data Model as well. To this end, it is more robust for Form Controls to come configured so that no matter what Property-level Validations are added or subtracted after the form has been generated, the automatic Property-level validation handling will still function.
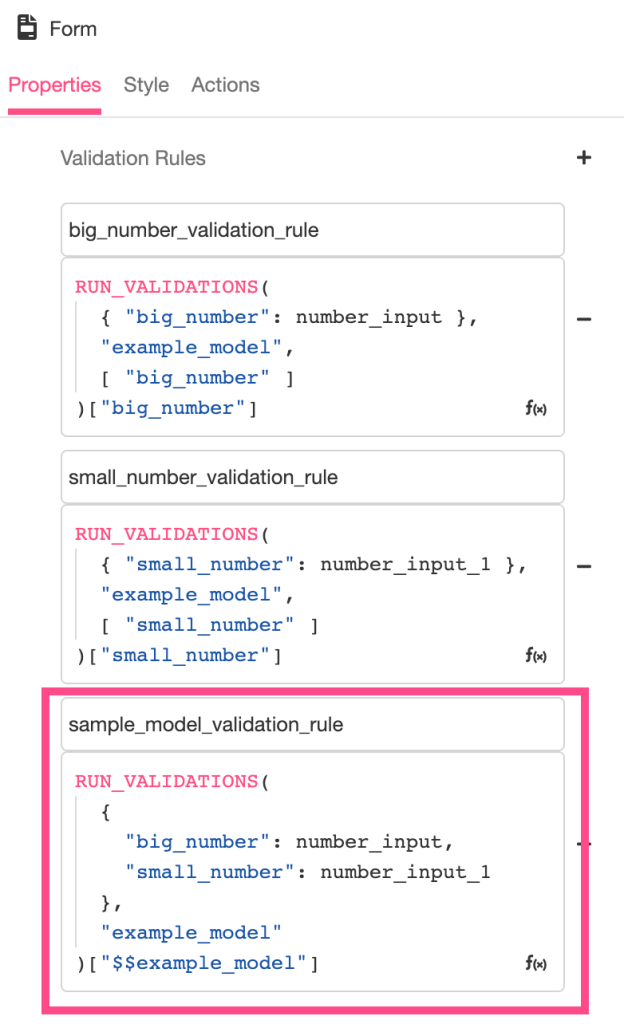
A Model-level Validation Rule can be created manually created by clicking on the '+' icon to the right of Validation Rules in the Tree. In the case of our example, we designated our new Validation Rule "sample_model_validation_rule", and it defined by the following expression:
RUN_VALIDATIONS(
  {
    "big_number": number_input,
    "small_number": number_input_1
  },
  "example_model"
)["$$example_model"]
This uses the RUN_VALIDATIONS function to run all the Validations associated with example_model, and returns the List of error messages stored under the "$$example_model" property. The values tied to each of the properties in the given Object ({ "big_number": number_input, "small_number": number_input_1}) reference the variables automatically-generated to bind to the relevant input boxes.
Forms come automatically configured with a "Submit" Button. We configured the Trigger Form Validation Action associated with the "Submit" Button's Clicked Event such that the Validation Rules to Run property was defined with a List containing a single string: "sample_model_validation_rule":
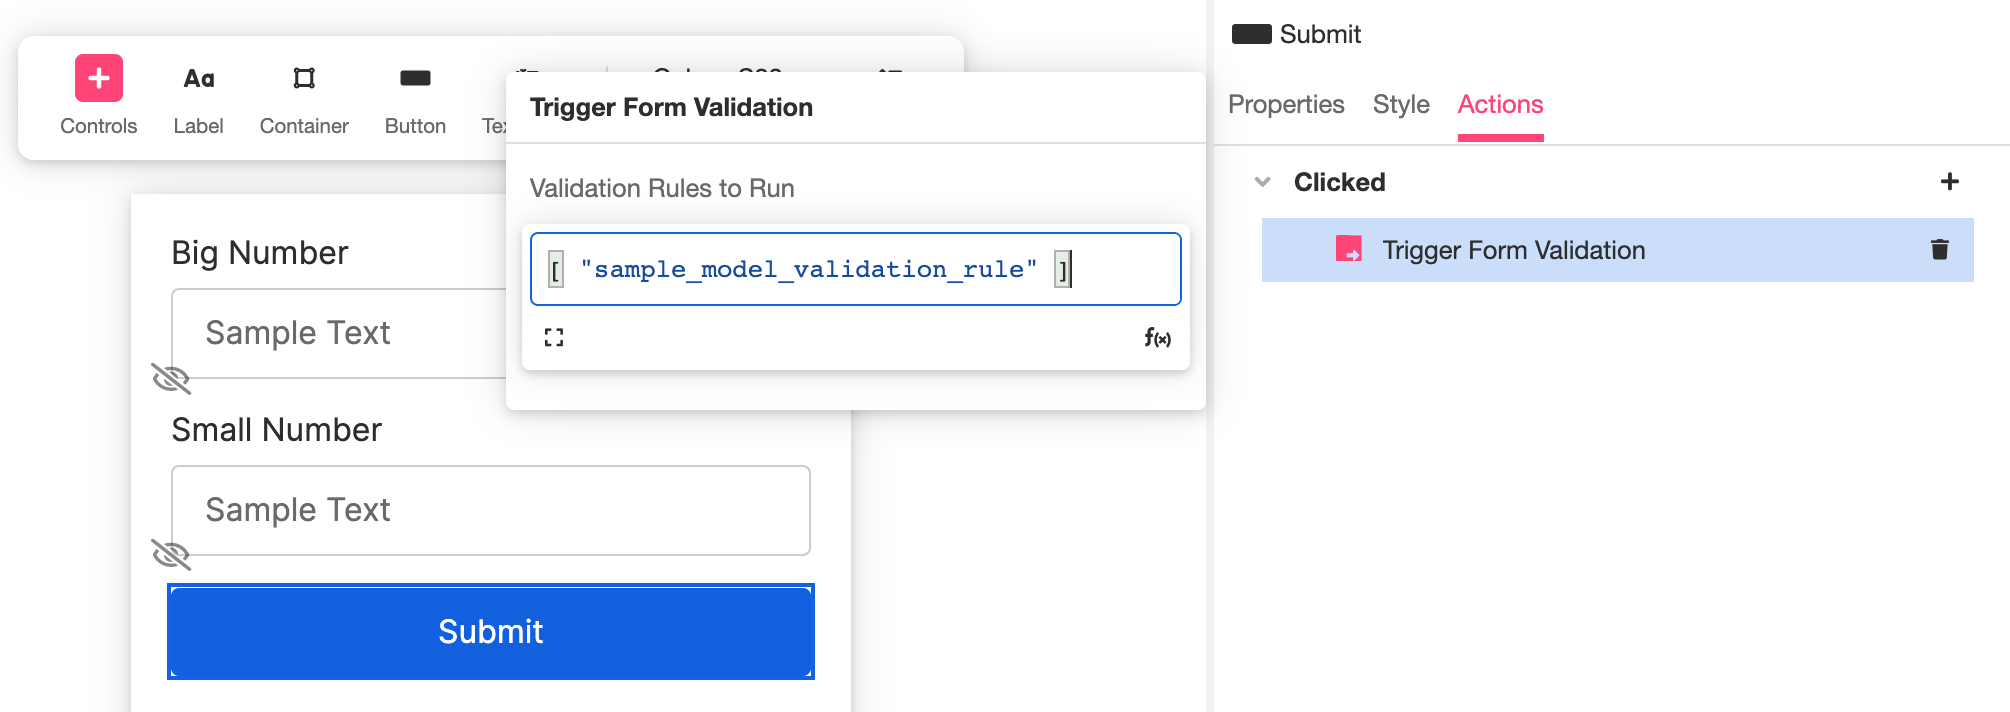
Now, when the "Submit" Button is clicked, it runs the Model-level Validations and generates error messages as relevant. These error messages are stored in a List under the "sample_model_validation_rule" property of the Object variable bound to the Form Control. Out-of-the-box, this Object variable was automatically generated with the name form.
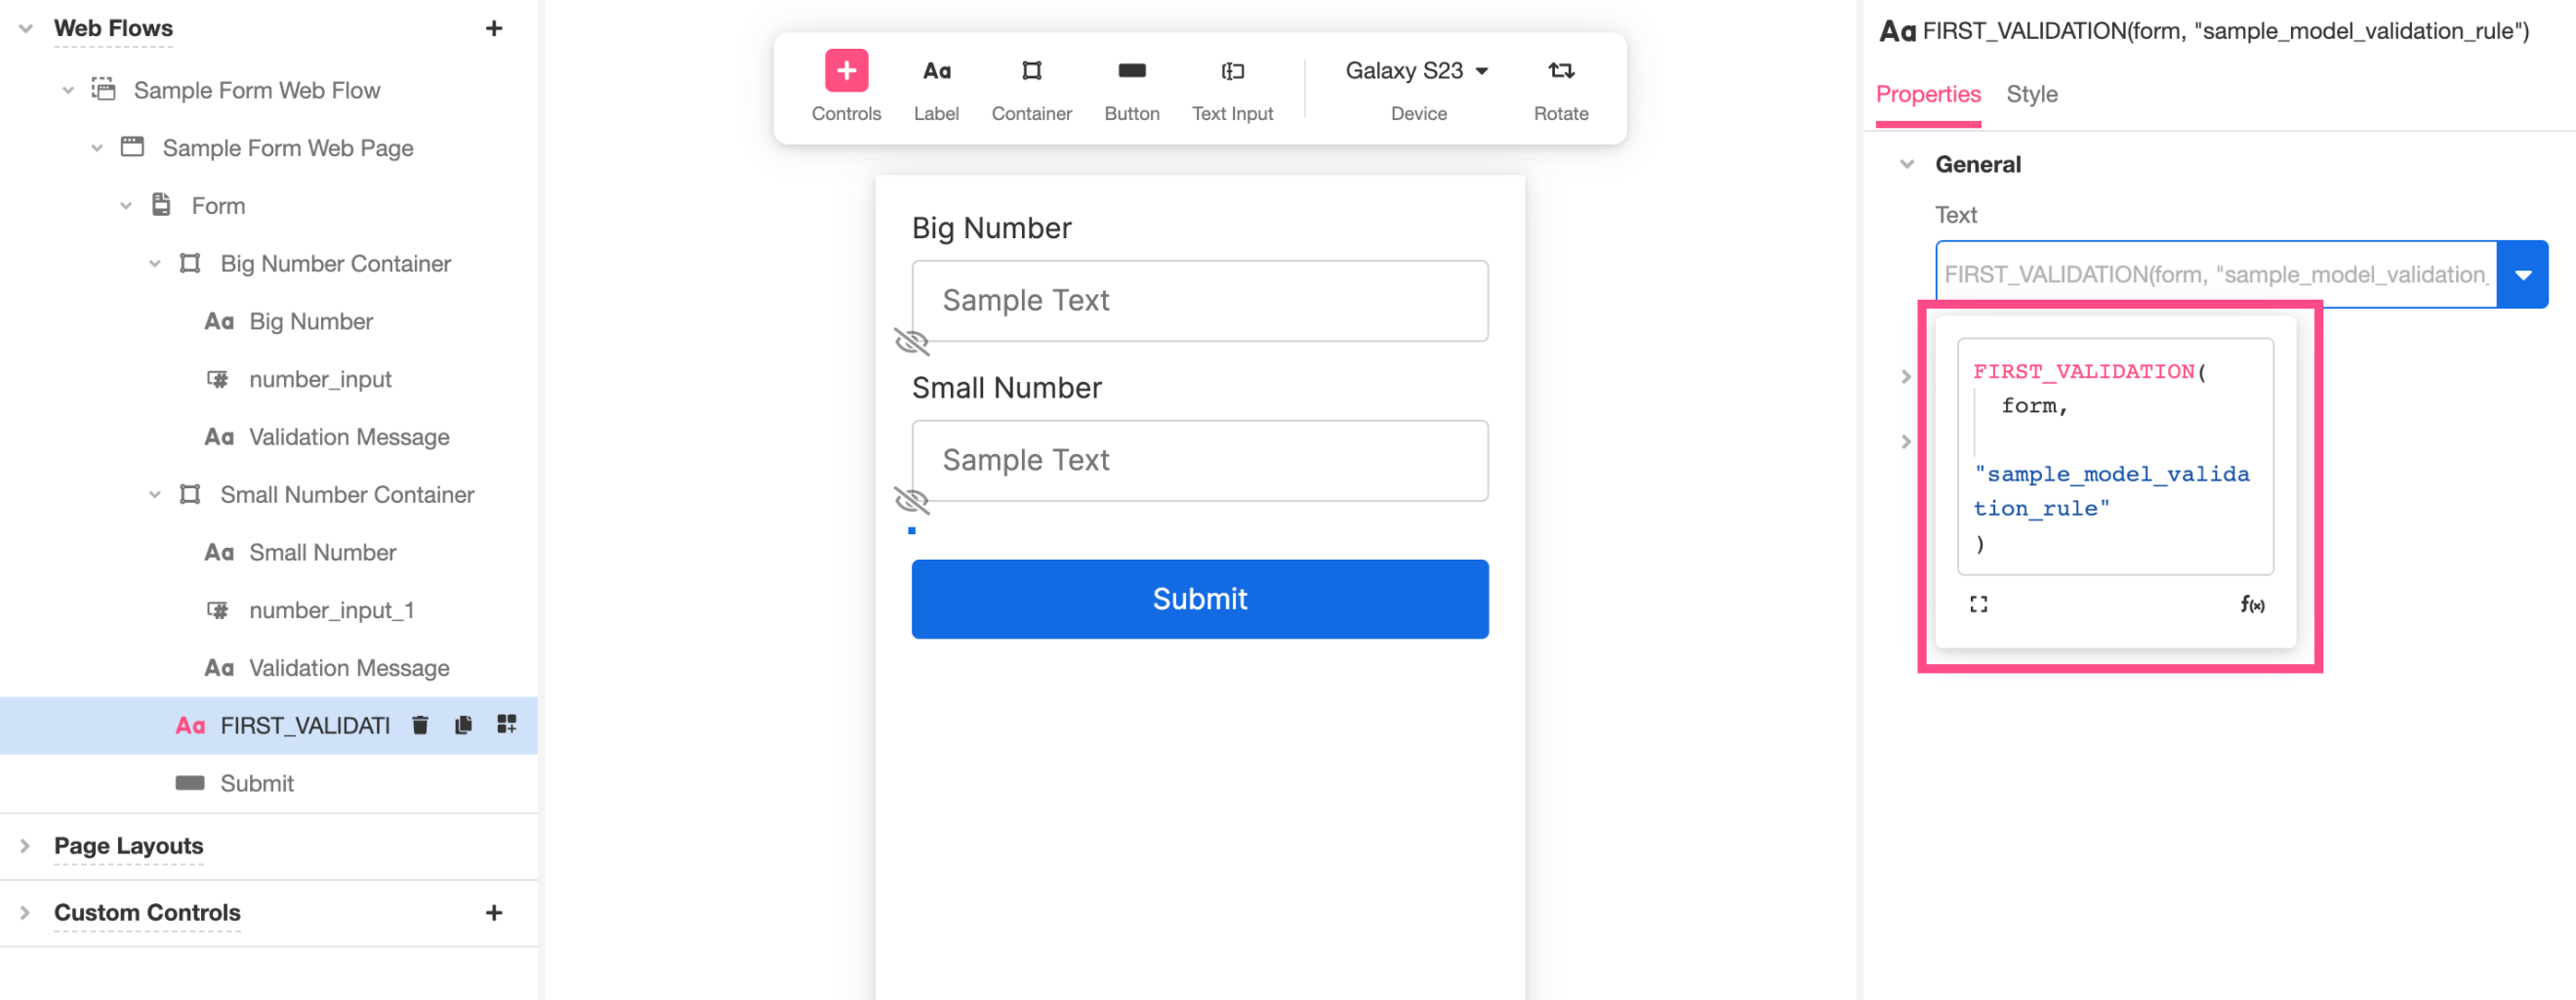
To display these error messages as appropriate, we added another Label to the Form Control, just above the "Submit" Button. We defined the Text of the Label according the following Airscript expression:
FIRST_VALIDATION(
  form,
  "sample_model_validation_rule"
)
This uses the FIRST_VALIDATION Function to display the first error message in the List of Error messages stored under the "sample_model_validation_rule" property of the form Object:
The end result is a Form that runs Model-level Validations when the "Submit" Button is clicked, and displays relevant error messages as appropriate:
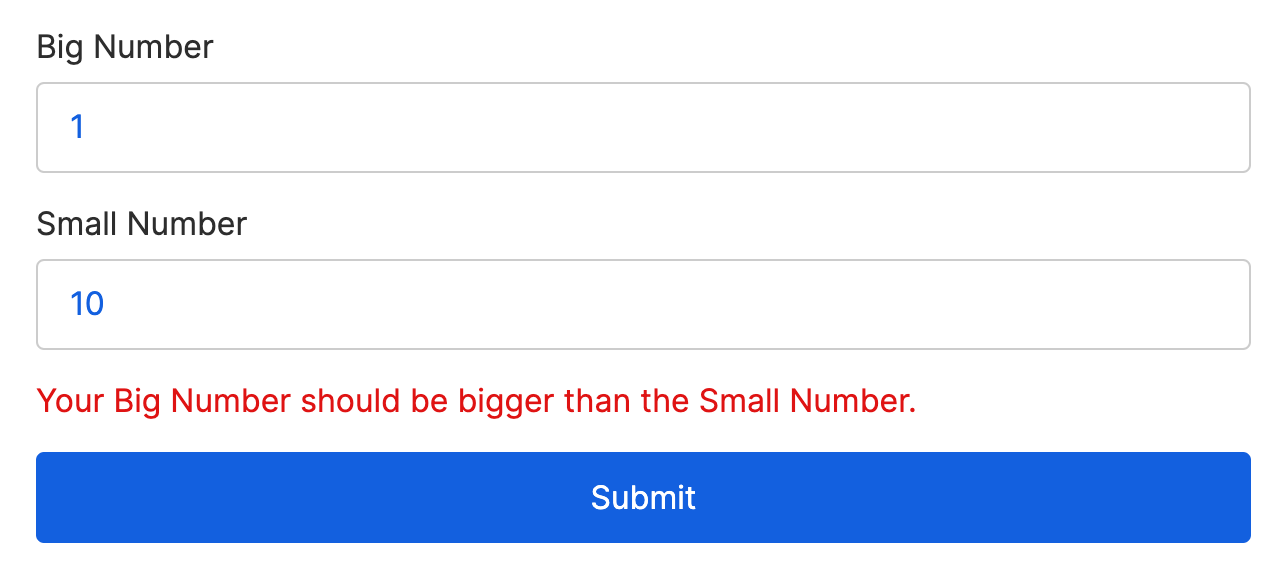
Note again that the error message here corresponds directly to the Failure Text in the Data Model.
Discussion
The Guide above focused on relatively simple, single-page examples for demonstration purposes, but the concepts introduced and discussed can be used to create far more complicated or customized forms. For instance, applying knowledge of how the Trigger Form Validation Action stores error messages can be used in tandem with the Condition and Navigate to Web Page Actions to ensure that users can proceed to the next Page of a multi-Page form if and only if they have provided valid responses to all of the fields on the current Page. As another example, the auto-generated variables bound to each input box could be replaced with the analogous properties in a local Object generated from the Data Model, which would structure the data appropriately for an external system of record to parse via HTTP Request.
Updated 3 months ago