Connecting to Salesforce (Advanced)
You've created a Contact form that both collects and stores information from users. Now, let's create an integration that sends that information to Salesforce.
This part of the tutorial requires a Salesforce account or developer instance in order to create a Salesforce integration in Airkit. To sign up for a salesforce developer account, go to https://developer.salesforce.com/signup.
Video
Tutorial
Integrating Salesforce to your application
Integrations are how external systems connect within Airkit. You’ll start configuring the integration in the Console and then continue in the Studio.
In the Console
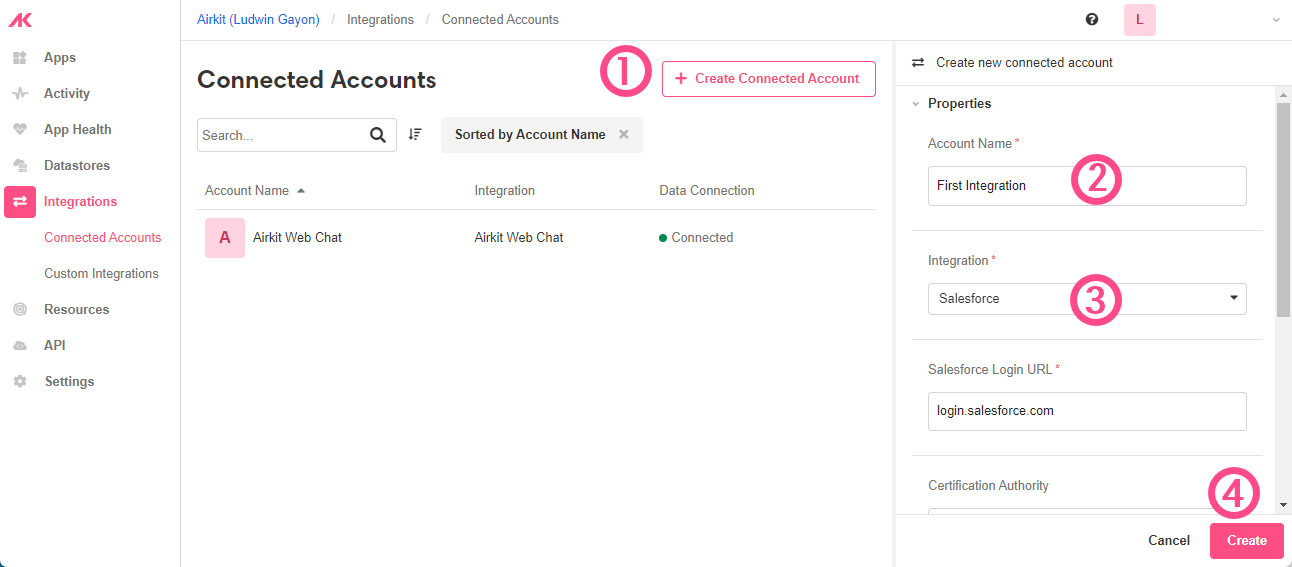
- Go to Integrations. Click on Create Connected Account, type a name and select the Salesforce integration. Then click on Create.
If you are not logged into your Salesforce instance, a popup will display asking you to enter your credentials.
Salesforce Login URLFor the Salesforce Login URL, Salesforce Dev and Production environments typically use login.salesforce.com while Salesforce Sandbox environments typically use test.salesforce.com.
On Studio
-
Access your Contact Form app and go to Settings. This is where you connect your resources to Airkit. Scroll down to Integrations and click on “+” to add a new Integration. Then select Salesforce from the Adapters.
[block:image]
{
"images": [
{
"image": [
"https://files.readme.io/62ba807-image.png",
null,
null
][ "https://files.readme.io/62ba807-image.png", null, null ],
"align": "center",
"sizing": "600px"
}
]
}
[/block] -
In Connected Account, select from the dropdown the one you have just created in the Console.
[block:image]
{
"images": [
{
"image": [
"https://files.readme.io/29beaff-image.png",
null,
null
][ "https://files.readme.io/29beaff-image.png", null, null ],
"align": "center"
}
]
}
[/block] -
Save the app.
Adding a Data Operation to connect to Salesforce
This section will go over the Salesforce Data Operation.
-
First, go to Connections Builder.
-
In Connections Builder, go to the Data Flow called "Insert Content" that was added when the Contact Form was built in the previous document. Add the Salesforce Data Operation to it by clicking on the '+' icon. Search for Salesforce and select it.
[block:image]
{
"images": [
{
"image": [
"https://files.readme.io/4b0ef99-image.png",
null,
null
][ "https://files.readme.io/4b0ef99-image.png", null, null ],
"align": "center",
"sizing": "500px"
}
]
}
[/block] -
In Datasource, select "Salesforce", which is the name of the integration previously created, and under Operation, select the type of action you want to perform. In this case, it’s going to be the creation of a new record. In Object Type, select Contact.
[block:image]
{
"images": [
{
"image": [
"https://files.readme.io/bce15a1-image.png",
null,
null
][ "https://files.readme.io/bce15a1-image.png", null, null ],
"align": "center",
"sizing": "500px"
}
]
}
[/block] -
The Object Body displays the properties you need to create a Contact Object. In this case it requires a Last Name, so the
nameVariable in your Contact Form needs to be passed here. Add the other fields one by one:phone,emailandcompany.
[block:image]
{
"images": [
{
"image": [
"https://files.readme.io/741f90e-image.png",
null,
null
][ "https://files.readme.io/741f90e-image.png", null, null ],
"align": "center"
}
]
}
[/block] -
You can do a quick test within this Data Operation by clicking on Run:
[block:image]
{
"images": [
{
"image": [
"https://files.readme.io/9addb06-image.png",
null,
null
][ "https://files.readme.io/9addb06-image.png", null, null ],
"align": "center",
"sizing": "400px"
}
]
}
[/block]
The record should be created in Salesforce.
Verifying Contact was created in Salesforce
-
Sign into your Salesforce account or developer instance, click on the App Launcher icon and select Sales Console.
[block:image]
{
"images": [
{
"image": [
"https://files.readme.io/b626d0b-image.png",
null,
null
][ "https://files.readme.io/b626d0b-image.png", null, null ],
"align": "center",
"sizing": "300px"
}
]
}
[/block] -
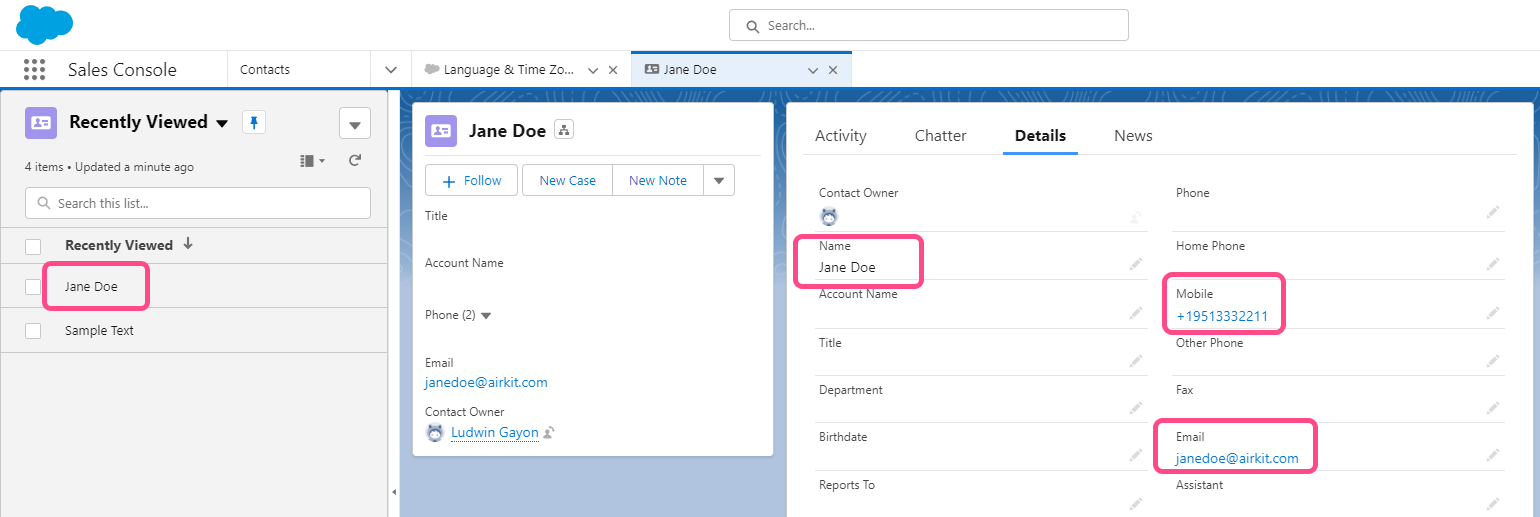
Once in the Sales Console, click on the arrow icon and select Contacts.
[block:image]
{
"images": [
{
"image": [
"https://files.readme.io/c9c57e5-image.png",
null,
null
][ "https://files.readme.io/c9c57e5-image.png", null, null ],
"align": "center",
"sizing": "300px"
}
]
}
[/block] -
Identify the user that was created through the Airkit application and check the information under Details.

Updated 4 months ago
To learn how to publish your application, see Publishing Your Application. To review concepts introduced throughout the process of creating a Contact Form, see Appendix.