Finalizing the App
You've created both the UI to collect user information and an AirData App Object to store the information in. Now, let's connect the two.
Video
Tutorial
Creating the Data Flow to Insert Data
A Data Flow has to be created from Connections Builder to send the data back to AirData.
What is a Data Flow?
Data Flows
Data Flows are custom connections. Conceptually, Data Flows work like functions: they take in input, process it, and return the resulting output (if applicable). Data Flows are primarily used to connect the front-end of Airkit apps to back-end systems, be they are part of Airkit (such as AirData) or external (such as Salesforce). Any data processing that must occur in order to make these connections smoothly will also be done within a Data Flow. For instance, if an API request returns a JSON object from which only a single attribute is worth displaying to the app user, it is within a Data Flow that the relevant information will be isolated.
For a deeper discussion on Data Flows, see Data Flows. For more information on the different kinds of Data Operations available, see the Data Operations Overview.
Why create a Data Flow to send information to AirData when it has already been bound to a variable?
Working with Data
When a value is bound to a variable, that value is tied to an individual Session. This simplifies the process of keeping track of information in the short term. If our contact form becomes published, and both Alice and Bob fill it out at the same time, the value of name_input will be different in Alice's Journey than in Bob's. Airkit will handle the details of keeping them separate.
However, outside of any Session, we, the app builders, might want to access certain information collected from all uses of our application. Upon sending out a Contact Form, for instance, we will likely want to be able to access information submitted by everyone, on every Journey, and thus we want to collect all relevant information in one easily-accessible place: AirData. (Note that while, in the case of creating a simple Contact Form, all bound variables are relevant, this will not always be the case. AirData App Objects are customizable precisely so that builders can store information in the way that is most conducive to their use case, rather than being bogged down by automatically-collected but ultimately cumbersome data.)
For a deeper diving into how data is conceptualized in Airkit as well as the crucial difference between binding data to a variable and saving it to AirData, check out Working with Data.
- From Connections Builder, click on Data Flow and then on Create Blank to add a new Data Flow.

Once added, double click on it to rename it as "Insert Content".
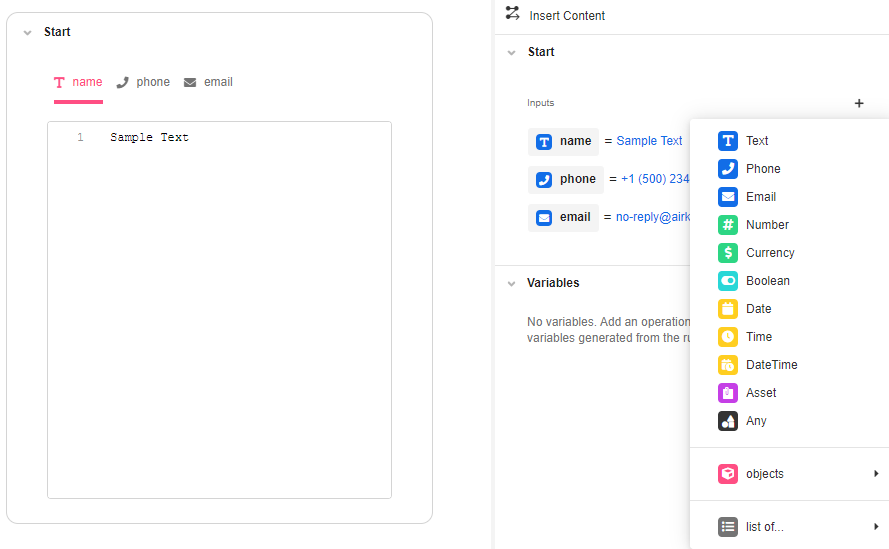
- In the Inspector section, add the Inputs that will enable you to pass the Values from the Form Inputs to the Data Flow and back to AirData. When all data types display, select the Text input and rename it to
name; select the Phone input and rename it tophoneand do the same with the other two fields.
- Add a Data Requests > AirData Request operation by clicking on '+' the icon in the Stage.

- Inside the AirData Request, choose from the dropdown the App Object (Contact) that will save the information and select INSERT as the Type of operation to perform since it allows adding an item into AirData. In Objects to insert or update, complete the Value column with the Input Variables corresponding to each Key
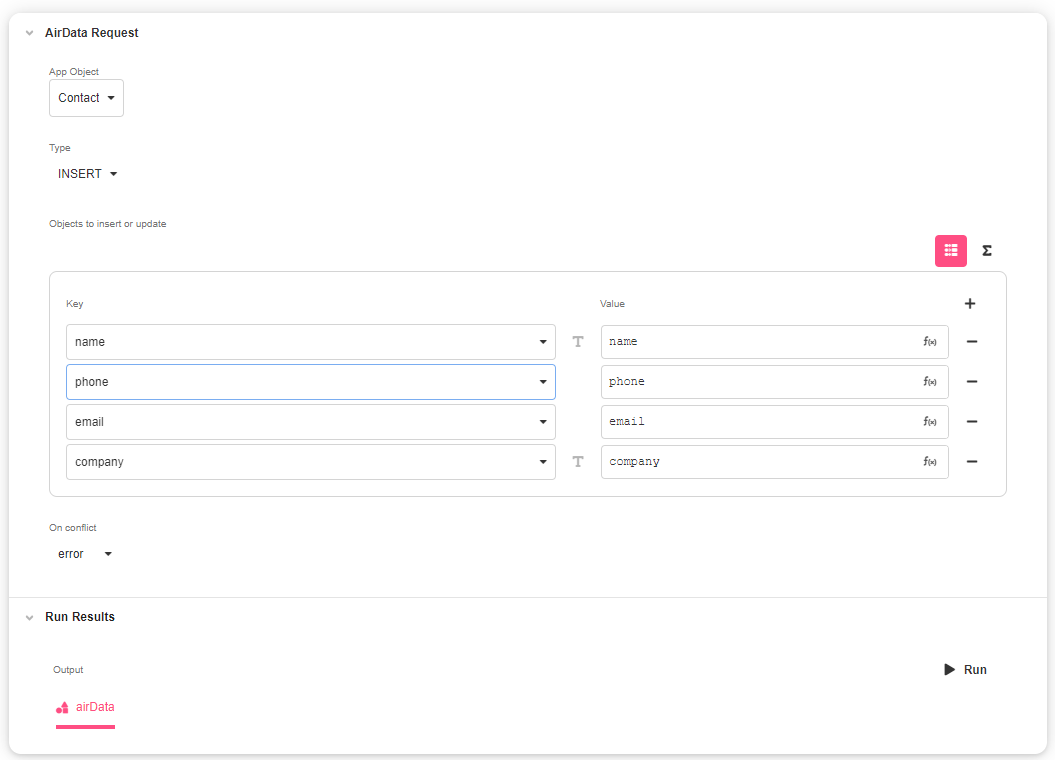
To test the Data Flow and make sure it is sending the information back to AirData, go to Run Results and click on Run. Then save the application and go to AirData Builder to check if the data was inserted.
Connecting the Data Flow to the UI
Now that the Data Flow is working and sending data to AirData Builder, go back to Web Flows Builder to connect the operation to the UI. In Web Flows Builder, you can define the Action Chain to be run when the users click on “Submit” once they finish completing their Form. This Action Chain is triggered by the Airkit Event of a user clicking the button.
What is an Action Chain?
Actions
An Action Chain is a series of Actions taken sequentially.
Actions are a broad category. They can be do everything from run a Data Flow to navigate to a specific Web Page to create a timer. There's also the Condition Action, which makes it possible to create branching Action Chains, where different Actions are taken depending on whether or not certain conditions are met.
For more on how to created an Action Chain, see documentation on Action Inspector Tab, which is where Action Chains are defined. For more on the different kinds of Actions that can be taken, see the reference documentation
What are Airkit Events?
Airkit Events
In the context of the Airkit platform, Events refer to any catalyst that might trigger an Action Chain. All Action Chains are associated with a particular Event. It is when – and only when – an Event is fired that its associated Action Chain is performed.
At its core, an Airkit Event is a piece of information that tells the platform something happened and might include optional metadata about the Actions that will consequently be taken. Not all Events will be associated with an Action Chain. An Event merely signals that the platform must check and see if there are any Actions to take. In this way, an Event like a letter: it's sent from somewhere, but ultimately once it gets to the recipient, the recipient decides what they do with it. The letter might spur some action, or it might be thrown directly in the trash.
When we say that Events tell the platform "something happened," we are being deliberately vague. All kind of things might trigger Events. A user clicking a Button Web Control is an Event, as is the instance before sending an SMS message, as is updating a Web Flow.
There are many different types of Airkit Events, including Starting Events, one of which you've already created in the Journey Builder, and Control Events, including the 'Clicked' Event associated with all Button Web Controls.
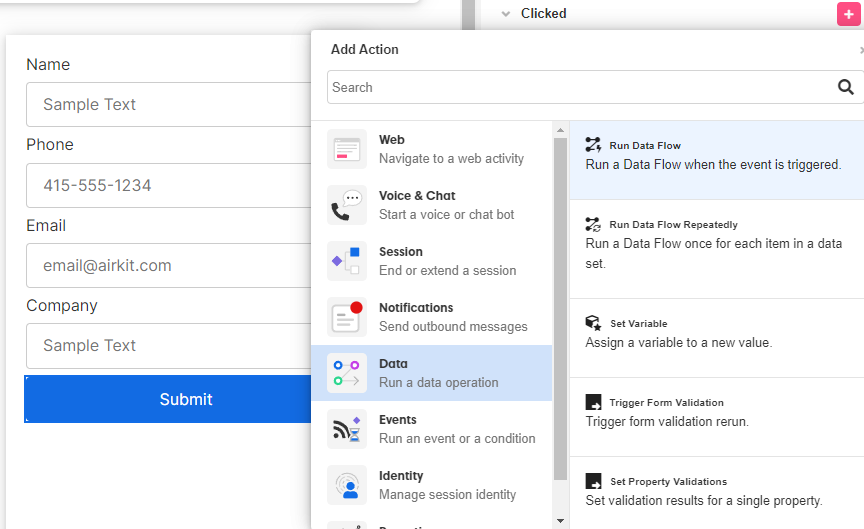
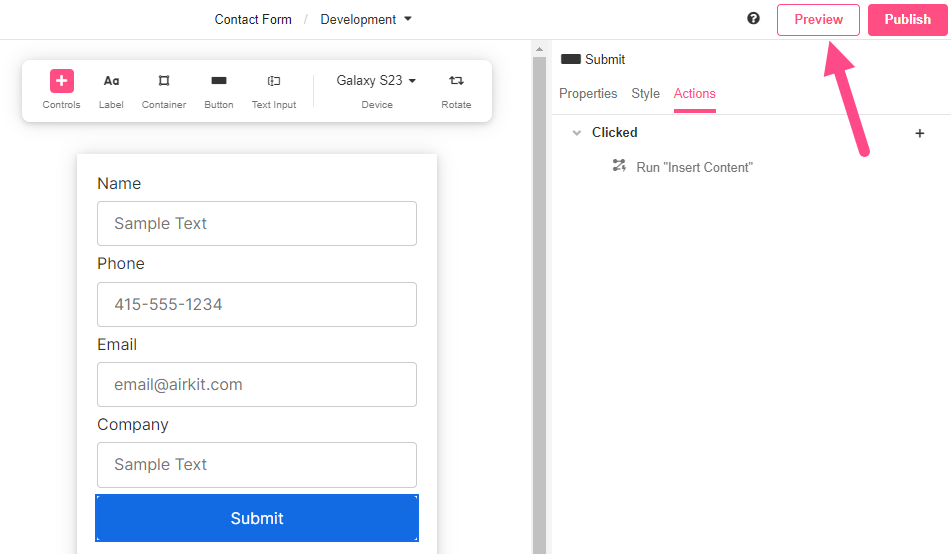
- Click on the “Submit” button and go to the Actions tab in the Inspector.

- Click on the '+' icon for the Actions menu to display and select Run Data Flow from the Data Options.
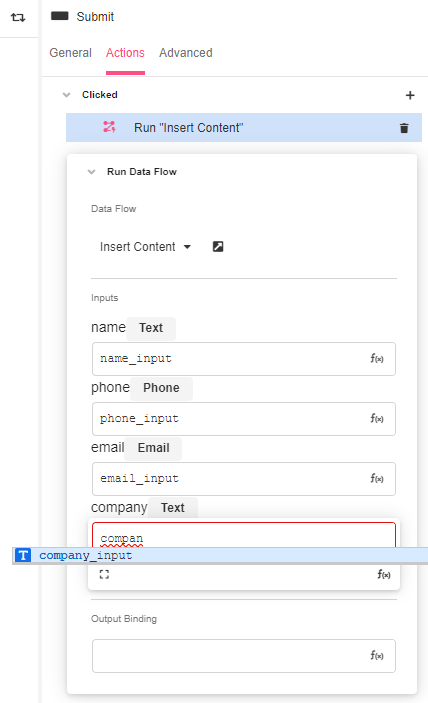
- Pick the previously created Data Flow and complete the displayed Inputs with the Input Variables of the Web Page. They will be suggested as you type, and you can select them by pressiong Tab:
- Save the app and it will be ready to be tested.
Previewing the App
Once the app is all set, it can be tested in the App Preview.
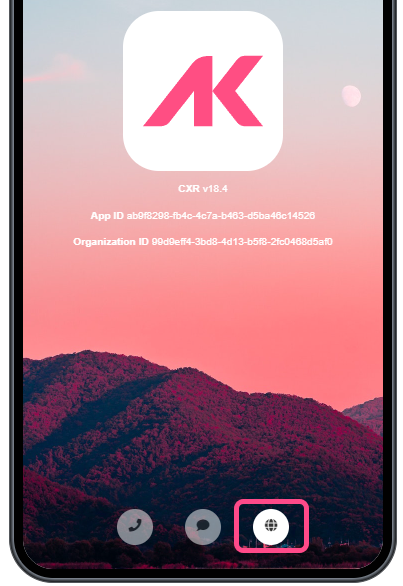
- Click on Preview at the right-hand corner of the Studio, which will open a new tab.
- Click on the globe icon, which allows the app to be launched from the start.
- Complete the fields and click on “Submit”.
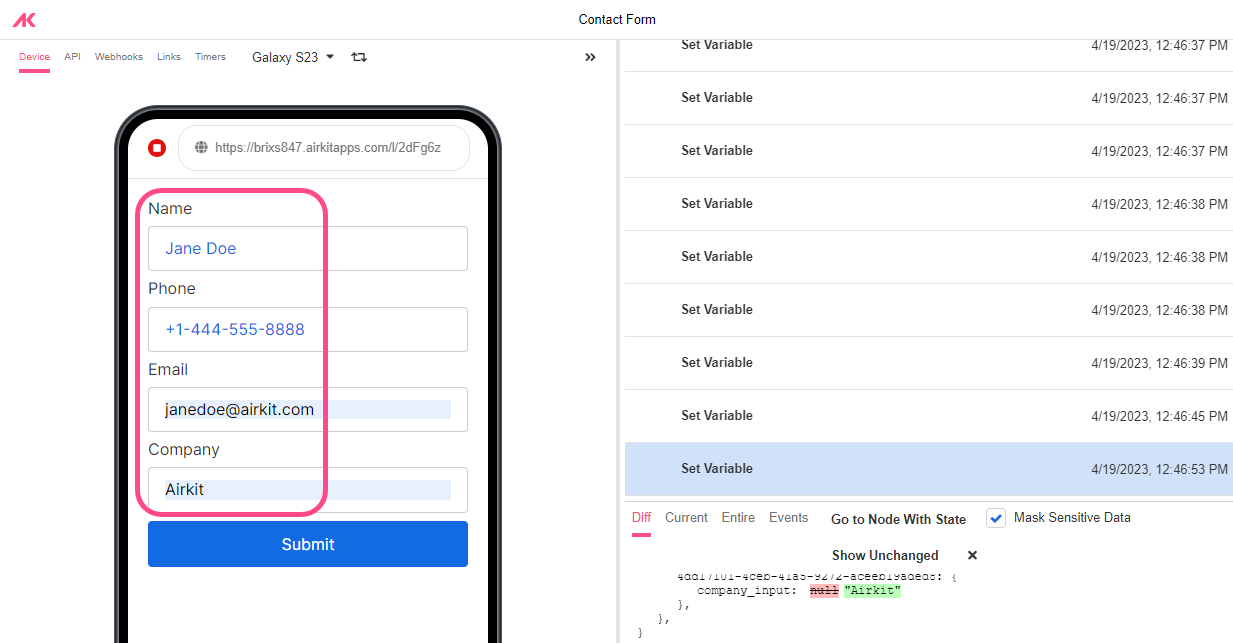
Phone Input ValidationIf a value entered into the Phone Input Web Control is not a valid phone number (as defined by the ISPHONE Airscript function), the phone input value will evaluate to
NULL.
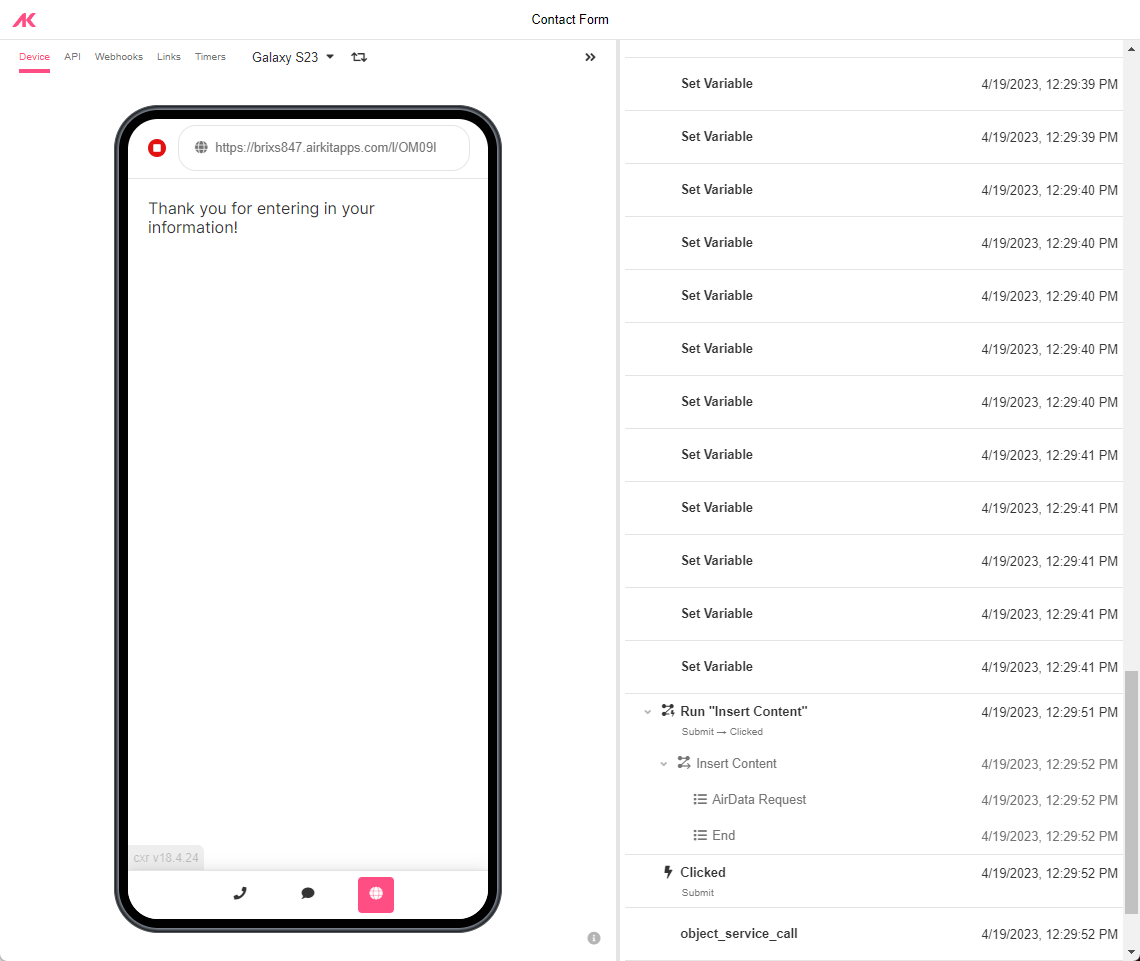
As expected, it will take the user to the Thank You Web Page.
- Finally, go back to AirData Builder and check if the entered information has been saved into AirData:
[block:image]
{
"images": [
{
"image": [
"https://files.readme.io/d591dc8-image.png",
null,
null
][ "https://files.readme.io/d591dc8-image.png", null, null ],
"align": "center"
}
]
}
[/block]
Now the application is ready to be published.

Updated 4 months ago
If you're comfortable building out integrations and have access to a Salesforce account, you can add more functionality to your simple form by following along with Connecting to Salesforce. To learn how to publish your application, see Publishing Your Application. To review concepts introduced throughout the process of creating a Contact Form, see Appendix.