Quickstart
Airkit is an application development platform that helps you build apps faster and deploy omni-channel experiences.
Here, we go over some of the basics, including how to:
- Make API requests
- Bind data to a local variable
- Design a custom UI that displays data dynamically
- Preview, debug, and publish your application
Access the platform 🔑
Log into Airkit
All of the tools required to build apps in Airkit are available on our browser-based platform.
- If you already have access to an Airkit account, you can sign in here.
- If your teammates have an existing Organization you want to join, someone with Admin permissions will need to invite you per the instructions given in Adding Users to Airkit.
Create an app and open it in the Studio 🛠️
Create a blank app
Once logged in click on the Create App Button in the upper right corner.
Start with a blank app by selecting the Blank App box.
Enter a name for your app in the App Name field and click on Create App.
Looking edit an app you already created? 🔨
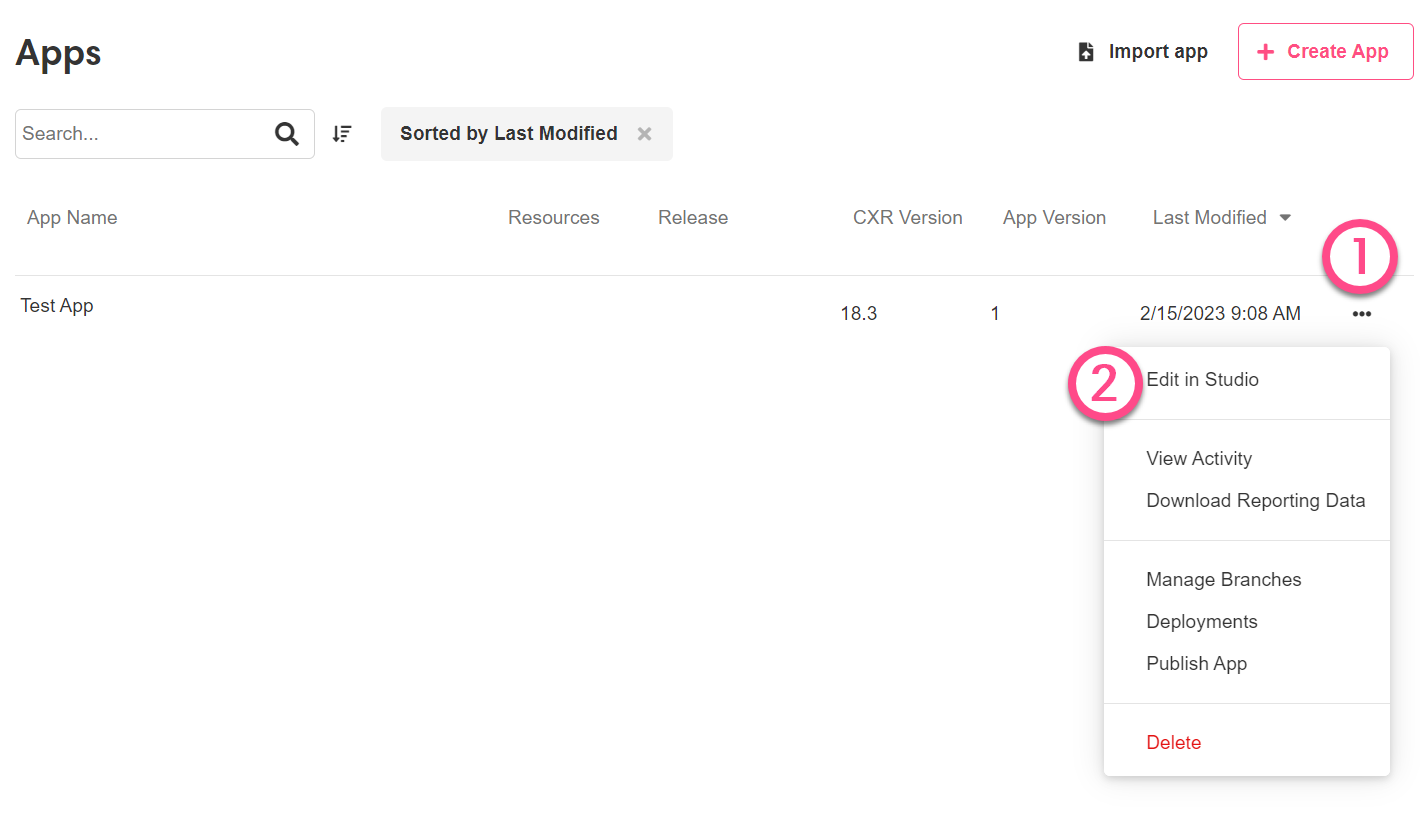
Edit an existing app in the studio
Upon first creating an app, it will open for you to edit in the Studio. If you navigate away from your app and want to return to it later, you can access it in the Console here. Click on the the three dots at the far right of your app as it appears in the Console and select Edit in Studio to continue building your app:
Make an HTTP Request
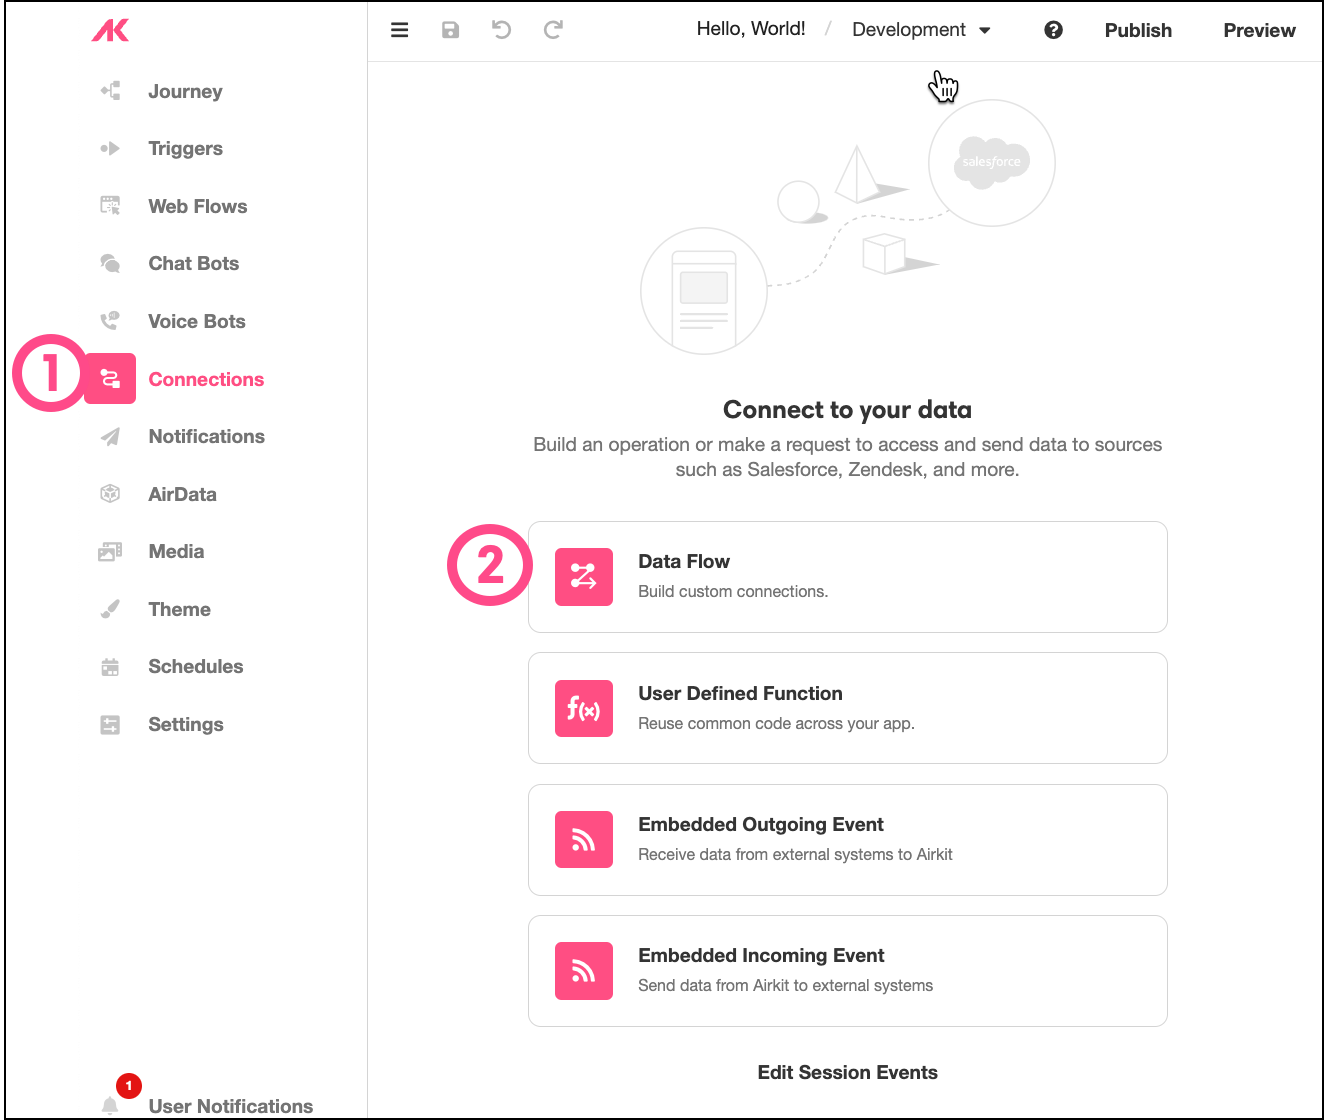
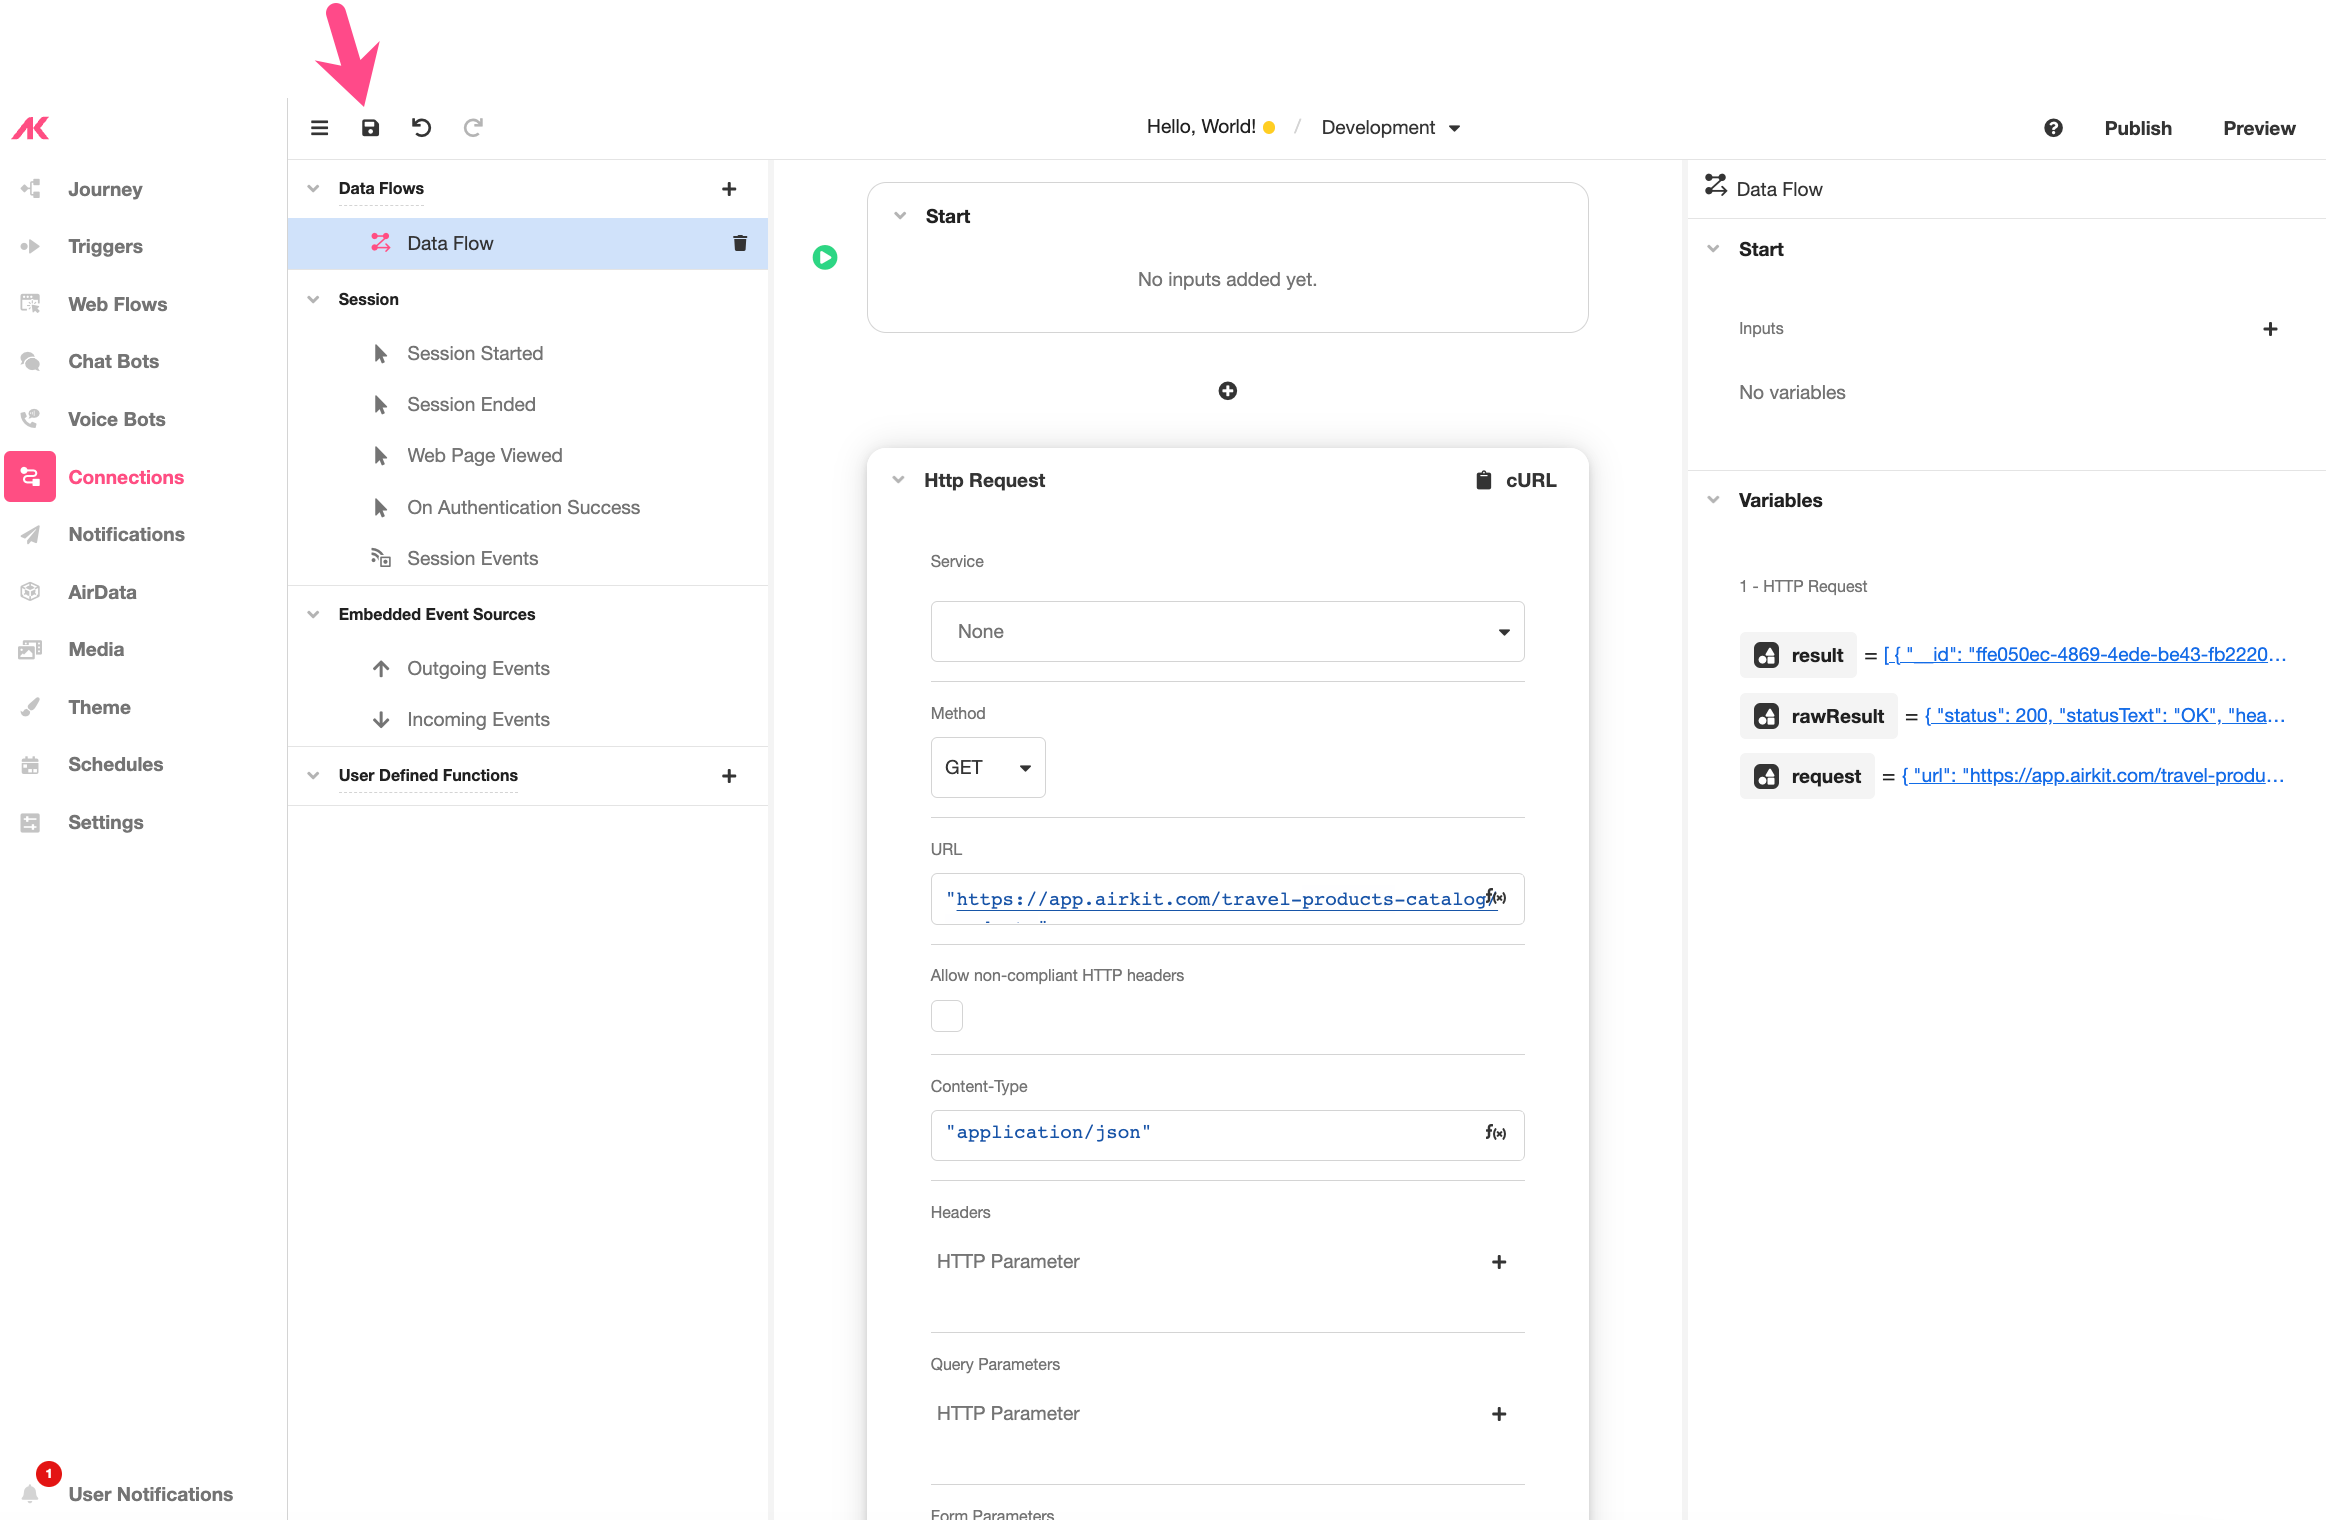
- The Studio consists of multiple Builders, which you can toggle between using the Builder Bar to the far left of the Studio. Toggle over to to Connections Builder and select Data Flow.
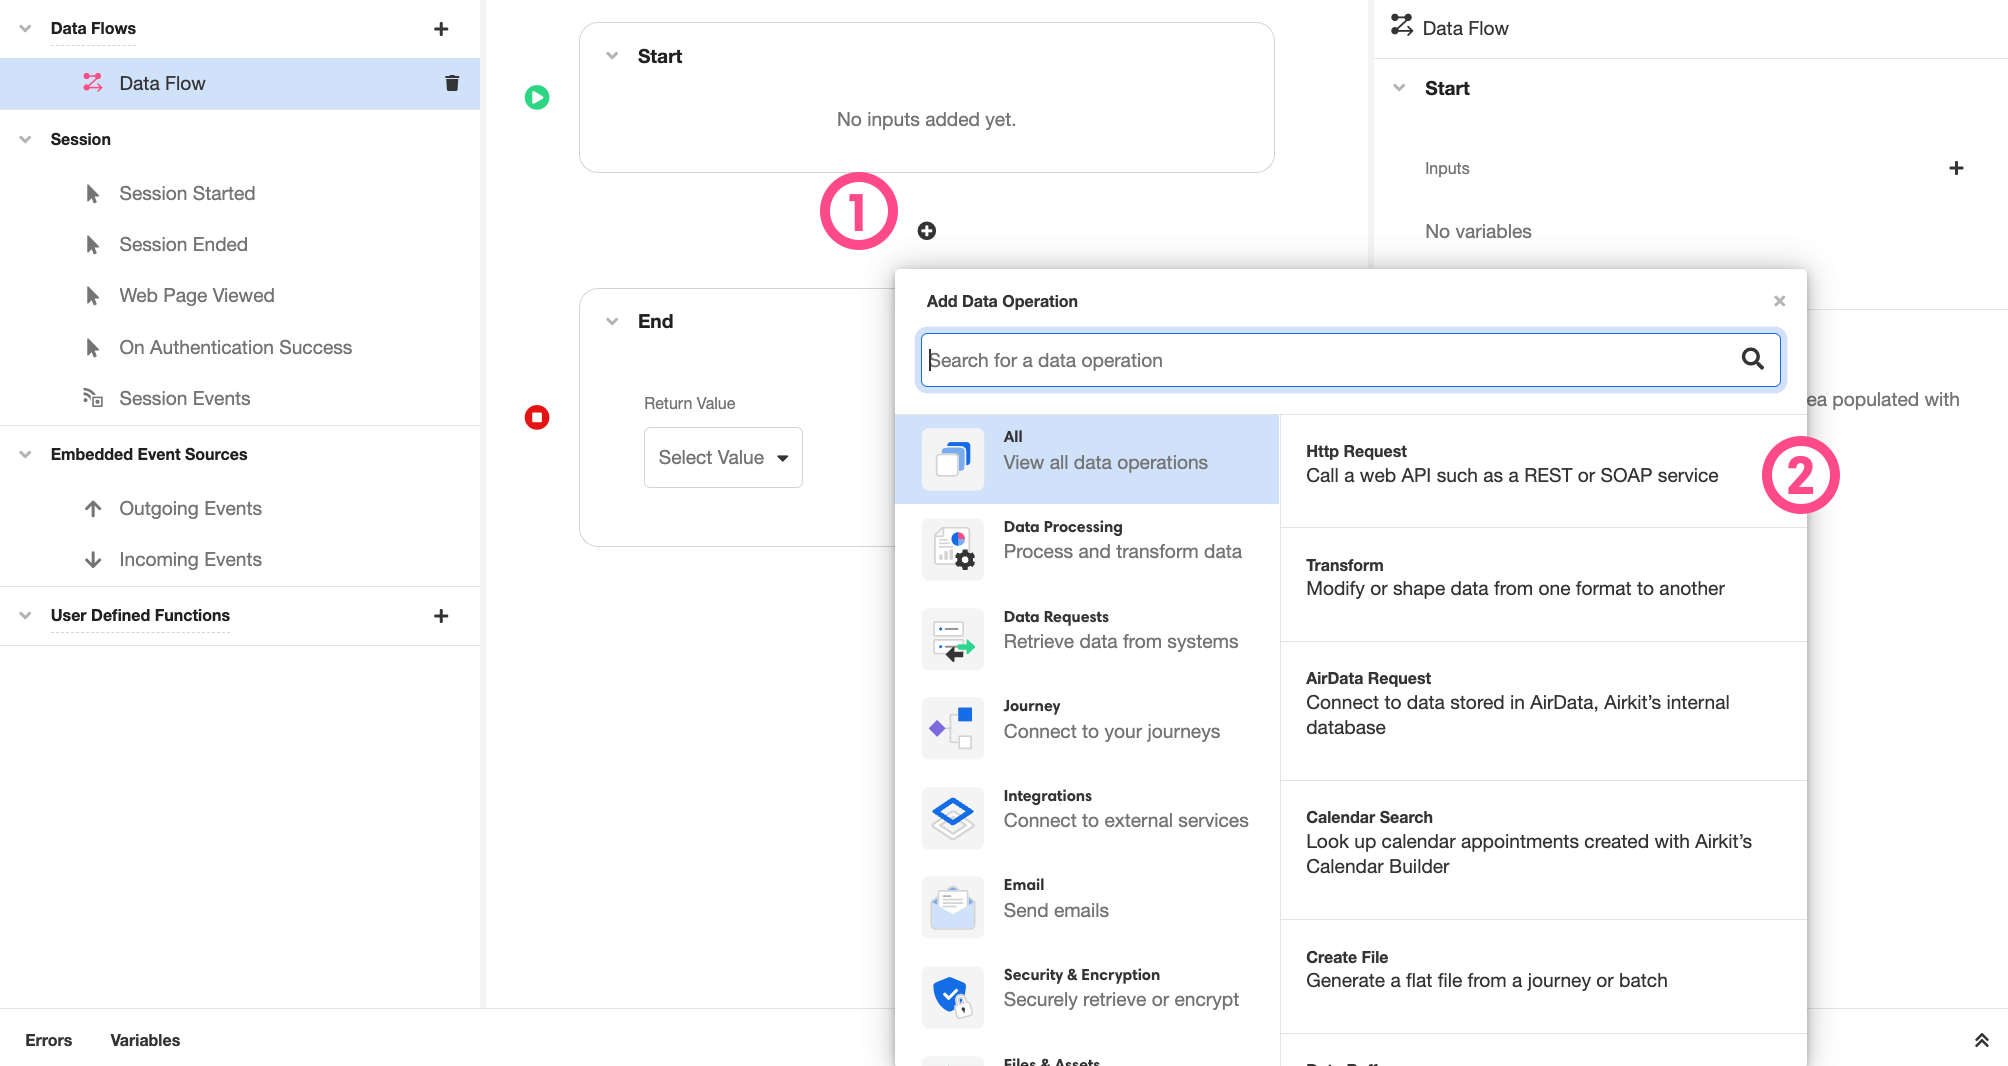
- Click on the '+' icon that appears between the Start and End Blocks in the Stage, and in the selection menu that pops up, select HTTP Request.
- An HTTP Request Data Operation will appear between the Start and End Boxes. Change the Method to
GETand enter the following URL:
"https://app.airkit.com/travel-products-catalog/products"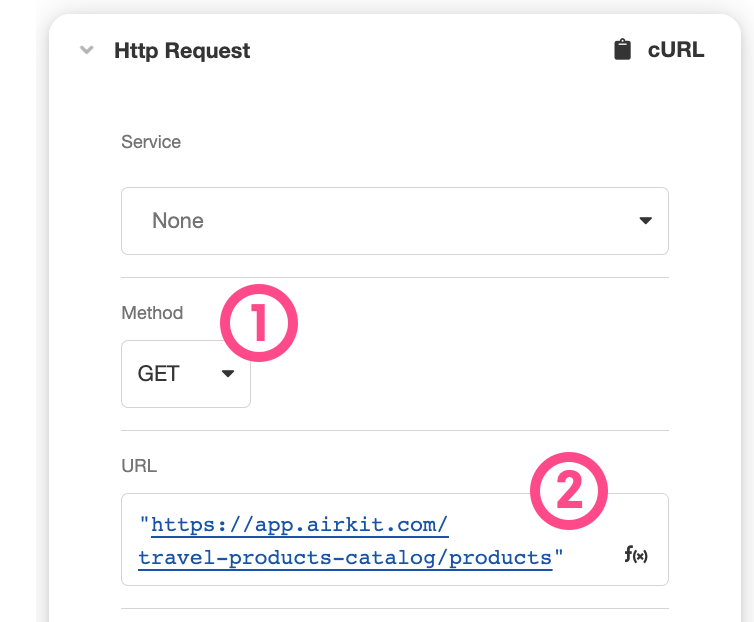
This endpoint returns a list of objects from a dummy product catalog. This API was made in Airkit, check out the API docs here.
For simplicity, this API requires no authentication. In most cases, it is recommended building authentication into your App APIs. Read more in App APIs.
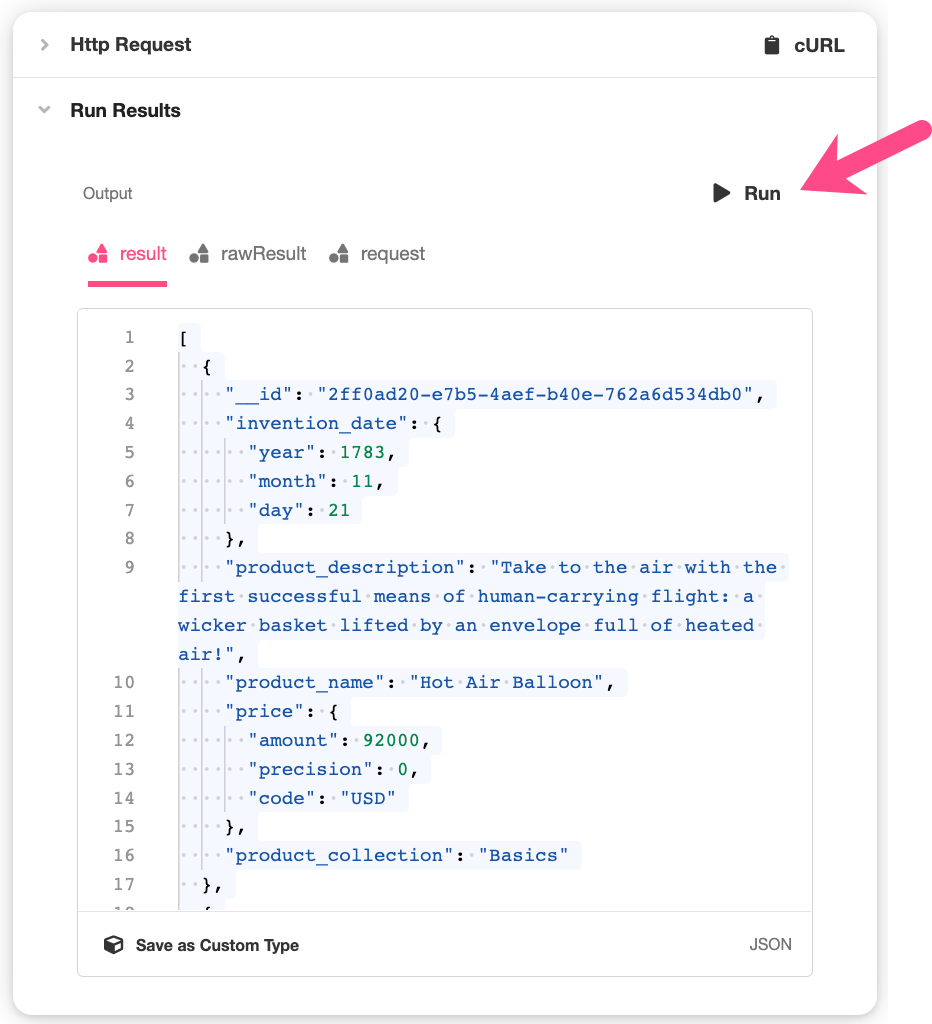
- Click the Run Button to submit the HTTP Request. The JSON packet returned by the API will be accessible in the Data Flow as
result.
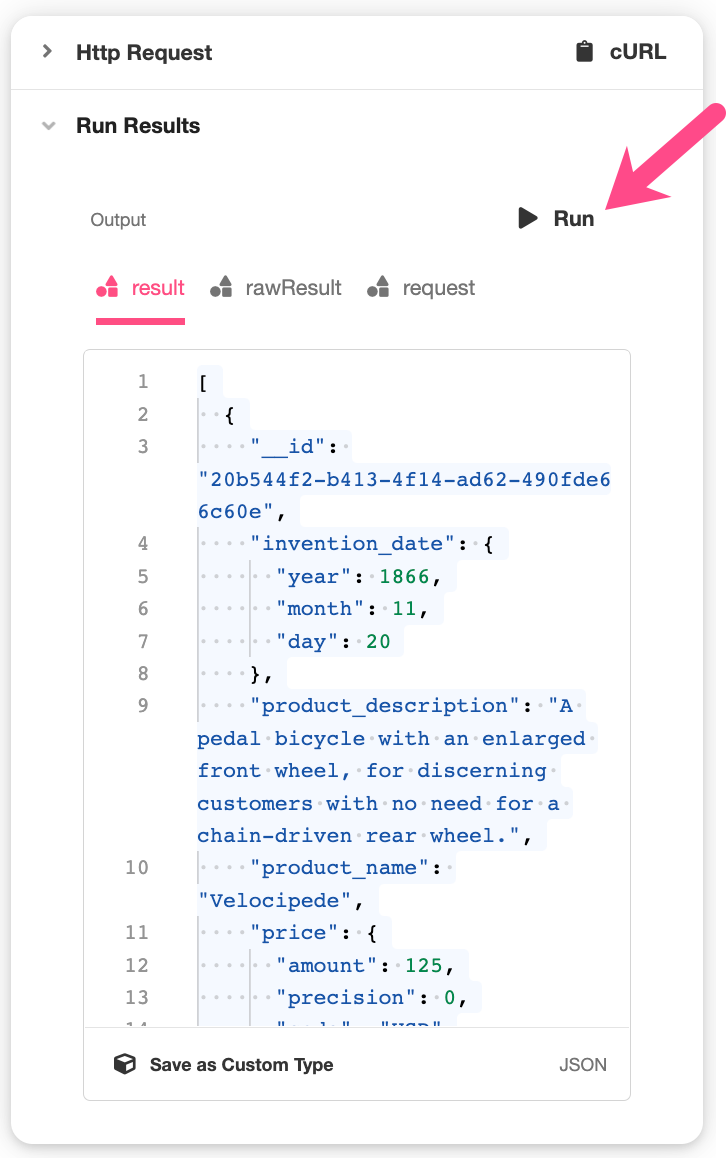
Congratulations! You've just used Airkit to pull data from an external API.
Airkit can integrate with all sorts of APIs. For more on how to integrate Airkit apps with your external systems, see Integrations Overview.
Take Input and Add Query Parameters
Data Flows are custom connections. Conceptually, they work like functions: they can take in input, they can process data based on any input they might have received, and they can return the resulting output.
We've already made a Data Flow that can pull data from an external API. Next, we'll configure the Data Flow so that it can parse input and use it as a Query Parameter in the HTTP Request.
We'll be using the Query Parameter "collection", which has only a few allowed values. See the API documentation for more details.
- In the Inspector, found to the far right of the Connections Builder, click on the '+' icon to the right of Inputs. Select Text from the dropdown menu of variable data types.
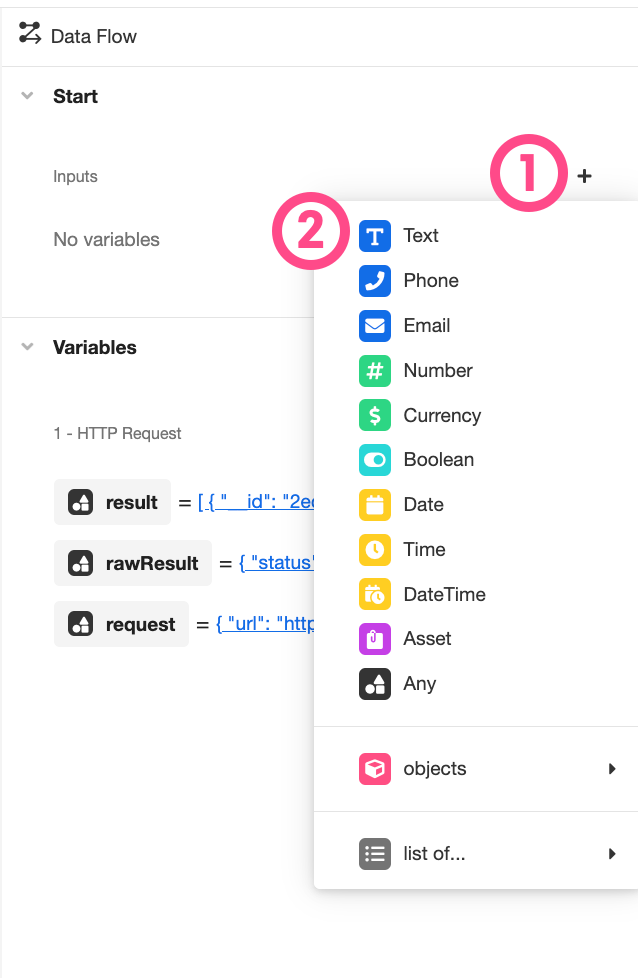
- Double click on the new Text variable, designated
variable1, and rename it toquery_param. Note how this changes how the variable appears in both the Inspector and the center Stage:

- In the Start Block in the Stage, change the example value assigned to
query_paramfrom "Sample Text" to "Basics".
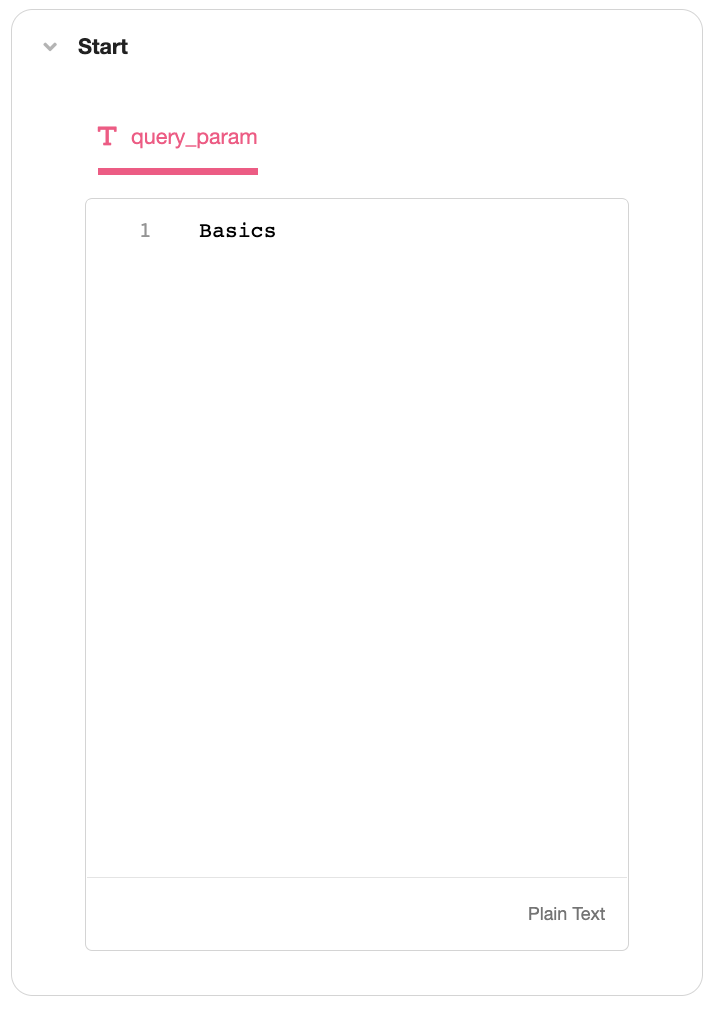
Example values are for testing purposes onlyThe dummy values given here are not default values, and they will not be used in production, but they will be useful for testing purposes while working within the Data Flow.
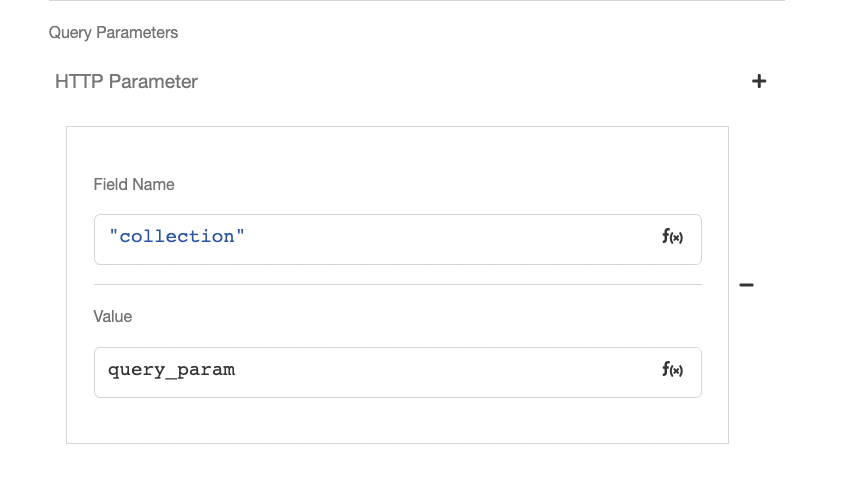
- Scroll back down to the HTTP Request Data Operation that was inserted under the Start Block, in the previous section. Under Query Parameters , click on the '+' icon to the right of HTTP Parameter. Under Field Name enter
"collection", and under Value, enterquery_param.
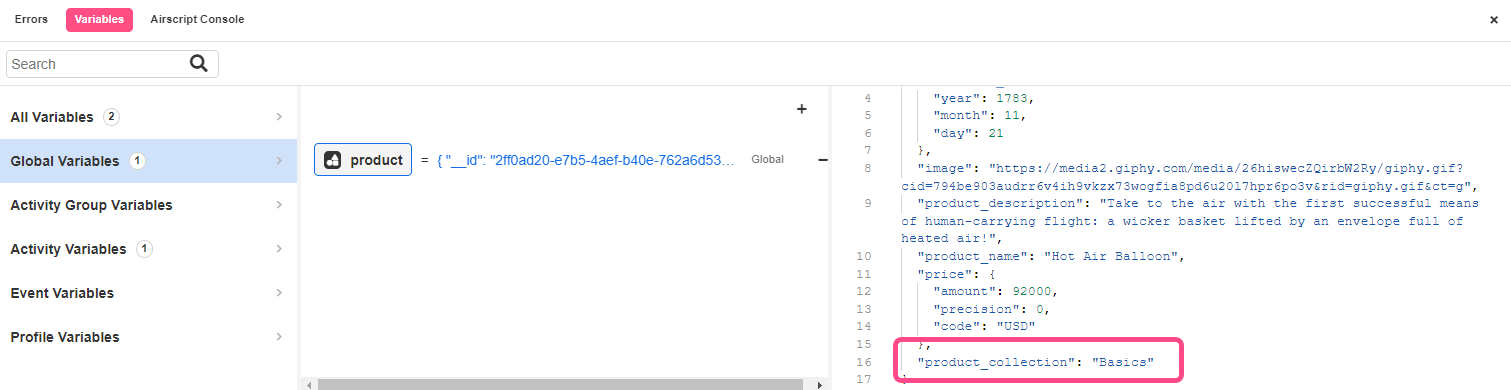
- Click Run to submit the HTTP Request and see the results. Note that all of the returned Objects in the List have the value "Basics" for
product_collection.
- Click on the 'Save' icon to the upper left of the Studio to save your progress.
Save your work frequently!Save your work frequently, so you don't have to worry about losing progress by accident. Click the Save button on the upper left of the Studio, or use the usual keyboard shortcuts: CMD + S or CTRL + S.
Transform Collected Data and Define Output
The HTTP Request we've configured returns a List of Objects. We're going to configure our Data Flow to return only a single random Object from the result.
- In the Stage, click on the '+' icon between the HTTP Request Data Operation and the End. In the selection menu that pops up, select Transform.
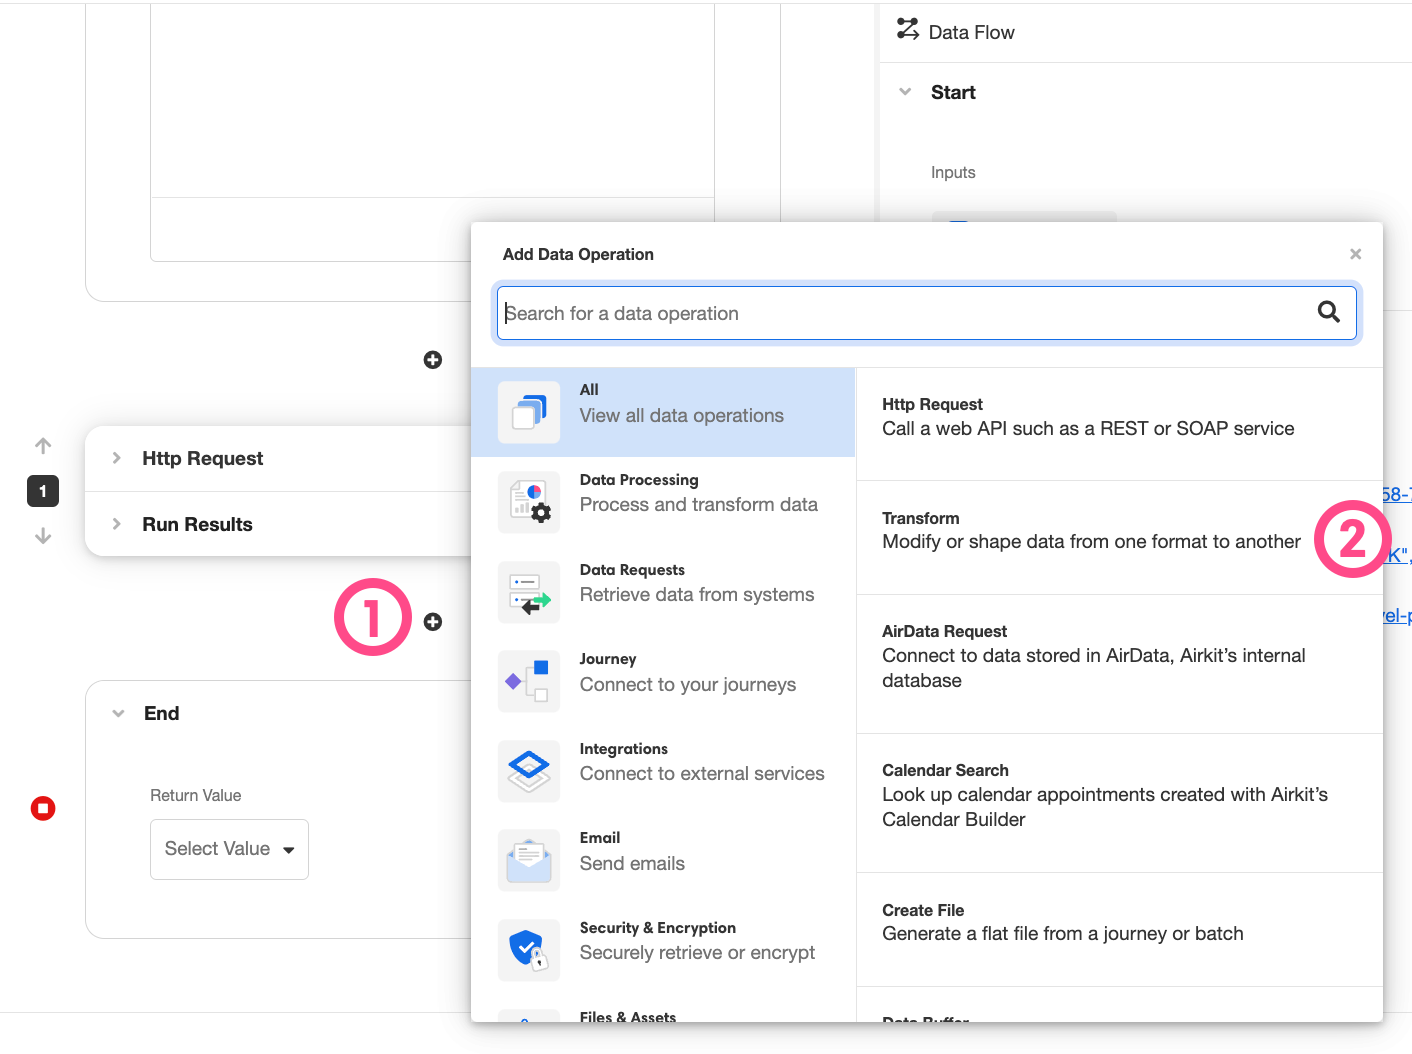
- A Transform Data Operation will appear between the HTTP Request Data Operation and the End. Under Transform Expression, enter the following Airscript expression:
result[
    RANDOM(0, LENGTH(result), TRUE)
  ]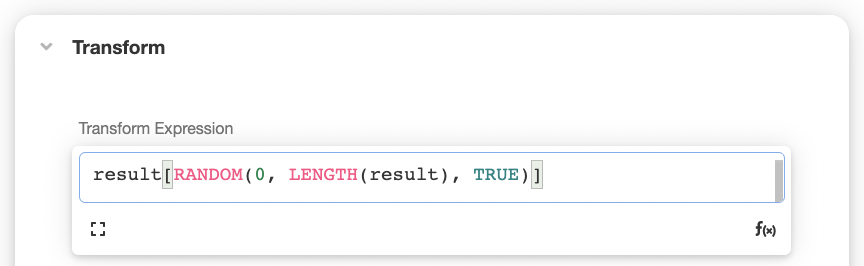
This uses the Airscript functions RANDOM and LENGTH to pull a random object from the from the list of objects given by the result returned by the upstream HTTP Request.
Use Path Expressions to reference Lists and Objects.Airscript references Lists and Objects using Path Expressions. List indexing begins at zero. For instance, if we wanted only the first Object given in the List, rather than a random Object, we would refer to
result[0]. If we wanted only theproduct_nameattribute given by the first Object in the List, we would refer toresult[0].product_name.
- Click Run to evaluate the Airscript expression. The value of the evaluated Airscript expression will now be accessible within the Data Flow as
transform.
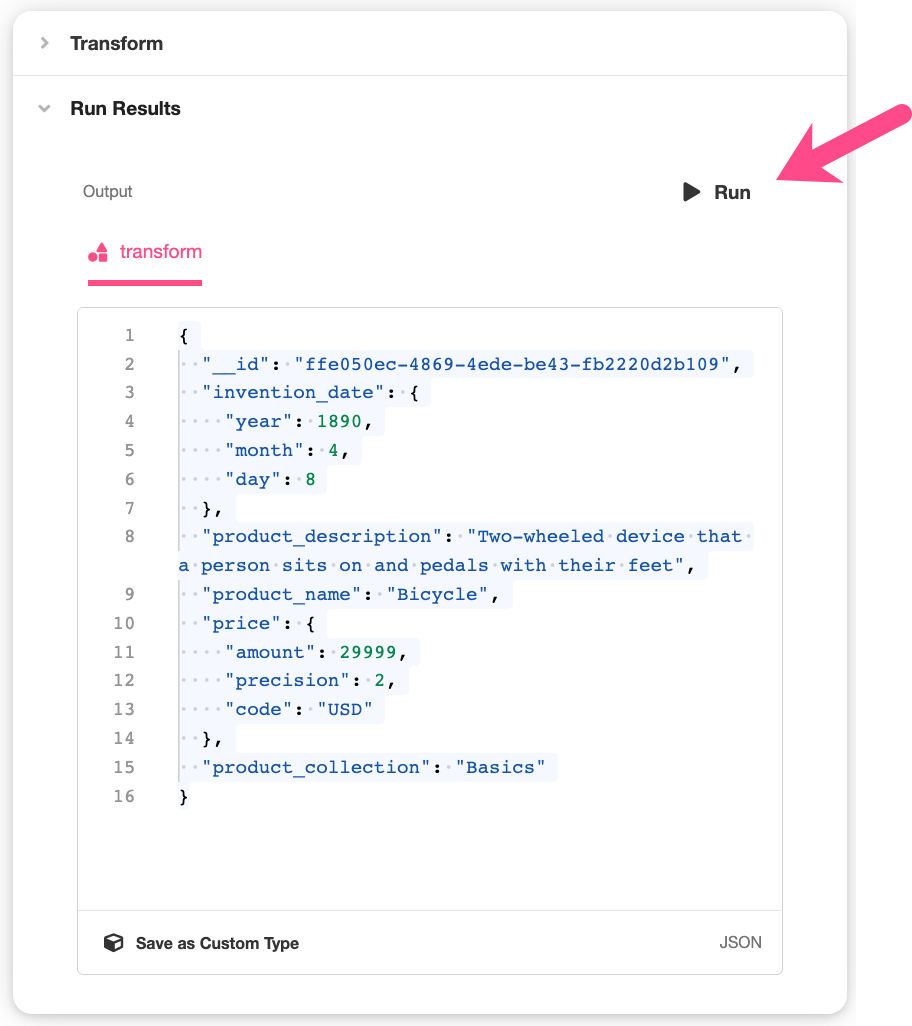
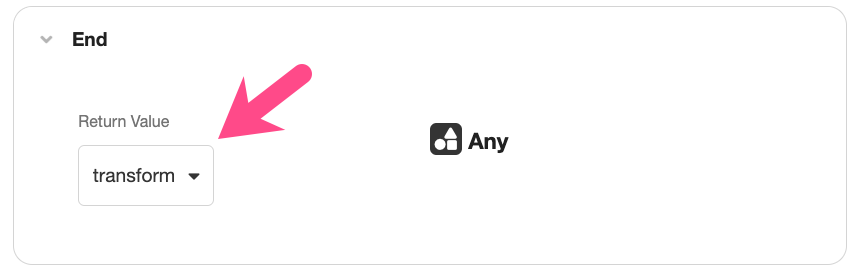
- In the End block, under Return Value, select
transformas the output of this Data Flow.
Managing variables within a Data FlowAs Data Operations are added to a Data Flow, they automatically generate internal variables to store values returned after running the Data Operation. These internal variables are only accessible within the Data Flow, and they are managed within the rightmost Inspector, where they can be both viewed and renamed.
Variables generated by a Data Operation can be accessed by all subsequent Data Operations.
For more working with data within Data Flows, see Data Flows.
Define a Global Variable
Now that we've created a Data Flow that both accepts input and returns output, we need to create a variable that allows us to store the output so that it can be accessed outside of the context of the Data Flow.
- Open the Variable Tree by clicking on the Variables button at the bottom left of the Stage.
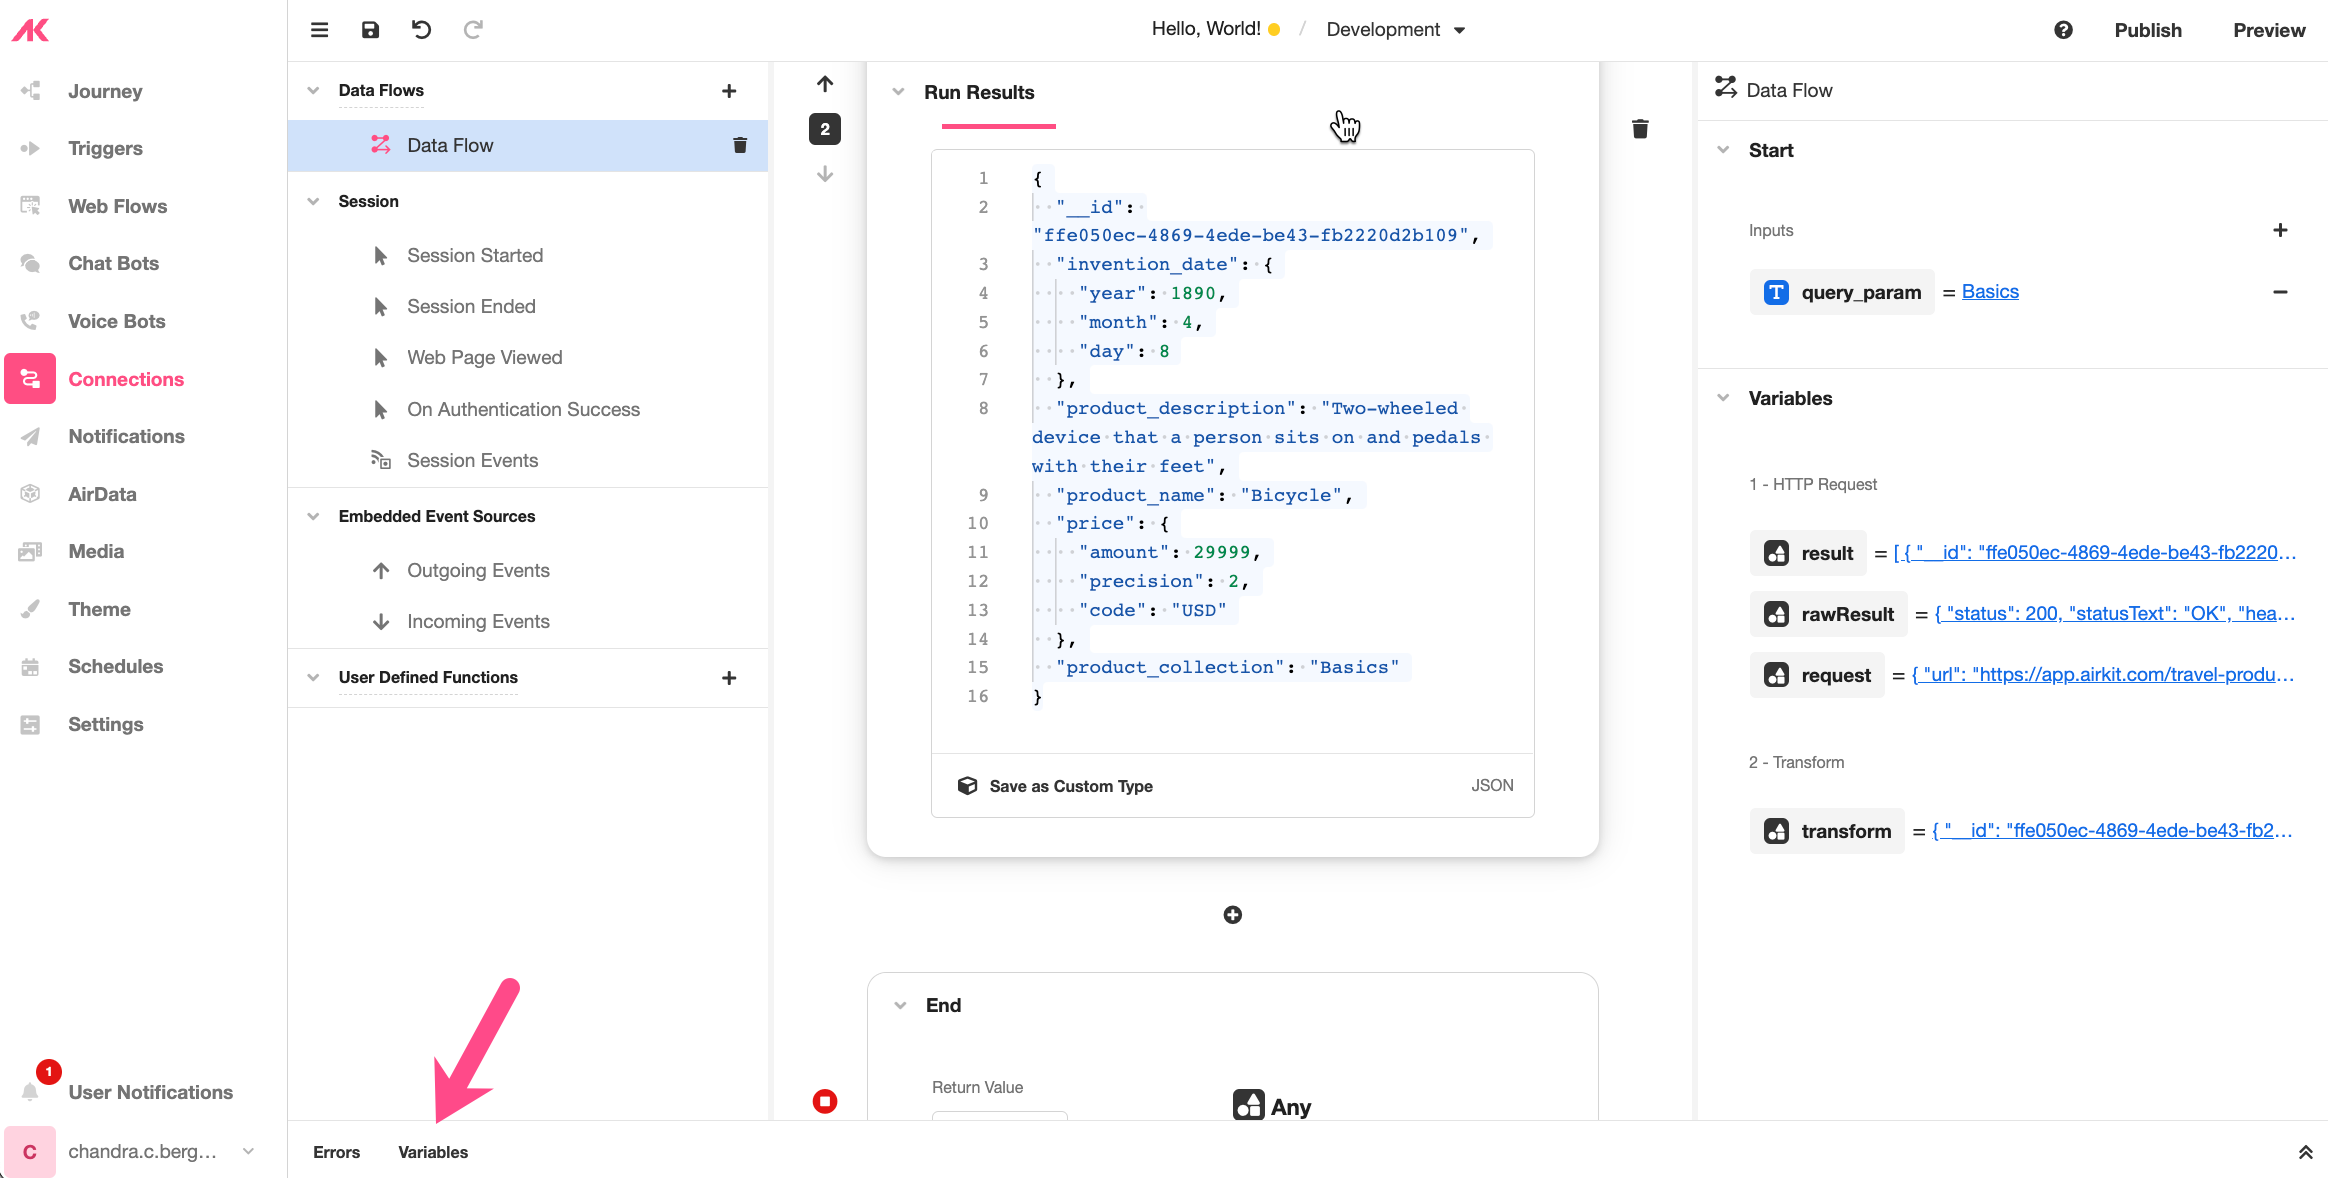
- Create a new global variable by selecting Global Variables from the leftmost column and then clicking on the '+' icon to the upper right of the middle column. Select the data type Any.
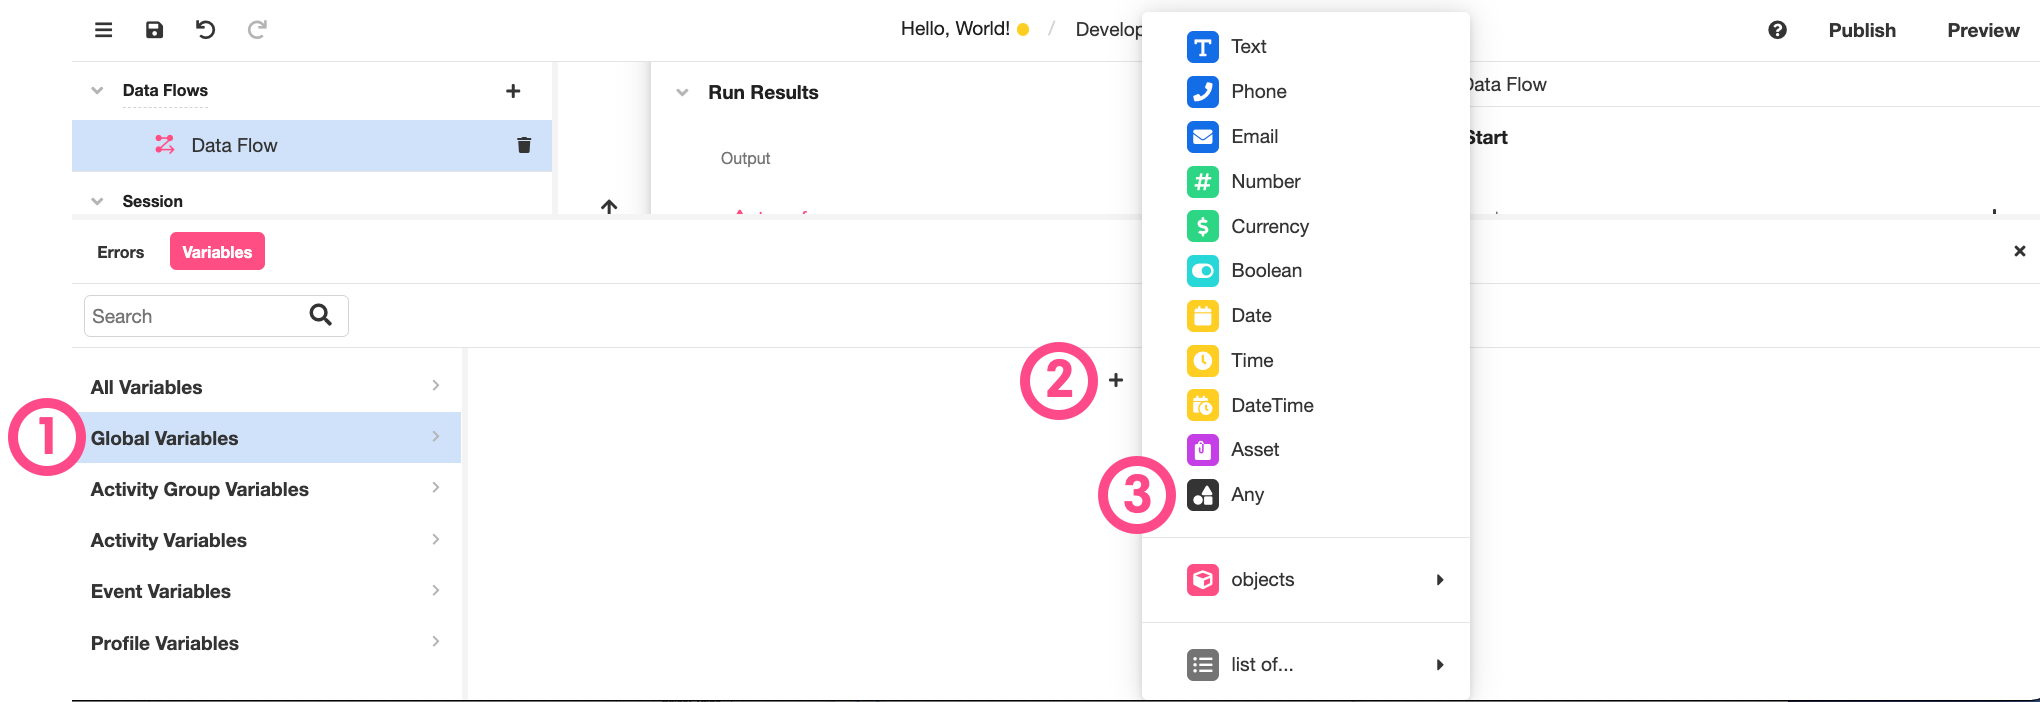
- Rename this new variable to
productand press Enter to create the variable.
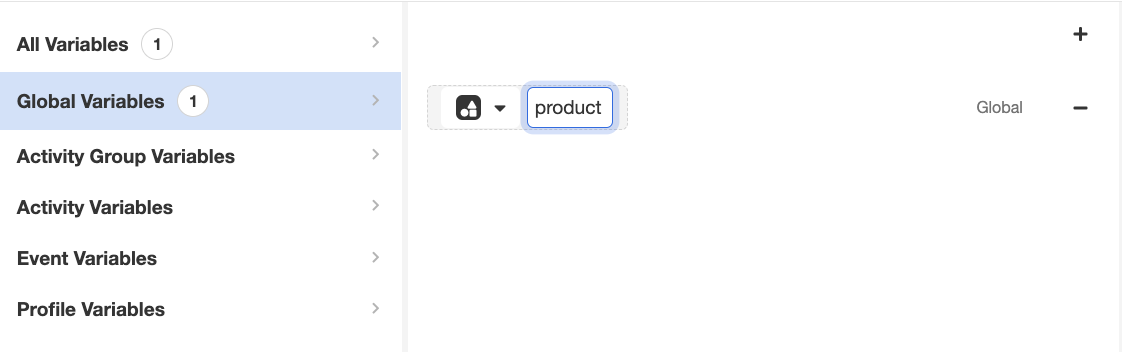
Because this is a Global variable, it can now be accessed throughout an application Session under the namespace session.product.
Accessing variablesAll variables within a Session have an associated namespace, which defines where the variable is stored, as well as how and when the variable is accessible. This places limitations on the scope of individual variables, which is important for the sake of both security and application efficiency. For more information on how to store and access variables of different scopes, see Variable Namespaces.
- Ultimately, the variable
productis going to be used to store the data returned from our Data Flow, but it's not hooked up yet. In the meantime, however, we can copy some sample data into this variable as a placeholder. Copy/paste the result of your Transform Data Operation into the rightmost column of the Variable Tree:
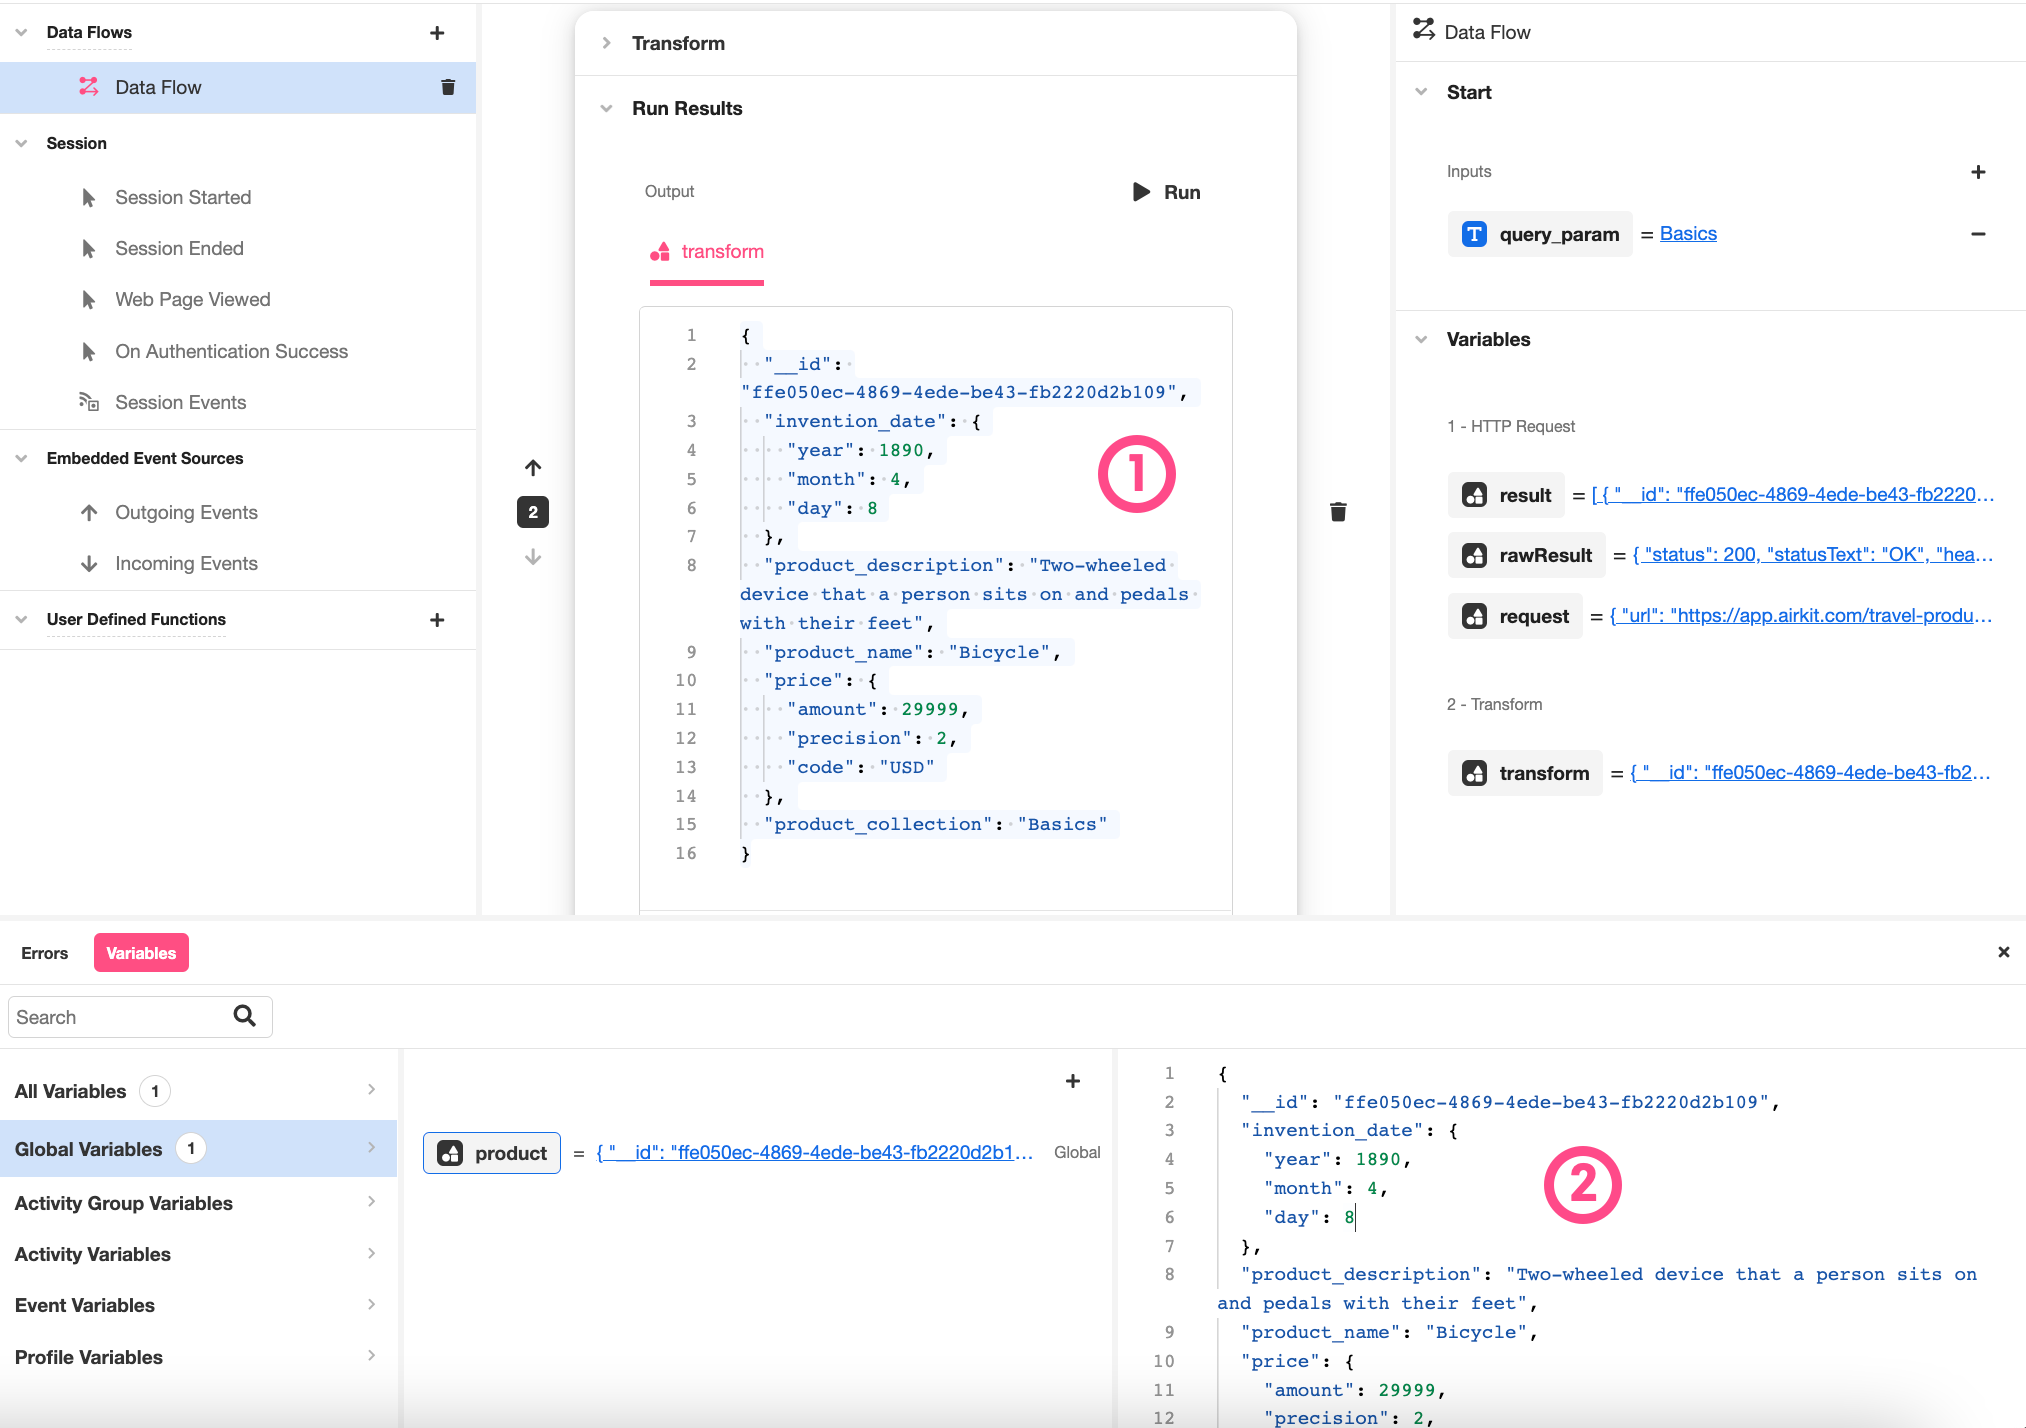
This will serve as an example value similar to the example values used as input in the Data Flow.
Example values are for testing purposes onlyThe dummy values given here are not default values, and they will not be used in production, but they will be useful for testing purposes while building within the Studio.
- Save your progress.
Run the Data Flow from a UI
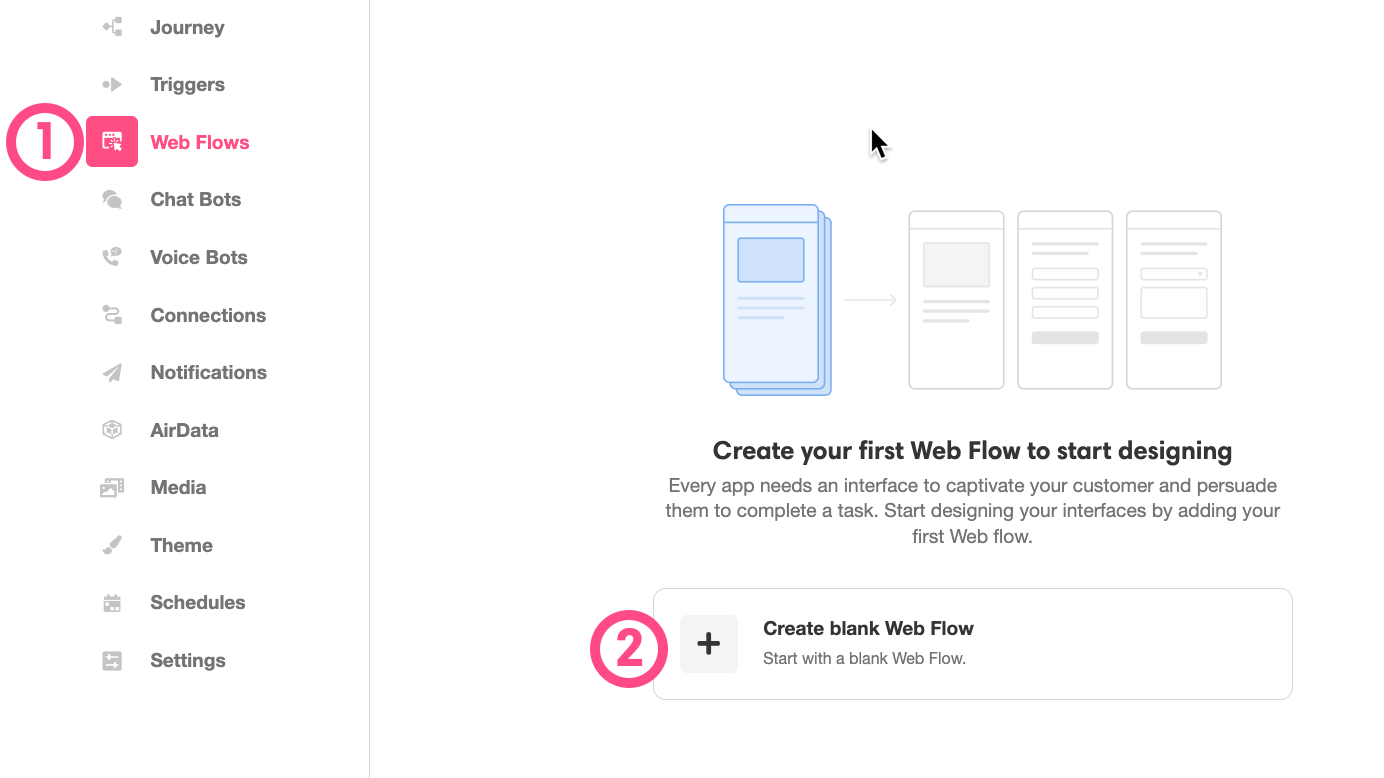
- Toggle over to Web Flows Builder. Select Create a Blank Web Flow.
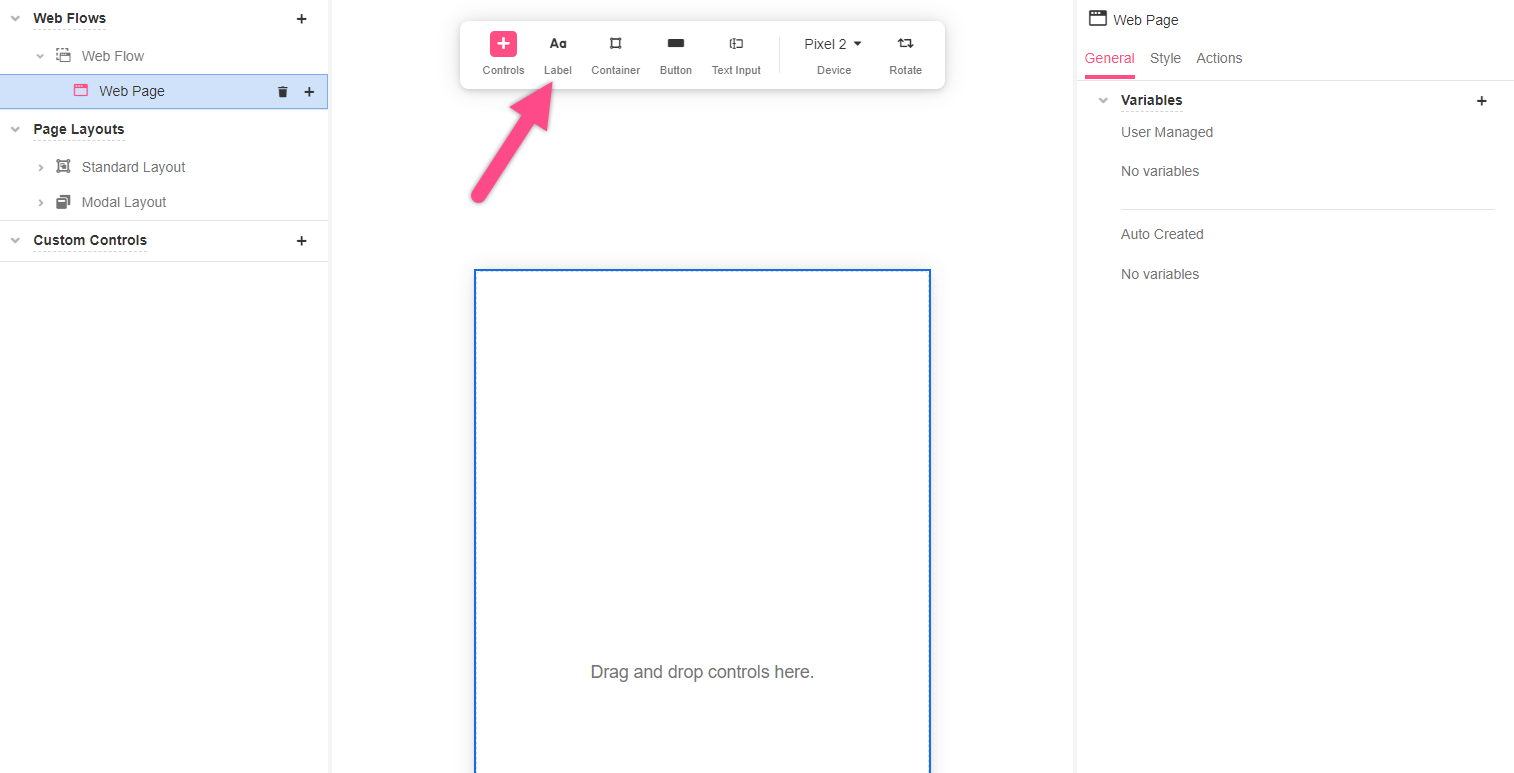
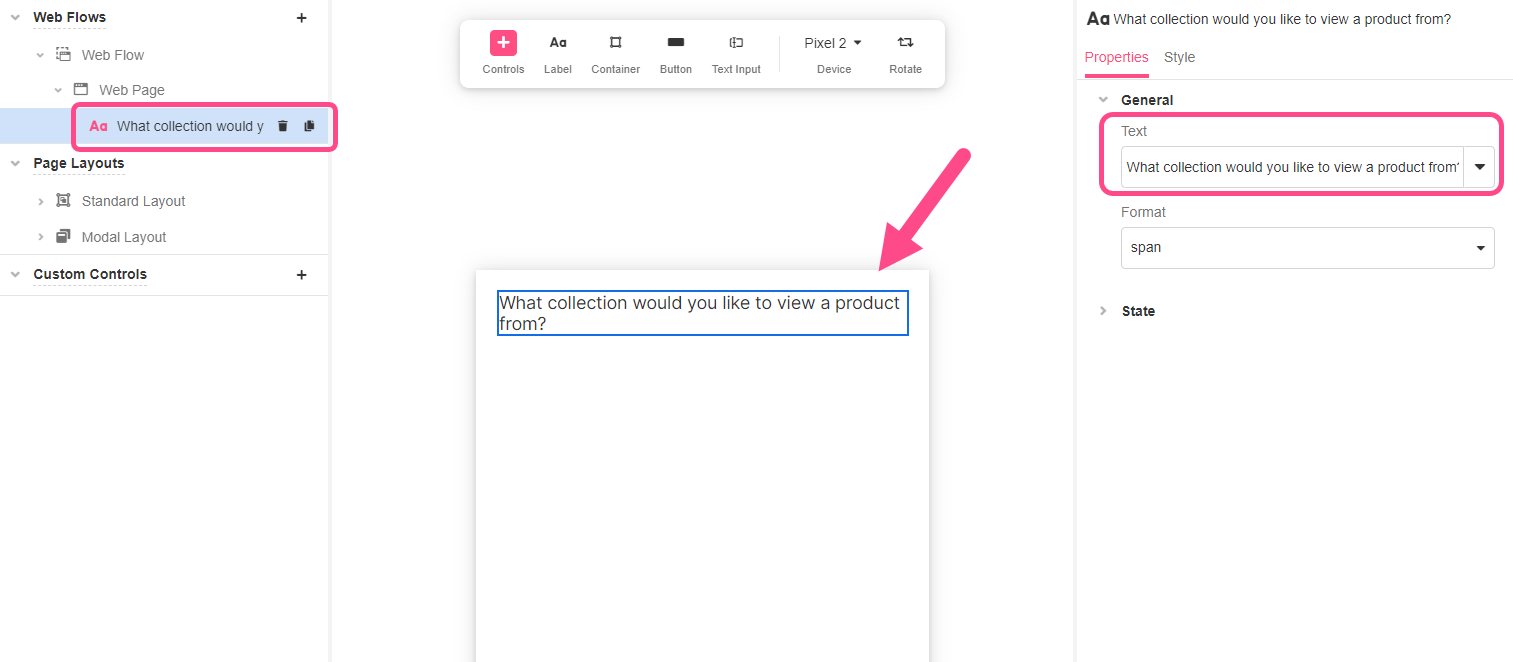
- Add a Label Web Control to your Web Page by clicking on the Label button on the Toolbar above the Stage.
-
Double-click on the text that appears in order to edit it. Replace "Label" with "What collection would you like to view a product from?" Note how this also changes the text in the Tree and the Inspector.
-
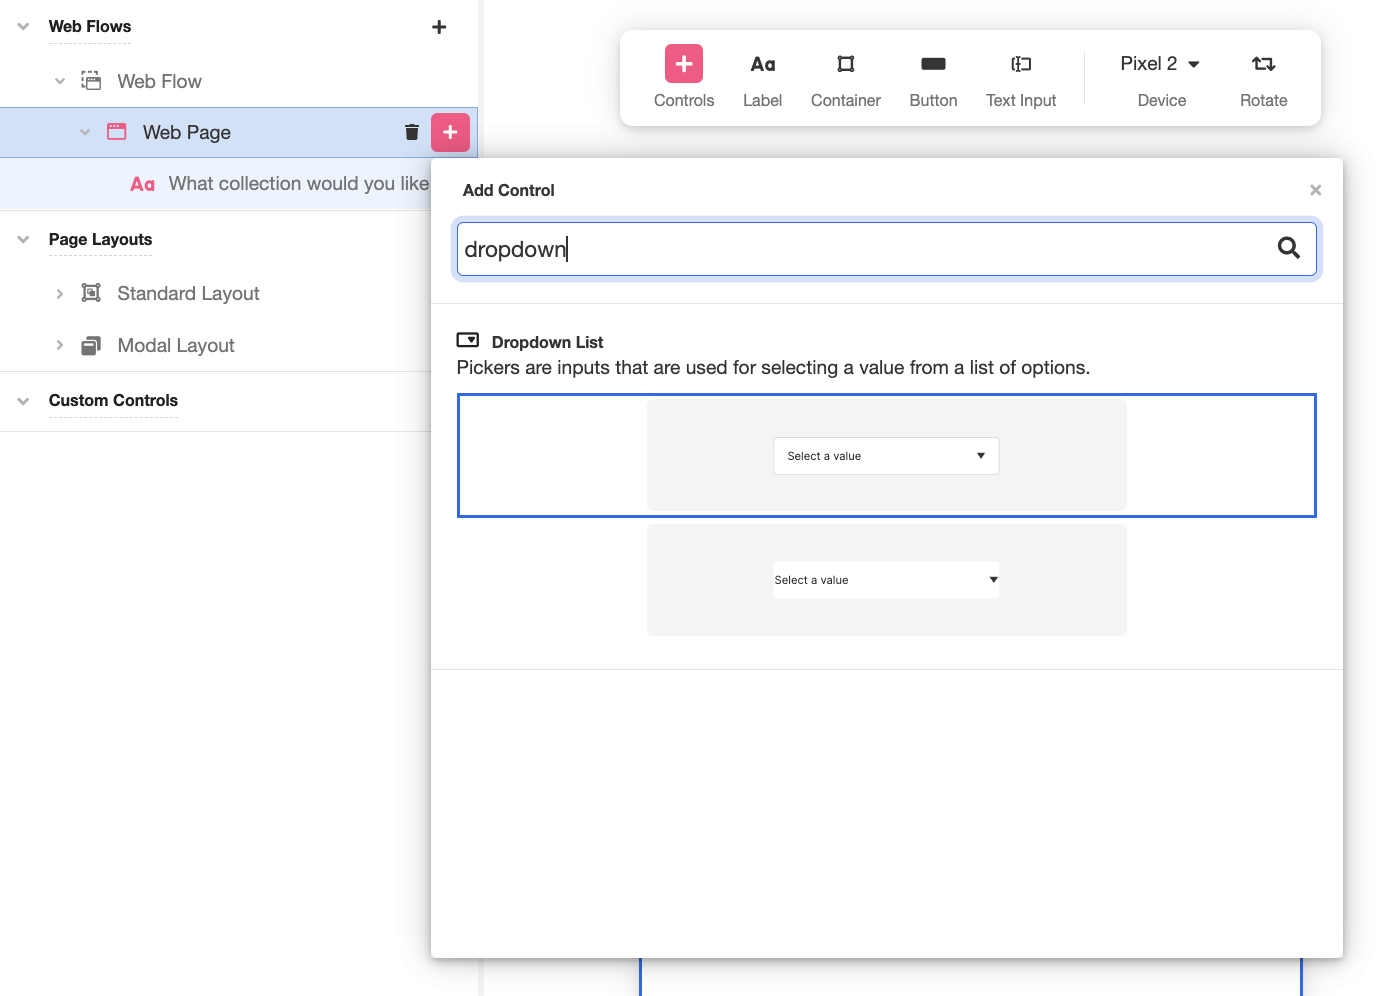
You can also add Web Controls from the Tree by clicking on the '+' icon to the right of the Web Page you're building. Add a Dropdown List Web Control this way.
-
The Dropdown List Web Control allows users to select from a finite list of options. In the Inspector, under Databinding > Type of List, select Custom Expression to define the options programatically.
-
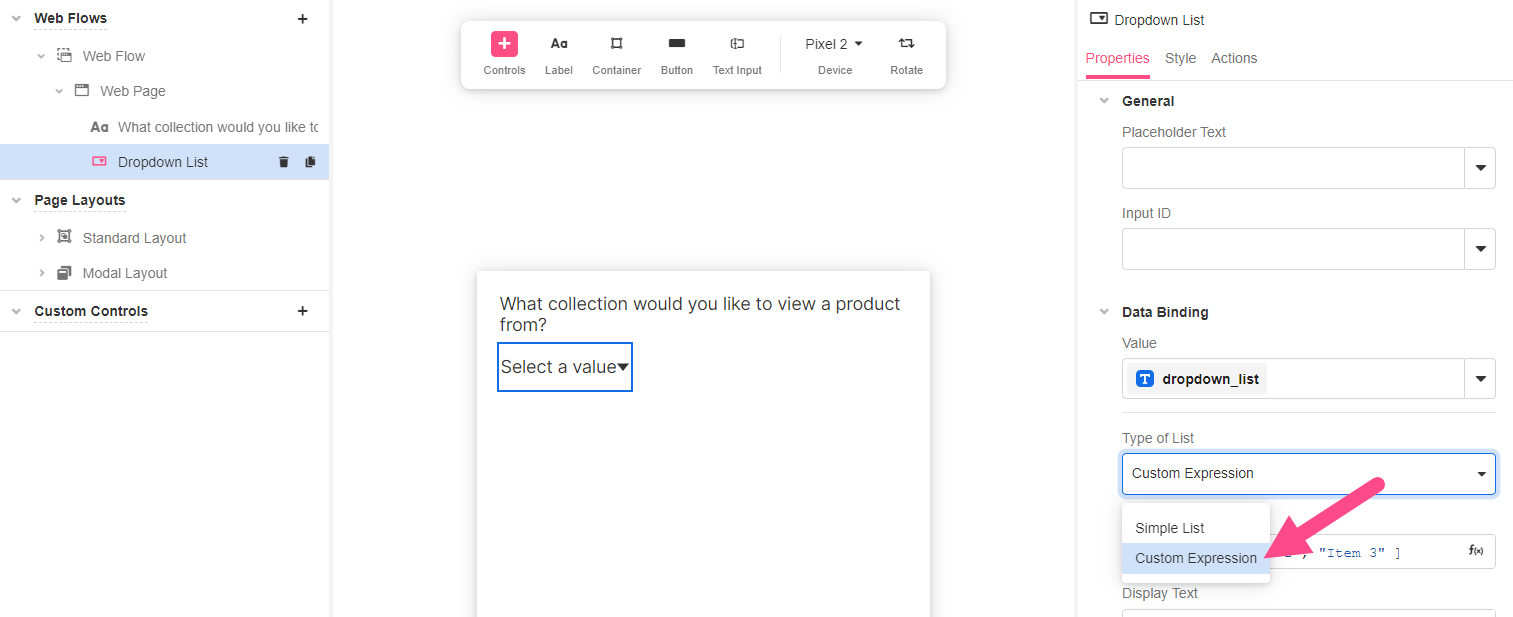
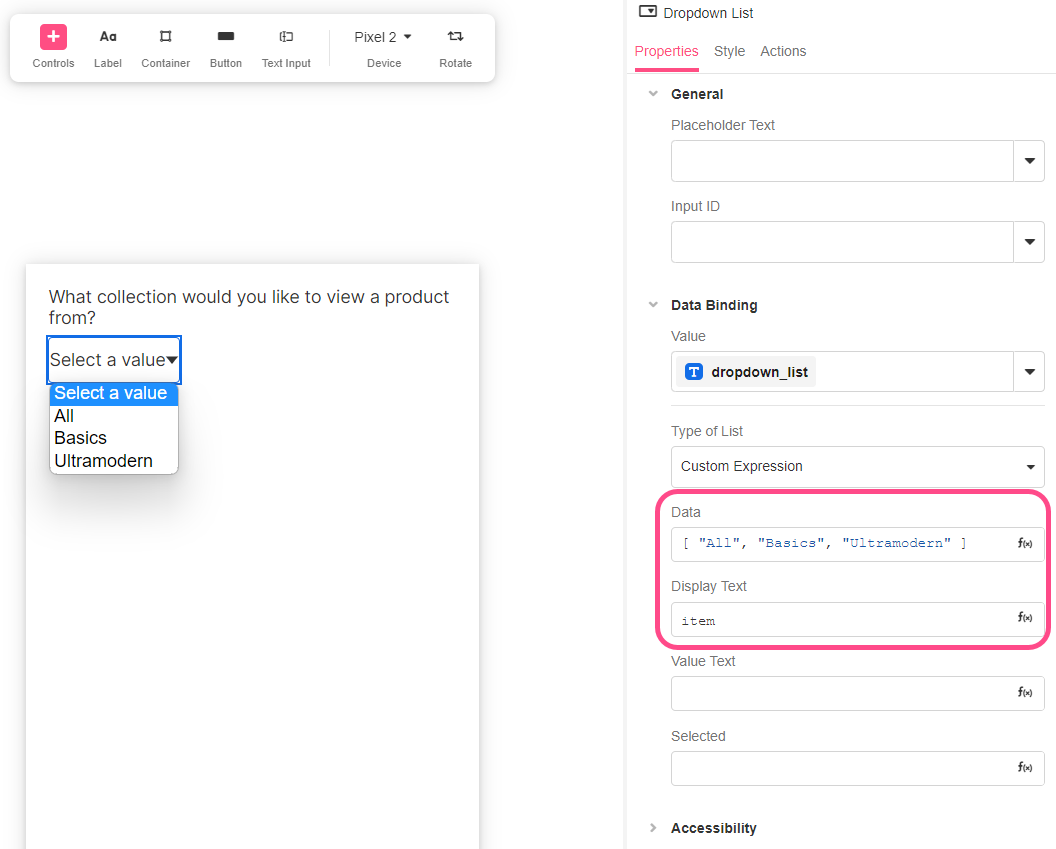
Under the Data section that appears, enter the following List of strings:
[ "All", "Basics", "Ultramodern" ]. Change the Display Text property toitemto will remove the quotes in the dropdown list. Note how this impacts the appearance of the Web Control in the Stage:
-
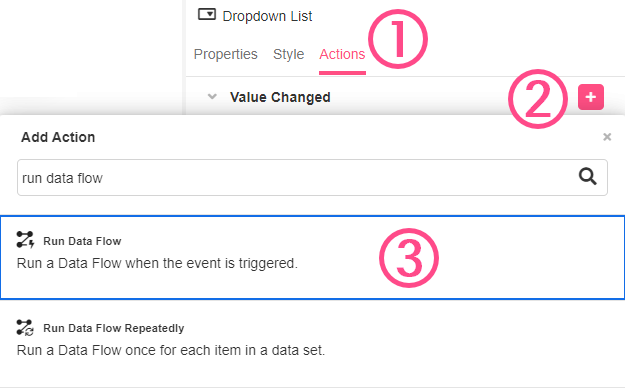
While continuing to Inspect the Dropdown List, toggle from the Properties Tab to the Actions Tab. Click on the '+' icon to the right of Value Changed and add a Run Data Flow Action from the selection menu.
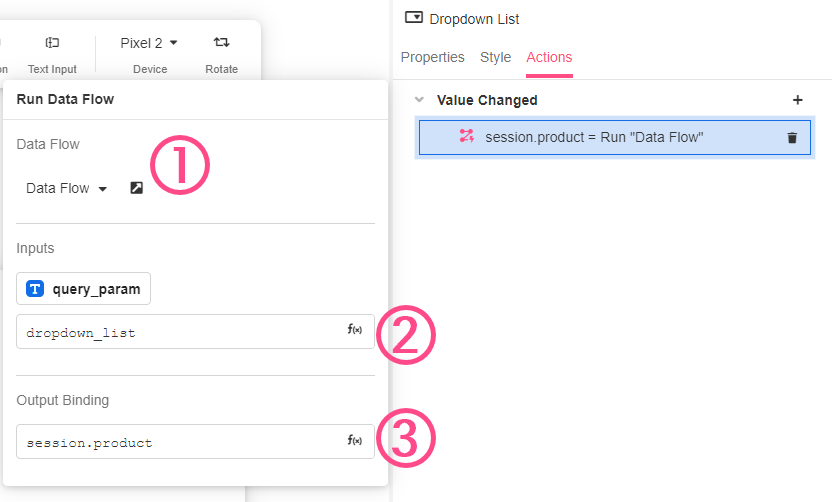
- Configure the Run Data Flow Action so that it runs your Data Flow using
dropdown_listas input and binds the output tosession.product:- Under Data Flow, select Data Flow
- Under Inputs >
query_param, enterdropdown_list - Under Output Binding, enter
session.product
You can use the Tab key to use the autocompletion options
- Save your progress.
Display the Data
We have now built a UI that collect user input and uses it to define a local variable, session.product, based on data pulled from an external API. Next, we'll configure the UI so that it also displays some of the collected data when appropriate.
- Add another Label Web Control. In the Inspector, under Style > Variant, select the Variant headingMedium to change the styling on the Label.
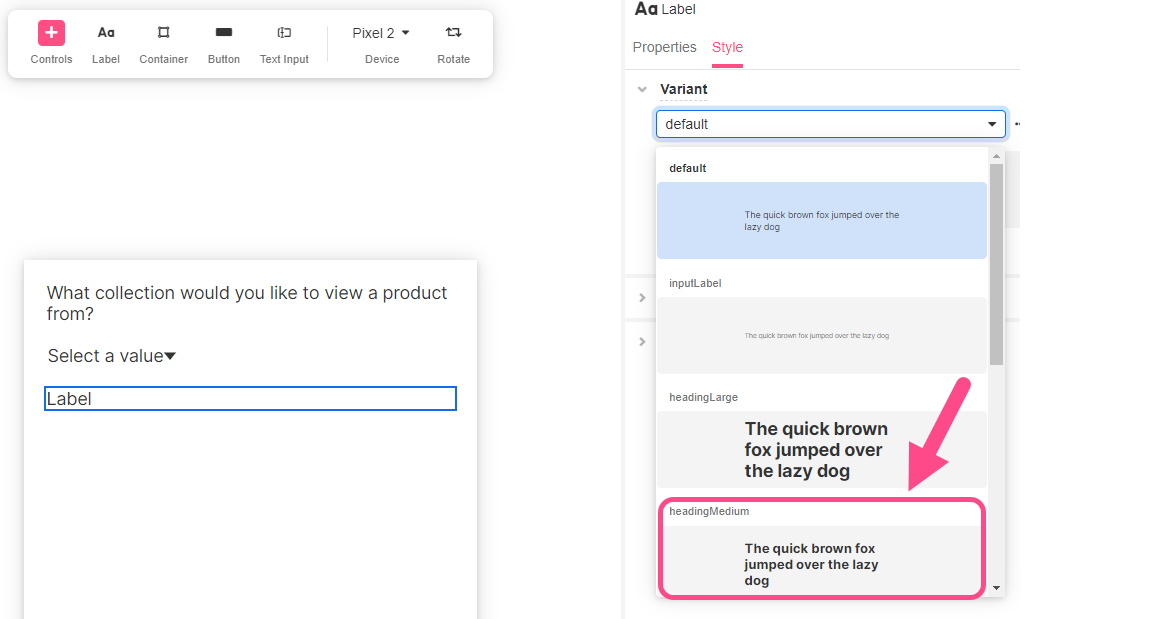
Variants are styling defaults that can be edited in the Theme Builder.A Variant is a set of styling properties for a specific Web Control, similar to a class in CSS. Every Web Control has associated Variants: cosmetic variations that appear differently but function identically. There are a variety of Variant options that come out of the box; they can also be created and edited in Theme Builder.
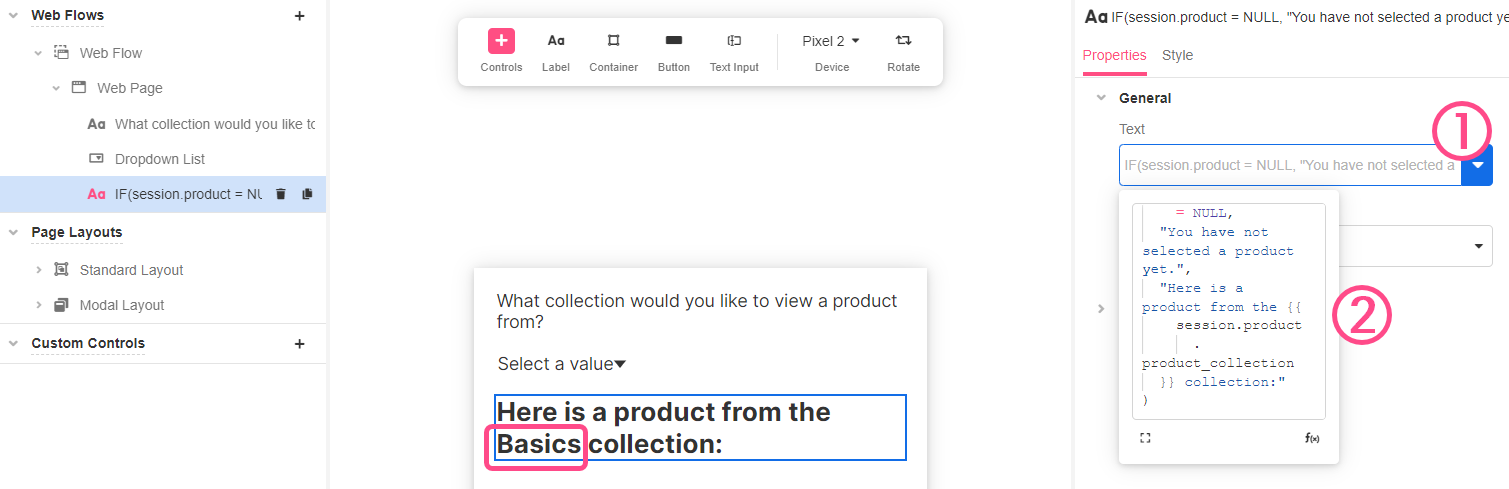
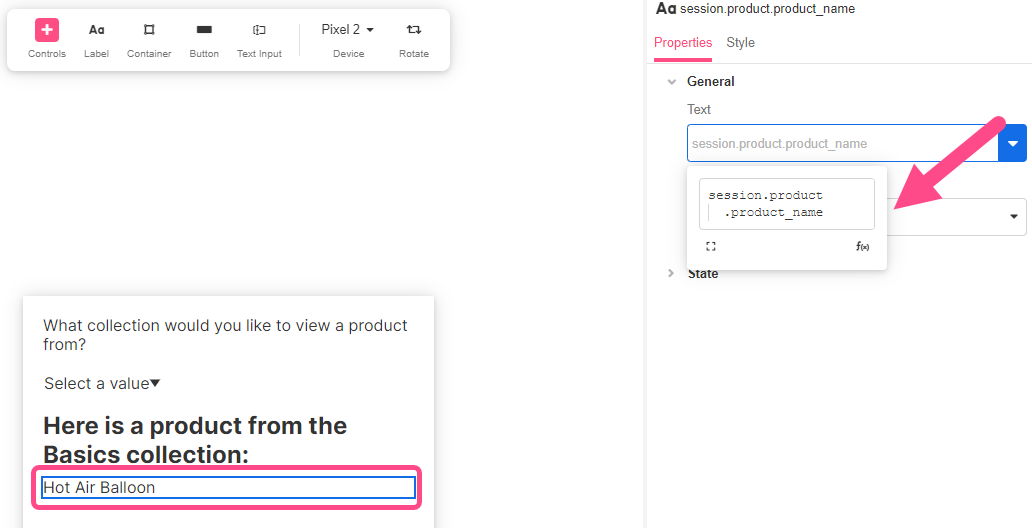
- While still inspecting the Label, expand the drop-down text box under Properties > General > Text and enter the following Airscript expression:
IF(
  session.product
    = NULL,
  "You have not selected a product yet.", "Here is a product from the {{session.product.product_collection}} collection:"
)
This uses the Airscript function IF to display different strings in the Label Web Control depending on whether or not a value has been tied to session.product. It also uses dot notation to reference the product_collection attribute of session.product.
Note how this changes the Label's appearance in the Stage; for testing purposes, it evaluates the Airscript expression using the sample value tied to the product variable in the Variable Tree:
Use double curly brackets to designate Airscript expressions in strings.To reference a variable or other Airscript expression within a string, designate the Airscript expression in double curly brackets, and the Airscript expression will be evaluated before the string is displayed.
- Insert another Label, expand the text box under Properties > General > Text and enter the following Airscript expression:
session.product.product_name.
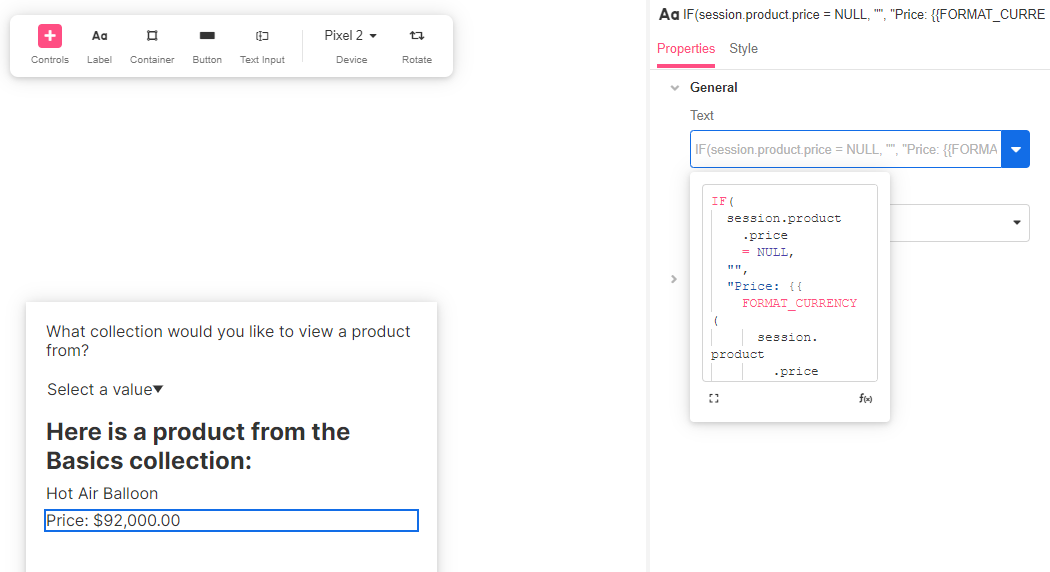
- Insert another Label, expand the text box under Properties > General > Text and enter the following Airscript expression:
IF(
  session.product
    .price
    = NULL,
  "",
  "Price: {{
    FORMAT_CURRENCY(
      session.product
        .price
    )
  }}"
)
This takes advantage of the fact that the price attribute of session.product is a special data type called a Currency object, which can be turned into a string using FORMAT_CURRENCY.
- Save your progress.
Fire Actions with a Button
- Add a Button Web Control. Under Properties > General > Text, enter the string "Give me a different product." Note how this changes the button's appearance:
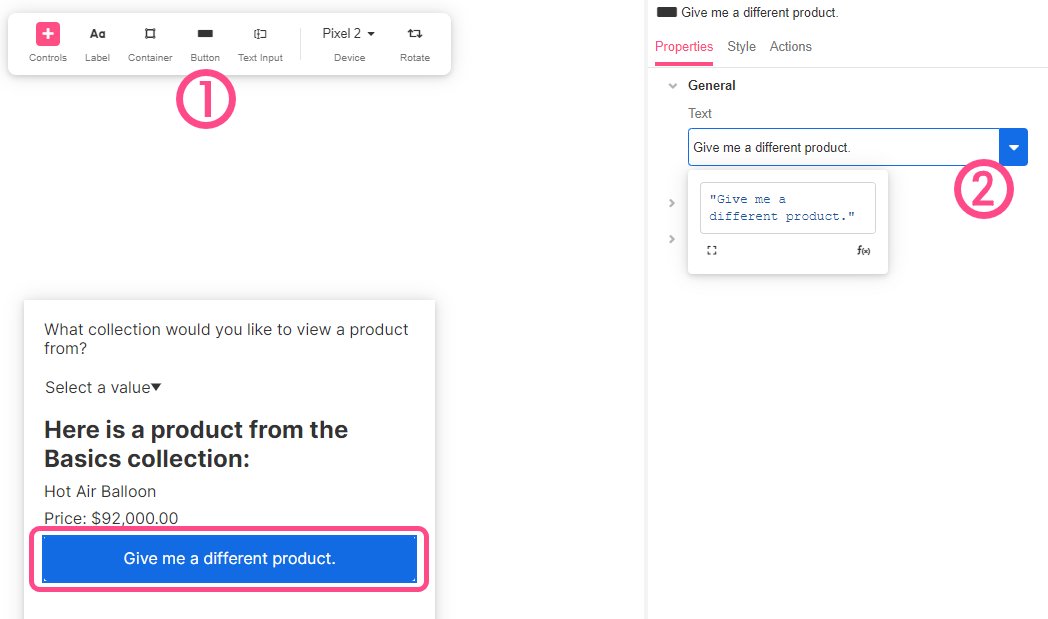
- While continuing to Inspect the Button, toggle from the Properties Tab to the Actions Tab. Click on the '+' icon to the right of Clicked and add a Run Data Flow Action from the selection menu. Configure the Run Data Flow Action so that it runs your Data Flow using
dropdown_listas input and binds the output tosession.product:- Under Data Flow, select Data Flow
- Under Inputs >
query_param, enterdropdown_list - Under Output Binding, enter
session.product

- Save your progress
Preview what you've built
Previewing your application fully emulates everything you've built out so far, allowing you to test all components of your digital experiences.
To ensure your App Preview will emulate all components of your app build, you'll need to save your app before Previewing; if you don't, you will receive a reminder to do so upon clicking the Preview button.
- Click on the Preview button to the upper right of the Studio.

- App Preview will open in a separate tab. To emulate accessing your application by clicking on a link, click on the Web icon to the bottom right of the leftmost Previews Window:
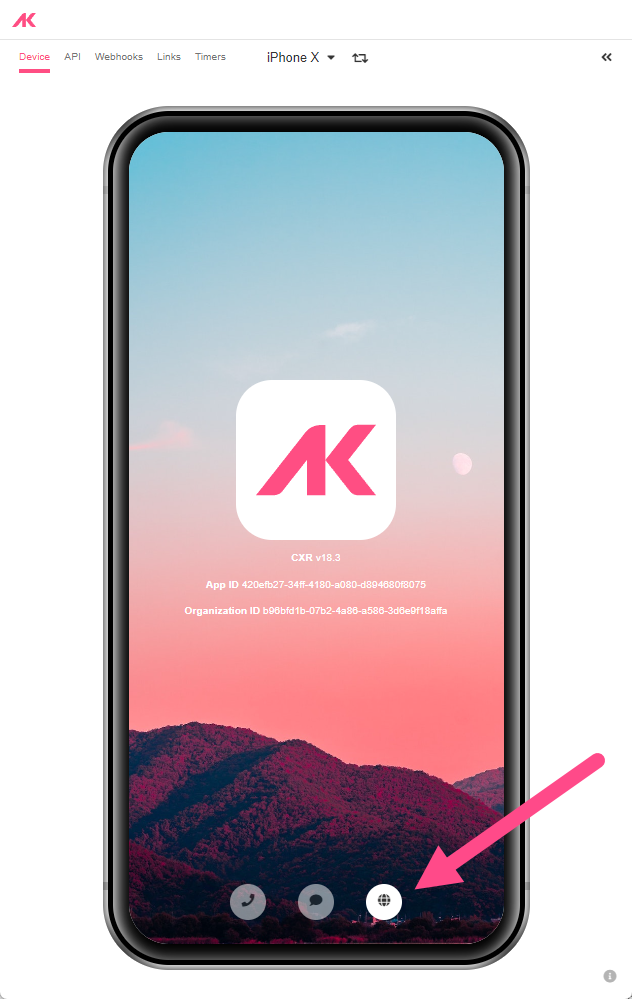
Clicking on this icon simulates the process of starting a digital Journey by clicking a link.
Simulating your application flow before it is published makes it easier to test and debug as you build. To learn more about what's going on under the hood of your application as a simulated Session progresses, click on the double arrow icon to the upper right part of the Device Preview Window to open the Event and State Viewers:
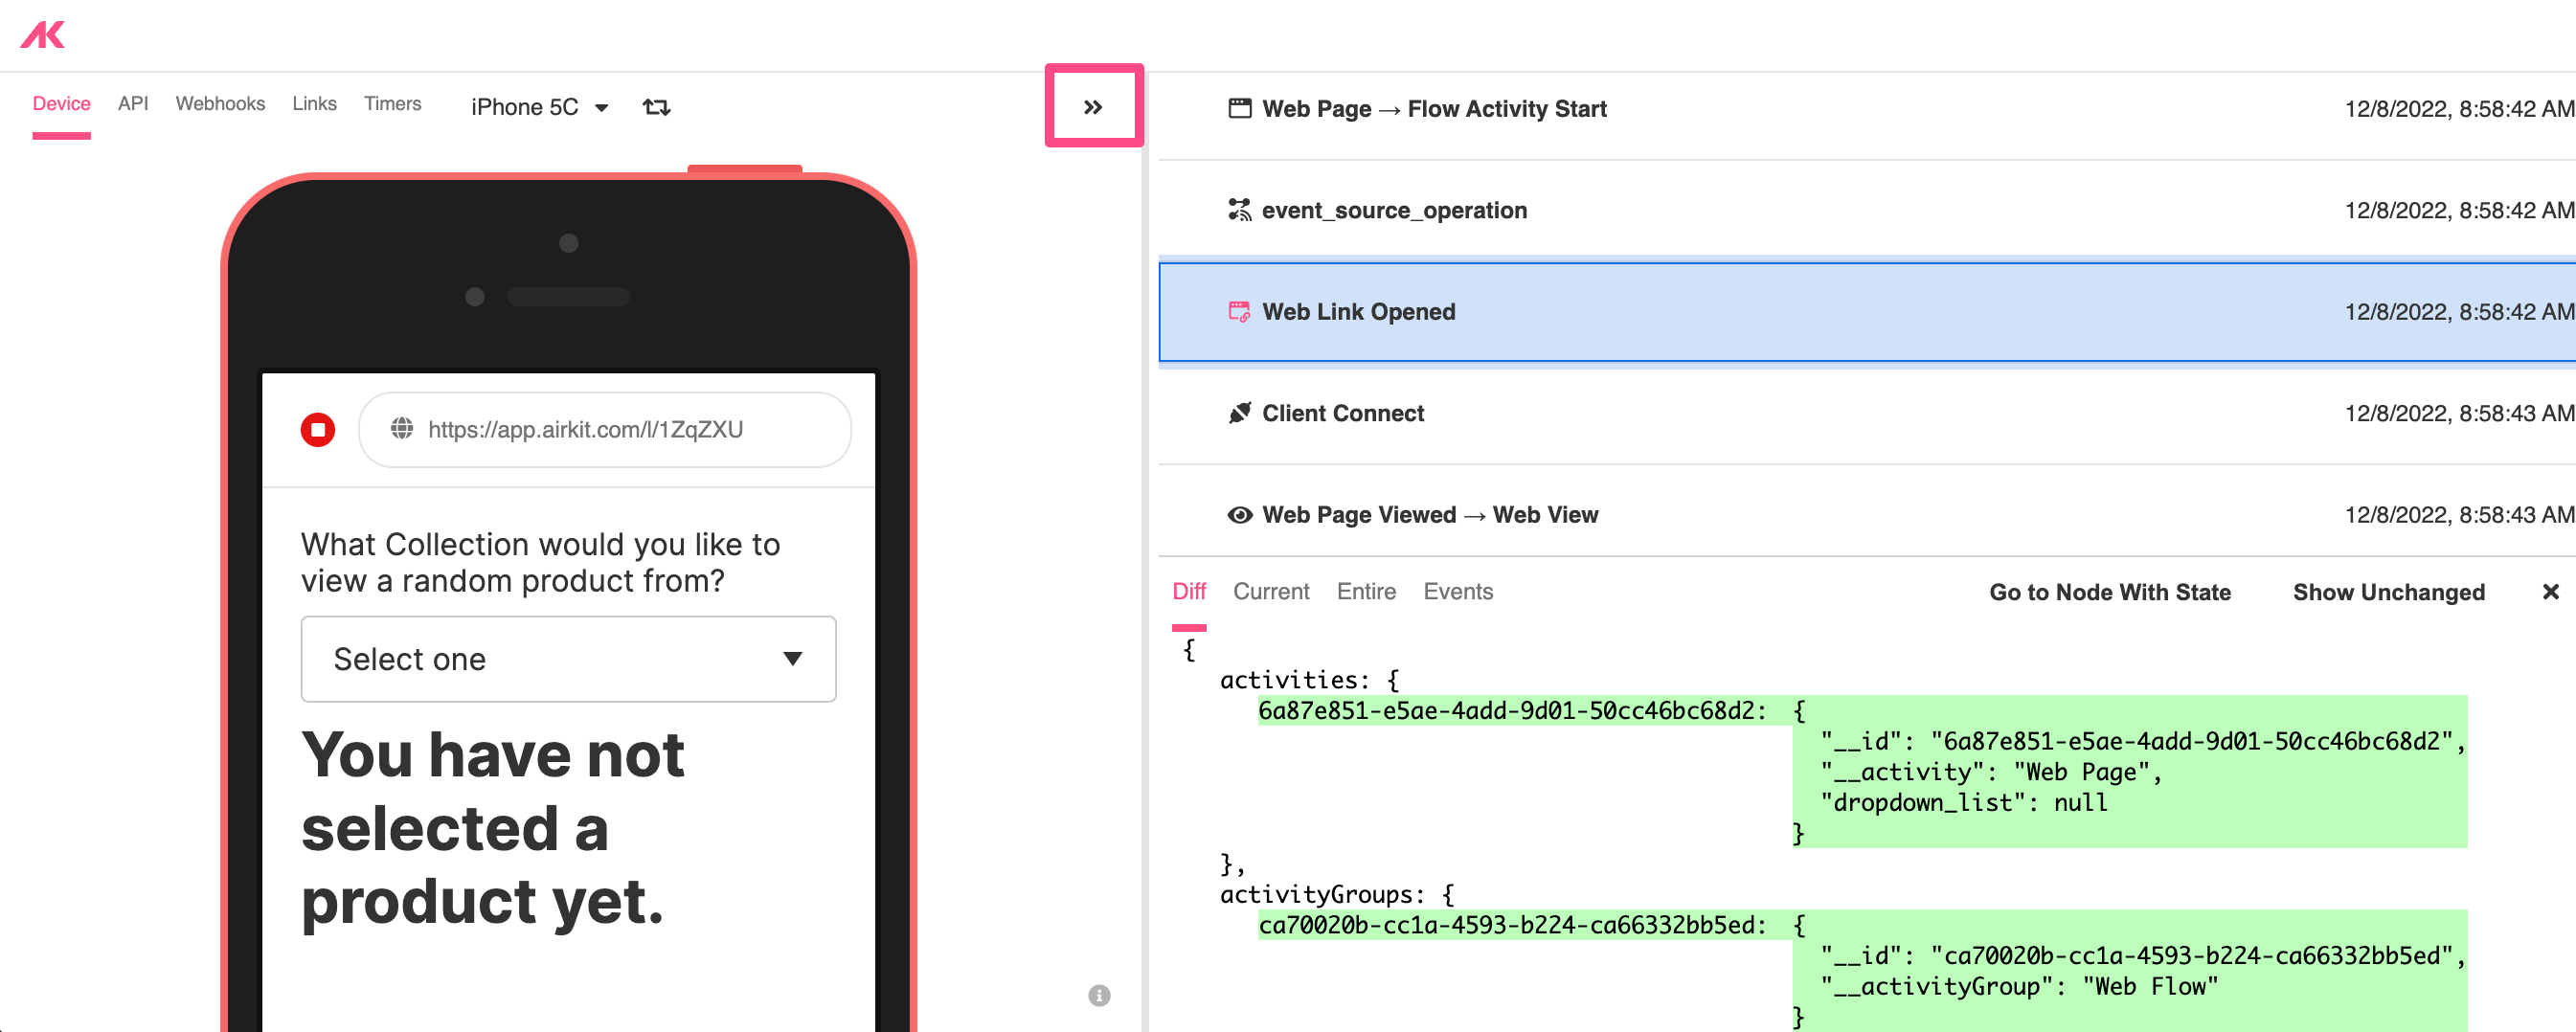
If any errors have been thrown during your simulated Journey, they will be marked in red.
Publish your Application
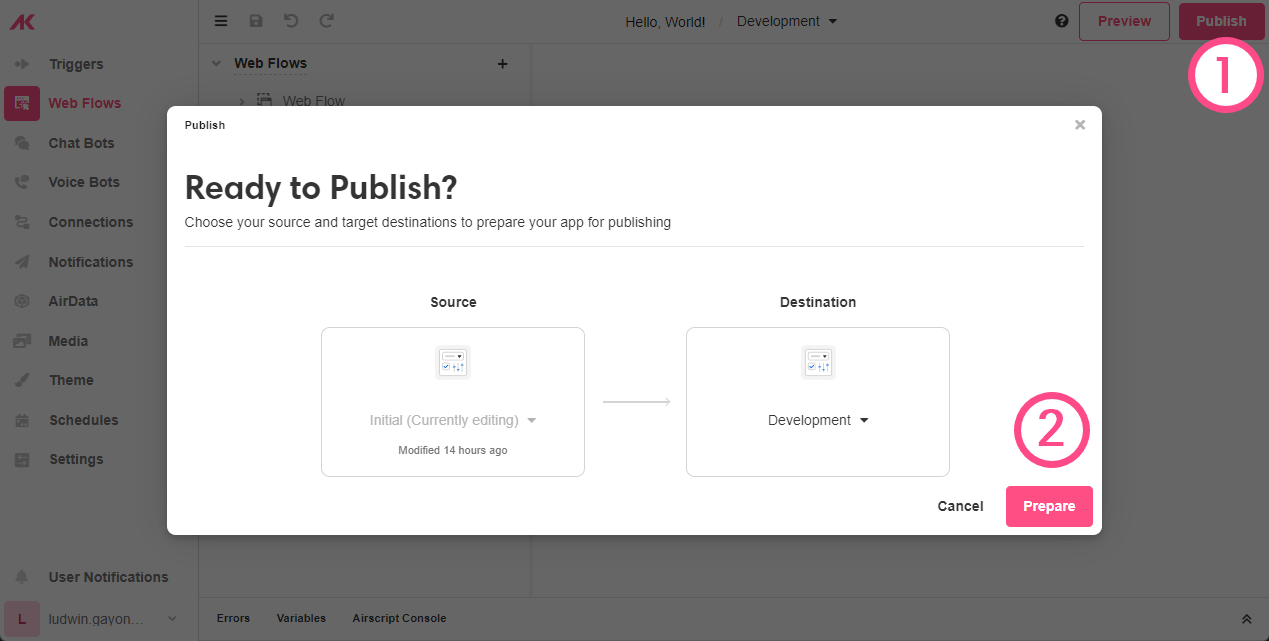
To publish your application, click the "Publish" button on the upper right to the Studio. In the pop-up window that appears, click on the "Prepare" button.
In the next step, review your publishing changes, and see if there are any issues that need to be resolved. After reviewing, click on the Publish App button. This will provide a Starting Link that can be used to navigate to the web experience that you just built out.
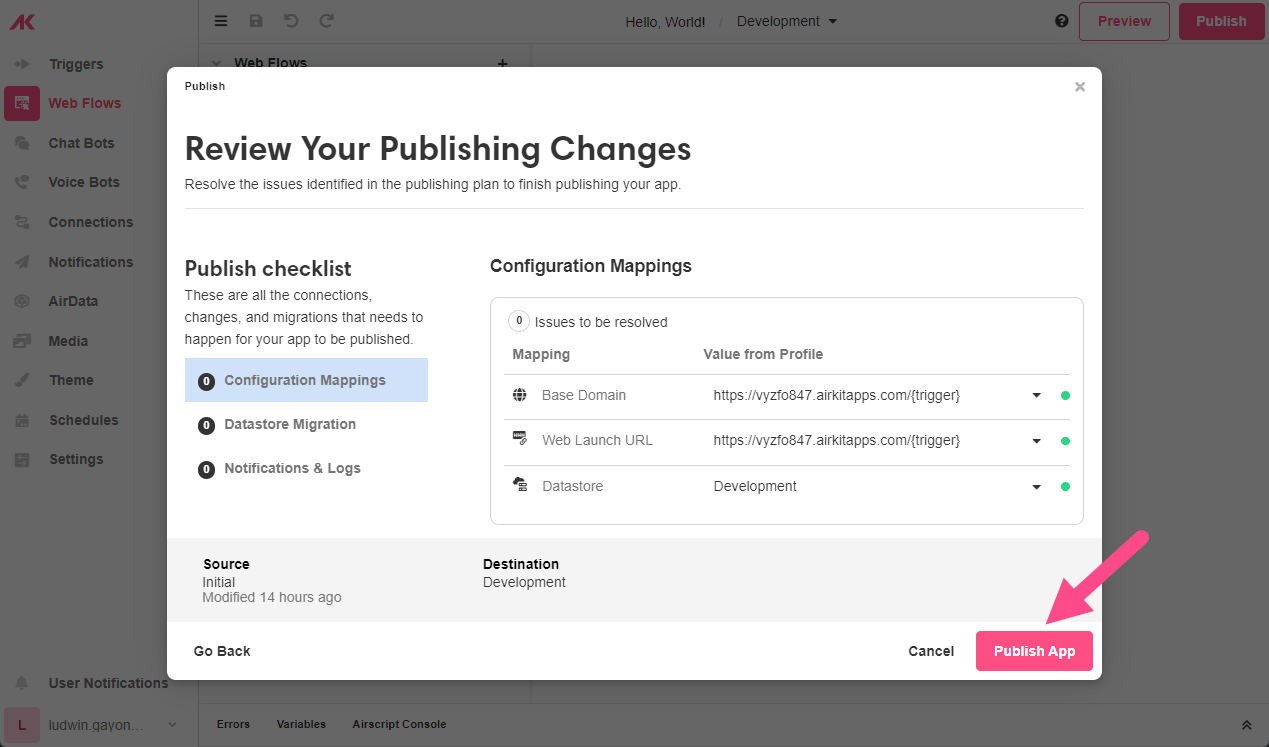
The Starting Link automatically generated here uses Airkit's default domain. For more on how to create a white-label URL to link to your applications, see Publishing Your Application.
Congratulations! You've just built and published your first Airkit app!
What's next?
Now that you've learned the basics, what you build next is up to you!
I want to work with more complex integrations!
You've already used Airkit to make an HTTP request, but Airkit's abilities to connect to external systems go far beyond that. Whether you're looking pull in data, updating existing records, or catch incoming requests, Airkit provides multiple ways to do so securely. Here are some resources to get you started:


Prefer to learn by building? 🛠️ Check out this long-form tutorial:

I want to build an app that spans multiple channels!
Airkit apps are designed to span multiple channels, include web pages, phone calls, and SMS conversations. By tying every channel to a single Session and associating each Session with an Actor, context is automatically maintained while switching between channels. These are powerful concepts that it's important to understand at their root, so here are some discussions to get you started:


Prefer to learn by building? 🛠️ Check out this long-form tutorial:

I want to make my apps look nicer!
The visual components of your applications are entirely customizable. Individual Web Controls can be styled in the Inspector, or you can edit Themes to make stylistic changes that apply across your entire application. Existing resources, including pictures, gifs, and fonts, can be uploaded to the Media Library and used to further customize your UI. Here are some resources to get started:


Prefer to learn by building? 🛠️ Check out this long-form tutorial:

Updated 3 months ago